 We are all about making the sometimes incomprehensible world of audio recording easier to understand. All too often, a simple concept is made needlessly confusing by the language used. And then there are topics which really ARE difficult to grok. Room acoustics is one of those topics that can baffle (pun intended:-P) even the smartest person. However, the home recording enthusiast doesn’t need to know EVERYTHING about acoustics – just a few important principles.
In a 2-part article over at AudioTuts, Rob Mayzes makes the need-to-know acoustics concepts easy to understand. Then he gives you several ideas – most totally free and a few paid – for creating your own vocal-booth-like isolation for you bedroom studio.
See his article here: http://music.tutsplus.com/tutorials/diy-vocal-booth-part-1-the-key-to-a-good-vocalvoice-recording–cms-25362 Enjoy!
Individual Parts For "Helplessly Hoping"
 Ever since I first put up the video of myself singing all the parts to Helplessly Hoping, by Crosby, Stills and Nash (see the video here: http://youtu.be/FfhKEp-GAKc), I’ve had a lot of people ask me for the individual parts, so they could learn them and sing the song in 3-part harmony. So I’ve just been e-mailing the three mp3 files to whoever asked. But that takes a bit of effort each time I do it – and you know how I feel about effort;).
So I’ve decided to just post each of the three vocal parts on this page and put the link on the video. Hopefully that will be a win-win for all parties.
What to Do With These Audios
Well obviously you don’t have to “do” anything with them except listen. But if you want to hear them all together, just stick each one on its own track in your favorite DAW (digital audio workstation). In Reaper, simply click Insert on the menu, and Media file in the drop-down. Then navigate to where the files are and insert them onto their own tracks. They are already panned, and there is some reverb on each file already.
So all you have to do is hit “Play” and they will sing together in harmony. Then you can mute and/or solo the tracks at will to get a feel for how they fit together. Plus you can practice your part by muting whichever part that is, and singing along with the other two parts. Fun, fun, fun! Note about using the guitar track: if you want to try to put the guitar track in with the vocal tracks, you’ll have to shift the vocal parts over to the right to make time for the guitar intro. This is easy in Reaper. Just click, hold and drag the vocal parts so that the start point is at about 13.5 seconds. You may need to fine-tune.
First I’ll put audio players below so you can just play and listen to them right now. Then after those you’ll find links that will let you download each mp3. Ready?
| Melody |
| Middle Part |
| High Part |
| Guitar Part |
If you would like to download the mp3 files, just right-click the below links and select “Save Link As” or the equivalent for your browser.
Melody
Middle Part
High Part
Guitar Part
How to Use These Files To Sing With Others
Lots of people like this song and would love to sing it with their friends and sound like CSN. The problem is that it isn’t easy for most people to listen to a song and then figure out each individual part. With these files, you can listen to one, have one friend listen to another and learn it, and another friend listen to the 3rd. Then you can all sing those parts together and have 3-part harmony, which is seriously cool.
How to Sing Harmony With Yourself
If you don’t HAVE any friends who can sing, you can sing harmony with yourself. The basic idea is to learn all 3 parts first. Then sing the first part in a track in recording software. then add a track and sing the 2nd part, then the 3rd.
Click here our post on how to sing harmony with yourself (and record it on your computer) like this using the free software, Audacity. I actually used Reaper software for Helplessly Hoping. The process is quite similar no matter what software you use.
There is an in-depth series of videos showing you how to do all this in Reaper, including how I did Helplessly Hoping, in our newest home recording course, The Newbies Guide to Audio Recording Awesomeness 2: Pro Recording With Reaper.
If you are really only interested in focusing on learning to record vocal harmony, check out our course, Harmony Recording Awesomeness.
Enjoy!
If you want a few free videos from our Harmony Recording course, click below…

Where Is The Track Volume Slider In Reaper 5?
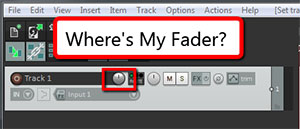 Are you wondering where the horizontal fader or “slider” control went when the Reaper 5 update came out? You’re not alone. The default control changed to a rotary knob in the latest version. When using the track panels along the left side, I find it a lot easier and somehow more intuitive to use the slider/fader. And the controls in the mixer view (vertical controls along the bottom of the screen) still have sliders for volume.
But I often don’t use the mixer controls at the bottom, since many of my projects don’t have a huge number of tracks. I like using the horizontal track control panels instead.
So how do we get the fader back?
It’s actually really easy. Whew!
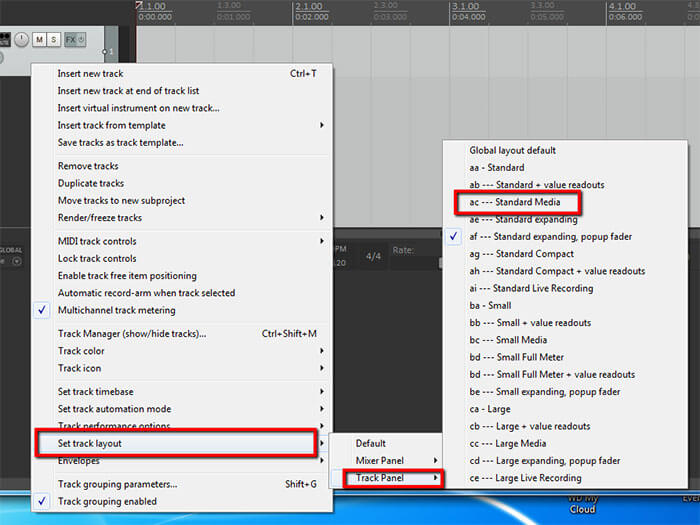
- Just right-mouse-click over a bit of the blank gray area in the track control panel (in other words – not on any of the buttons or readouts). That will give you a pop-up menu.
- Hover over “Set track layout,” then hover over “Track Panel.”
- Then you’ll see a list of 19 layouts to choose from. Select “ac — Standard Media.”
- Rejoice in the return of your slider!
The answer is really easy, but as with so many things, it totally depends on having a little bit of knowledge. Well, that or looking in the manual. I did mention I was a guy, right?
Here is a video showing you how to do this step-by-step
http://homebrewaudio.wistia.com/medias/2eqhili2nx?embedType=async&videoWidth=700
So if you were wondering where your slider/fader went, and you didn’t know how to get it back, I hope this helps!
Cheers!
Ken
How To Finish Long Voice-Over Jobs Faster
 Here’s a tip to help you record and finish long voice over jobs more efficiently (which translates to much faster). If you are lucky enough to have gotten a fairly long voice-over job, such as an audio book, documentary narration, etc., then you know that there will be little mess-ups along the way that need to be fixed at some point. There are a few ways to deal with that.
Ways to Deal With Mistakes
- The best and fastest way to produce an error-free voice track is to never make a mistake. Shya! Good luck with that. I will grant that there are freaks of nature who can do it perfect every time. But most of us need at least SOME do-overs, whether it’s because we mis-read something, stumbled over pronunciation, or just felt like the emphasis or “feel” of something was off some how.
- Stop recording to delete every mistake and re-read the part each and every time it happens. Yeah, that’s an option. But if you do it this way, you’re going to be working on that job for a very long time.
- Never stop recording. When you make a mistake simply wait a second then go back and re-read the part and continue.
Which One Is Best?
Well, as I stated above, option 1 is the best if you can manage it. But for mere mortals, option 3 is the way to go. You simply continue recording until you’re done, leaving all the mistakes in to be deleted after the fact. I realize that the quality gurus out there are going to complain that fixing an error as soon as possible is usually the best way to go, and I agree with that…for most things, especially physical operations like manufacturing. But in this case, if you use the tip I’m about to tell you about, deleting the mistakes after the fact is best.
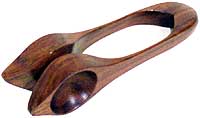
OK, so what is this tip? It involves making a loud sound right after you mess up and right before you re-read the part you messed up. How you do this is less important than that this loud sound leaves an obvious visual cue in the waveform (the blobs that appear on your screen when you record). I use either of 2 methods, snapping my finger close to the mic or using a wooden musical percussion instrument (wooden spoons) that makes a very loud “clack” when you tap any part of your body with it. I’ve heard that some people clap (lately I heard someone say they clap 3 times). Either way, the goal is to leave a visual mark in the audio (yeah, this method requires you to see sound. Don’t think about that one too hard!) so you don’t have to spend any time hunting for the mistakes while editing.
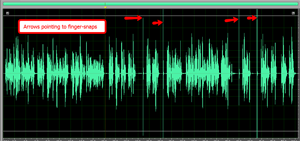 In the picture to the left, you can see where I make the visual cues by snapping my finger close to the mic after a mess-up (no cracks about how often I mess up! That’s not the point;)). Compared to my voice narration, these quick snap or crack sounds stand out like a sore thumb. Now I can simply zoom into each mistake and delete both the snap sound and the mistake. It took me all of about 45 seconds to do that for all 4 edit-points in the job to the left.
I want to repeat here how important it is that the noise you make be LOUD and “snappy,” or it might not work. I record with someone often who, on the rare occasions that she makes a mistake, blows a raspberry with her lips, which makes no obviously different wave form cue. I tell her to read it again and continue, but when editing her finished audio, I have to listen to the entire thing to make sure I find and delete the mistake and raspberry sound.
So get in the habit of snapping or clapping, or carrying a pair of funky wooden percussion spoons, or whatever it takes. This will prevent a lot of stop-and-start when you’re recording, as well as speed up the process so you can get the voice-over job to the client and get paid. So get clackin’, or snappin’ or slappin’!
Tony, in the comments below, recommended dog training clickers like below. Thanks Tony!
Improve Audio Recordings on a Laptop With a Limited Budget
I just received a note from someone asking advice on how to improve the audio on his videos and podcasts, which are produced on his laptop. He has very little money to spend and had been told that he needed an external sound card.
Since there are lots of people in the same boat, I thought I’d share my reply back to him.
BTW, since this post was written, I created a 6-part article series called Improve The Quality Of The Audio You Record At Home. 5 of the 6 tips show you how to improve your sound without having to buy or build anything. Check it out HERE.
Question:
Hi, thanks for all the great information – I really appreciate it.
Here’s a question : I have a website that teaches English for free, and would like to do more of my own videos and podcasts instead of just embedding other people’s youtube videos. The sound quality of my recordings has prevented me from doing more (the ones that are online are just terrible).
However, I only have a laptop and have been told that I would need an external sound card to make decent recordings.
Any advice? I’m on a limited budget as my site doesn’t make much money!
Thanks a lot,
PS your Helplessly Hoping video is wonderful – better than the original – a spine-tingling moment!
Answer:

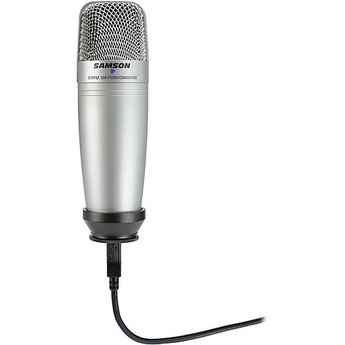
About the sound quality thing, an external sound card/interface would give you good quality audio, but that isn’t the cheapest way to go, especially as you would also have to get a decent mic along with it. On a limited budget like yours, I would recommend getting a USB mic – but NOT the kind on a headset. I recommend something with a larger capsule like the Samson Q2U (about $59) or the Samson CO1U (~$80), both of which you can get at most Best Buy stores and certainly at a local music store. Just plug them into your laptop and you’re off to the races. You’ll get much better quality audio than you can get from the on-board sound card.
Good luck and I hope that helps!
Ken