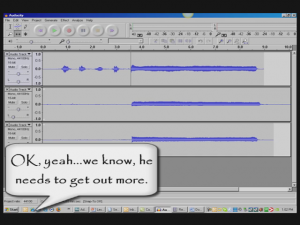
 Multitrack recording software allows you to add tracks to previously-recorded tracks. This is mainly used in music recording where, say, you are a singer and want to record yourself singing harmony with yourself. You’d sing the melody first (usually) on one track. Then you’d open a second track and sing a harmony along with the melody on track 1, which requires you to be able to hear the playback from track one while you record track two. This also applies to adding other instruments to previously-recorded tracks, like adding a lead guitar part to a song, etc.
One thing you need to be sure of when doing multitrack recording is that your speakers need to be turned down or off when you record along with previously recorded tracks (unless you have someone else at the controls and the recording is happening in another room where the speakers can’t be heard). This may sound obvious but it is very easy to forget. If those speakers are audible when you’re recording a harmony or lead guitar track, the audio from those tracks will get recorded right along with the new track.
For example, if you recorded an acoustic guitar part on track 1, then wanted to add a vocal on track 2, your goal is to have each track contain ONLY those two things so that when you’re done, if you listen ONLY to track 2 (muting track 1) you would ONLY hear the vocal, not the guitar. This allows you to mix tracks, adjusting volumes relative to other tracks. However, if the speakers (playing the guitar part) were audible when you were singing that vocal part, track 2 would now have BOTH the vocal AND the guitar (picked up from the speaker) on it when played back by itself. That means that when both tracks are turned up, the guitar would be coming through twice, once from its original track (1), and once from track 2 where it was recorded along with your voice. You don’t want this!
So make absolutely certain your speakers are muted, turned off, unplugged or otherwise made inaudible when adding tracks to your song. Monitor previously recorded tracks with headphones when recording new tracks.
Church Sound: Passive & Active Direct Boxes, And How They Should Be Used
Home Recording: A DI unit, DI box, Direct Box or simply DI is an electronic device that connects a high impedance line level signal that has an unbalanced output (a.k.a., a piece of equipment) to a low impedance mic level balanced input, usually via XLR connector. The DI performs level matching, balancing, and either active buffering or passive impedance bridging to minimize noise, distortion, and ground loops. DI (pronounced dee EYE, not “DIE” as in “die feedback, die!”) is variously claimed to stand for direct input, direct injection or direct interface. The ends of each coil of wire protrude from the windings; one pair of ends is the input, and the other pair is the output. If the primary has more windings than the secondary, it is called a step-down transformer because the signal level and impedance are lower at the output than they are at the input. Passive DI Units A passive DI unit typically consists of an audio transformer used as a balun.
Read the full article here:
Church Sound: Passive & Active Direct Boxes, And How They Should Be Used
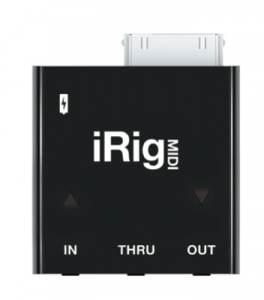
MIDI For Your iPhone or iPad: IK Multimedia Announces the iRig MIDI
 MIDI for your iOS device? Oh yeah. News from Summer NAMM 2011 tells of yet another awesome product from IK Multimedia, the folks who brought you the iRig microphone and Amplitube iRig guitar interface products for your iPhone, iPad, or iPod Touch. This time it’s iRig MIDI which, you guessed it, allows you to connect any MIDI device, like a keyboard, to your iOS device.
Why is this awesome? Well besides letting you connect anything from a super-compact portable keyboard to a full 88-key digital piano to your iPhone or iPad, iRig MIDI also includes IK’s SampleTank free virtual instrument app, which IK describes as the first professional iOS multi-part sound module tailored for live usage. That means you could be on stage with nothing but your iPhone and a compact MIDI keyboard in your hand, and play high-quality sampled instruments live. Your roadies will love you if nothing else (I’ve always wanted roadies but that job usually falls to us and a few friends:)).
Keep an eye on this space. We will let you know the very day when the iRig MIDI becomes commercially available.
Cheers!
Ken
Mixing Beyond Stereo: Delving Deeper Into Aspects Of Sound & Perception
One of my favorite topics in the whole wide world:) – From the ProSound Web folks. Stereo mixing involves balancing out all audio signals equally for both sides, as human ear clearly understand from which direction sound is emanating to come up with a mix of multiple dimensions for more clarity without increased sound. Therefore, it is important to avoid sending identical signals to both speakers to minimize tonal, timing similarities, and avoid comb filtering. Therefore, one needs to send different signals to each side for better mix, good tonal balance, good sound reproduction etc, along with reduced audio signal in perceptual center for wider stereo quality sound.
Read the full article here:
Mixing Beyond Stereo: Delving Deeper Into Aspects Of Sound & Perception
Home Recording: Singing As Loud As You Want
 I just received a question through the Home Brew Audio YouTube channel (http://www.youtube.com/user/homebrewaudio) about recording vocals at home.
This person doesn’t understand why when they sing loud into the mic in their home recording studio, the sound comes out distorted. Here’s this person’s question and our answer:
Q: well what I’m trying to understand is why I can’t sing as loud as I like… I recorded in a studio a few times, and i could sing as loud as I like, and similar things, however now the trimming affect works and the software break the voice into a horrible annoying sound… so sorry I don’t know how to describe it any better.
I connect my mic to a little boxy thing that my dad bought with it, called M-Audio (ed: he probably means the M-Audio Fast Track) that connects to my computer through USB.
Thanks alot, Dave :]
A: Dave, I know exactly what you mean. You have two options. The best one is to get a compressor and/or limiter, and connect it to the M-Audio box (Fast Track is it?). A compressor will lower your voice loudness when it starts getting loud, and a limiter will prevent it crossing a certain loudness level entirely. You would use the “insert” sockets on the back of the box. I use a great little compressor called the Really Nice Compressor (I’m not kidding:)), by a company called FMR audio. There are lots of different kinds out there though.
The second way is to back way away from the mic for the loud bits. If the entire song is loud, turn the “gain” knob down until the loudest parts don’t clip (make the red light on the M-Audio box go on), and then raise the level of the recorded wave after the fact. The problem there though is that it might let more noise in along with your voice, which you would then be turning up at that last stage.
I hope that helps!
Ken
note: Dave is not the real name of the person who asked the question. We changed it for privacy reasons.