In this day and age (specifically October 27th, Digital Age I guess:)), if you want to sell the audio you produce on your home recording studio, it is a pretty good…no scratch that…a VERY good (as in mandatory really) to make those recordings available on iTunes.
If you sell CDs, as in actual hard-product disk-in-a-case kind of thing, getting that music or spoken-word product onto iTunes is pretty easy right now. I personally generate more income from my CDs via iTunes than any other way. I make it easy on myself and simply put all my albums on CD Baby. Then they take care of the rest, like getting the album on iTunes, as well as most other digital music distribution services such as Spotify (!).
Here is an article on About.com talking some specifics other than the CD Baby route to getting your sale-able audio onto iTunes:
http://homerecording.about.com/od/duplicatingdistributing/a/Get_On_iTunes.htm
Reverb and Delay – What Are They?
Some folks say they are the same thing, reverb and delay (or echo). I don’t. The thing we call reverb for use in a home recording studio is really 2 things. The first is like an echo, yes. That is you hear a repeat of the original sound at some point after the original reaches your ears. But the thing we think of as reverb is the fact that the sound lasts longer. It’s like being in a large room (college stairwells had nice reverb when I used to play guitar in them:)) with stone walls. Technically the sound lasts longer because what you’re hearing is a mish-mash of a bunch of echos from all over the place. But it all blends together for a very different sort of sound than delays or echos. To me, echos are what you hear when you yell something in a canyon like: hello…hello…hello…hello.
Anyway, here’s an article that explains how you can use both to both delay and reverb to improve recordings:
http://www.prosoundweb.com/article/in_the_studio_reverb_vs_delay/
Hooking Up Monitors to Your Computer
Here is an interesting article on connecting monitor speakers to your home recording studio computer. I’ve usually used a mixer in my setup, so this is something I’ve not don,e personally. But it is a good how-to for folks who don’t yet have a mixer, or maybe don’t even need one. Heck, voice-over-only folks this may be perfect for. Check it out here.
http://www.audiorecording.me/how-to-connect-m-audio-bx5a-to-your-computer-soundcard-audio-interface.html
Tips On Improving Your Music Mixes
In this article, Des give some really practical advice, and even better, cheap-to-implement advice on improving your home recording studio mixes. Several of these tips are things I espouse and use myself, such as listening to your mixes on lots of different systems. I do a lot of critical listening in my car:). A lot of people will listen to you mixes in their cars too. Anyway, that plus some really great over-arching advice like not sticking to dogma so “dogmatically” I also find appealing.
Check it out here: http://www.hometracked.com/2008/05/31/improve-your-recordings-and-mixes-on-the-cheap/
AmpliTube iRig by IK Multimedia
IK Multimedia have been putting out some awesome music products for iOS, specifically iPhone, iPad, and iPod touch. I reviewed the iRig Mic and how to use it to record using the apps iRig Recorder and VocalLive here: iRig Microphone Review

So what is the iRig?
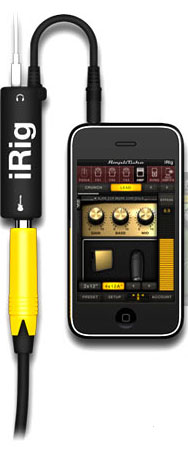
Today I’m reviewing the AmpliTube iRig, which is a small device that looks like a little tube that you hook up to your iOS device, allowing you to then plug your electric guitar or bass and headphones into your device. See figure 1. The yellow-sleeved plug is the guitar input and the white plug at the top is for the headphones.
Once everything is hooked up, simply go to the iTunes App store and download your free version of AmpliTube, the app version of the guitar amplifier modeling program called AmpliTube Free. This is free guitar amp modeling software. There are paid versions too, such as AmpliTube LE for $2.99 and the full version for $19.99. Everything is pretty intuitive from there, which is good because I don’t like reading directions – a personal flaw maybe. Anyway, so first things first, put on your headphones. Then under the tools menu is the first thing I was looking for, the tuner, which will deliver a clean guitar sound (meaning all the amplifier settings and effects will be bypassed…don’t forget to turn the tuner off when you’re done tuning!) for more accurate tuning. After I was all tuned up I headed for the fun stuff.
The Fun Stuff
I tapped the icon that says “AMP” and started playing around. The amp head has knobs for Gain, Bass, Mid, Treble, Presence, Reverb and Volume. After a short time turning those up and down, which you do by tapping a control and then sliding your finger up or down on the meter display, I saw the “Preset” button. Ooo, that looks like fun. There is a Preset pack built in with 6 factory presets that rock…literally. THAT is where the fun began. I tried every preset and holy cannoli did things sound awesome.
Basically I now had an amplifier for my guitar for the price of the iRig, which is $39.99. What?! An awesome sounding amp that doesn’t weight anything (important!!!) for $40? Where were you, oh iRig, when I was in all those bands? OK, it was the same place that iPhones and iPods were, but you get the point.
Next I decided to record a little bit of my playing. Yeah, didn’t I mention that there is a recording function built in? Yup. Just tap on the icon of a tape recorder that says “Rec.” It does exactly what it says, with a cool little animation of a cassette tape rolling as you play and/or record.
Once you’re done recording you can save your song and even export it to share or use it in your own home recording studio project. The program allows you to either e-mail it to yourself (in m4a format) or “file share” it, which creates a wav file of your recording that you can access by connecting your device to iTunes and downloading it from your device (under the “apps” section of the device). You can also simply record the audio file straight into your computer by connecting a 1/8th-inch stereo plug into the iRig’s headphone output and connecting the other end to your sound card or other recording interface. That is what I did with my little riff recording. You can hear what that sounded like below. I did nothing to it at all in terms of editing it. What you hear is exactly what Amplitube in my iPhone produced.
What does It sound Like?
Take a listen! Here’s my riff recorded using only AmpliTube iRig
[jwplayer config=”Custom Audio Player” mediaid=”7023″]
So how would you use the iRig on stage? I mean, sure, it’s all fine and well to be able to strum (or shred) in your headphones. But it is another thing entirely to be able to play a live gig as a guitarist and not need to schlep an amp with you. Can you do that with iRig? Well, if you’re group has a PA you can plug into, yes…yes you can. Like I mentioned above, all you need is a cable with a 18th-in. stereo plug on one end and two 1/4-in. mono plugs on the other end, which you plug into a stereo input (or two mono inputs) on the PA mixer and voila! Amp-less-ness. Well, technically you still have the amp inside your iPhone. What you don’t have is 20 or 30 pounds of boxy bulk to lug around. Sweet!
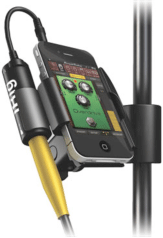
 By the way, I highly recommend adding the iKlip MINI (or iKlip for iPads) to your iRig setup. The iRig MINI allows you to connect your device to a mic stand for easy access, plus it comes with an attachment for the AmpliTube iRig. How cool is that? See figure 2.
Under The Hood
AmpliTube Free comes with 1 amp and 3 stomp-box effects – delay, noise filter, and distortion once registered. That is just about all the basic band guitarist needs a lot of the time. The full version comes with 11 built-in stomp-box effects and 5 amps to choose from. You can also start with the Free version and then add the effects pedals and other amps as you need them.
There are tons of other details and specs that you should check out on the IK Multimedia Site here: http://www.ikmultimedia.com/irig/features/
Summary
Well here it is. The AmpliTube iRig is a professional sounding guitar amplifier that will fit inside your iPhone, iPod Touch, or iPad. For $39.99 you can hook up your guitar to your iOS device and practice, record, or play live with basically the same amount of gear (namely an amplifier with 3 stomp-box effects) I used all through my rock band years by starting out with AmpliTube Free guitar amp modeling software. You’ve heard just one of many possible sounds in this article. I didn’t even scratch the surface. If you have an electric guitar or bass AND a compatible iOS device, there just is no reason in the universe I can think of why you shouldn’t get yourself an AmpliTube iRig. It RAWKS, plain and simple.