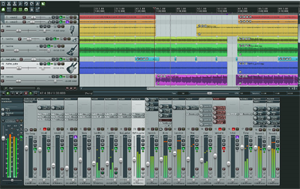
I’ve been saying that for your home studio, with Reaper software you also need an audio editing software program. It turns out that for most people in most situations, this is simply untrue. I know, crazy right? I’ve been giving out advice that may have been wrong. Gasp. For me, sadly, I think there is no going back; at least not easily. I started many moons ago using a program called Cool Edit Pro (now Adobe Audition), which had two “views” that you could toggle between; one for multitrack use and mixing, and one for audio file editing. When I was working in multitrack view and wanted to edit a file (which actually changes the underlying wave file in a process called “destructive editing”), I would click on the View toggle and presto! I was in the editing view. I worked like this for years.
Part of the reason I worked that way was that my computer was feeble, which is to say, normal. In order to treat a track in multitrack view with effects that could have done some of the same things that I was doing in the edit screen, I would have been using “non-destructive” editing. These treatments, in the form of effect plug-ins, didn’t actually do anything to the underlying wave file in the track. The effect would just plug into the track and affect whatever audio happened to be on that track. This kind of non-destructive editing eats up massive amounts of computer horsepower in a hurry, especially if you have several tracks and several effects running. It didn’t take much at all for my computer to simply raise the white flag and lie down in exhaustion. Destructive editing, especially if I saved a back-up of the original file, was the way to go for non-specialized computers.
Eventually, a program called Reaper came on the scene and had, as one of its biggest benefits, a streamlined architecture that ate up fewer computer resources than its fellows. I jumped on-board immediately and started doing a lot of my formerly-destructive editing tasks in Reaper (like compression, EQ and reverb) with no ill effects on my computer. But there were still things I did in Adobe Audition, mostly our of habit. Those were things like p-pop elimination, noise reduction, and final mix mastering. I still do that today.
But you almost certainly don’t have to use an external editor at all. I’ve been challenging my assumptions and habits and it turns out that for most readers of Home Brew Audio (we cater to recordists of voice over and musician alike here). I’m going to be doing some more checking up on this, just to fully convince myself, especially in the noise reduction arena. I’ll let you know what I find out. But if you’ve been confused in the past by my assertion that if you use Reaper, you’ll also need an external audio editor, please know that I have reversed (mostly) my thinking on that score.
Go forth and record AND edit with Reaper!
Resources
Royalty Free Music File Download Here (right mouse click and choose “Save Link As” in Firefox or “Save Target As” in Explorer)
Drum Loop for lesson Download Here
Multiple Mics and The Ravages of Time
So much of capturing sound in our home studio recording efforts comes down to time. We get close to the microphone perhaps to help reduce room sound, trying to win the race against the reflected versions of our voices that have bounced off the walls.
Maybe we make a copy in our multi-track software of something we recorded with a single microphone – intending to delay one version by 30 milliseconds so we can pan both copies left and right to create fake stereo. This is only possible by manipulating time-related stuff, the relative positions of our two tracks to each other with respect to time.
All too often, copies of sounds we want to record enter our recordings without our permission, blending unpleasantly with their fellows, rendering the effects of college wave mechanics and bringing terms like constructive- and destructive-interference back into our brains. Amends can be made by moving stuff around, filtering, raising or lowering volumes at targeted frequencies, or any number of other remedies.
Such is the subject of the article below. Use more than one microphone to record something and you risk any or all of the wave-mechanic-y problematic symptoms on a heretofore unheard of level.
http://www.homerecordingshow.com/2011/11/show-141-multi-mic-time-aligning-and-aes-convention-recap/?utm_source=feedburner&utm_medium=feed&utm_campaign=Feed%3A+homerecordingshow+%28The+Home+Recording+Show%29
Video Logo
[jwplayer mediaid=”7828″] This is a video logo for our latest video tutorial product – The Newbies Guide To Audio Recording Awesomeness 2: Pro Recording With Reaper. It took me about 15 minutes to make using just Animoto, a video editor (I used Vegas but any one should work) and Omnisphere to add the sound.
Recording Drums Versus Virtual Drums
I just posted an article about virtual drumming here: https://www.homebrewaudio.com/virtual-drumming-use-your-computer-to-drum-without-drums. One of the things I mentioned was virtual drumming’s benefit over real drumming when it comes to recording drums. If you’d like to get an idea of what it would take to record and actual real live drum kit, here is a good article on that topic: http://homerecording.about.com/od/recordingtutorials/ss/recordingdrums.htm Why re-invent the wheel? Plus, I’m busy recording fake drums;).