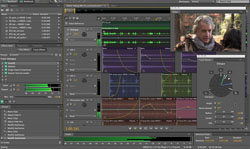
Adobe Audition is a full-featured audio recording and editing software program. What I mean by “full-featured” is that not only does it allow you to record and edit audio, it also has a multi-track screen that allows you to mix audio on different tracks as well as add midi virtual instruments, etc.
I started using Adobe Audition when it was a different program called Cool Edit Pro back int he 90s. Adobe purchased it from the developers, Syntrillium, in 2003 and renamed it Audition. There were 3 versions of AA until 2011, when Adobe made it part of their suite of programs called Creative Suite 5.5, or CS 5.5 for short. The latest version is referred to by some as Adobe Audition 4. Now in 2017, it’s part of the Creative Cloud as well.
As a DAW
A digital audio workstation, or DAW, is the term usually applied to software that allows you to record and mix multiple tracks of audio, usually together with MIDI and/or video tracks as well. When Cool Edit was developed, it was intended, as the name implies, as an audio editor. that means that you open a single audio file (mono or stereo) and make changes to that file. When you’re done, you end up with a different file than the one you started with. It’s basically the same thing as editing a Word document. If you open a .doc file and make changes to the the spelling, grammar, layout, etc., you’d just edited that file, and when you save that version it’ll be different from the original.
Somewhere along the line, though, Syntrillium decided to add multi-track functionality as well. It worked pretty well for basic stuff. They had a toggle button to allow you to switch between the multi-track and editing screens. As version progressed, they added more and more to the multi-track part of the program. But things just got kind of complicated and the midi stuff was not great. So when Reaper (by Cockos) came out in about 2006, I jumped on it as my primary DAW and stopped using the multi-track piece of Audition, though I still use it for editing and mastering.
As an Editor
There is a rule-of-thumb I like to use for products and companies that also works well for food and restaurants. I ask myself “what is the company’s/restaurant’s specialty?” If I’m at a seafood place I tend not to order the steak. Once I ordered a Boston Cream Pie for dessert at Marie Calendars and didn’t like it. When I told my wife, she said “well, Boston Cream Pie is not pie. It’s cake! You ordered cake from a pie shop; what did you expect?” There is a point to this, I promise.
If you ask “what was the specialty of Cool Edit Pro?” As the name implies (again), the answer is “audio editing.” So Audition is basically an editor with multi-track functions added on.
Now if you ask what the specialty of Reaper is, the answer is a big fat “DAW.” It is designed from the ground up to be a multi-track recording program. Even better, it was designed to be a streamlined program without all the code bloat you get from competitors. That being the case, Audition was relegated to the job of editor in my studio.
But this is an article about Audition, so what makes it a good editor? For me it’s about workflow and excellent quality effects. I have a different mind-set about editing than I do about working in multi-track mode. Ironically it was probably Syntrillium/Adobe that caused this in me. Either way, when I finish recording and mixing several tracks together and the final product is ready to be mixed down/rendered into one file, my brain switches to edit mode.
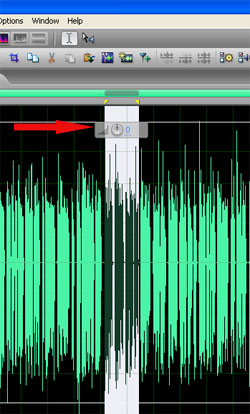
I open the file rendered from Reaper in Audition and set to work. There are several outcomes I’m looking to achieve in the editor, such as eliminate residual noise, tame p-pops and other vocal extremes (such as little clicking sounds associated with saliva in the mouth, etc.), and overall average volume of the audio. The tool I love the most in Audition is the Gain Control tool. See the picture on the right. What this does is allows you to quickly and immediately raise or lower the gain (just think “volume”) on ONLY what is selected. Everything else remains as is. Of course sometimes You WANT to select and adjust all your audio and so the tool affects everything. But it is such a time saver. Before this tool was available, I had to select some audio and enter a number corresponding to how much I wanted to raise or lower the gain, hit OK and use trial-and-error until I got it right. With this tool, you can see immediately how the audio waveform will be changed while you hold down the mouse button and drag. You can make adjustments while still holding down the button, and when you have it where you want it, you just release the mouse button and the change is made. Have I mentioned that I LOVE this?
In addition to the gain control editing, I also like to add or remove silent areas. Sometimes, especially with dialog, you want to increase or decrease the time between phrases. This is fast and easy with Audition. I also mentioned editing p-pops. For that I use the “Favorites” toolbar and created an EQ curve that cuts out a bunch of the bass (low) frequencies. All I have to do is select the part of the audio saying the “P” sound, click the “P-pop” control that I created on my Favorites toolbar, and it’s done and on to the next thing.
Once everything is timed and sounding just how I want it, I “normalize” the result, which just means that the gain of the entire audio file is raised by the amount it takes for the loudest single sound to hit max volume. This ensures that the audio is as loud as it can be without clipping and causing distortion.
So that’s really it in a nutshell. Adobe Audition is what I use just for editing, but many folks use it as their all-in-one audio solution. As ever, these decisions are highly personal and depend on how you like to work. My own recommendation nowadays is to start with just Reaper. With its own capabilities you may never need an external editor at all. If you need to add an editor, Adobe Audition is a great choice. Check it out on amazon HERE.
Cheers!
