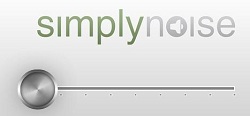
 Have you ever been trying to concentrate at your computer when something you hear around you keeps pulling your attention away or distracting you? This happened all the time when I worked in an office made up of cubicles and about 2 dozen other people. Sometimes it happens at home if I can hear the TV or the stereo. I’m easily distracted. But I recently found a very cool thing online that helps drown out all that distracting noise, and it is so simple and fast. Oh, and its totally free. It’s a site called “Simply Noise.” (http://simplynoise.com/) You simply (see what I did there:)) slide the volume control up or down to your correct level and leave that page running in the background while you work. It’s awesome. You actually can choose between white, pink, or brown noise, indicated by, what else, white, pink or brown buttons. Go check it out and discover another use of audio in your life.
Cheers!
Mastering a Song – What Does It Mean?
 I just read this question: What does mastering a song mean? That’s a great question, actually. Here’s the answer: nobody knows. Nobody, that is, but a small and exclusive cabal whose members are sworn to keep the sacred arts a secret until their dying days. Well that’s what it feels like to me sometimes. Interviews with members of the cabal, I mean professional audio mastering community, always seem to hint (or sometimes outright state) that mere mortals could never understand the complexities and subtleties involved in actual mastering. I say “actual” because it is also hinted that what we mortals call mastering is laughably over-simplified, likened to cave people banging flint together to make fire.
You know, now that I read the above paragraph out loud, I think it’s possible I underwent some sort of psychological trauma at the hands of a few non-representative individuals calling themselves mastering engineers several years ago. I’m led to understand that things are better now, and that they may never have been that bad even back then. OK, now that the air is cleared let’s talk about mastering a song.
A bit of history
In the old days before mp3 or CDs or even cassettes and 8-tracks, consumers pretty much had to rely on records to hear recorded music. Musicians would go to recording studios to record onto wide strips of magnetic tape that simply could not be played back on any consumer device (unless that consumer was someone like Les Paul…but that’s another story). So if the recording were ever to be heard by members of the public, the studio people had to have a way to make the audio go from those wide strips of tape onto a flat plastic (or rubber or shellac, depending on when we’re talking – see the wikipedia entry here) that normal people could play on their record players.
Actually, before there was magnetic tape, the recording engineers captured wound through recording “horns” which were hooked directly to a cutting stylus that would etch the disc directly. But when magnetic tape allowed the creation of a master disc (from which mass produced records were made) to occur at a time and place completely separated from the time and place of the recording, specialization began to occur. The recording studios focused on capturing the sound and separate facilities dedicated themselves to moving the audio on the non-consumer-playable tapes onto master discs, which were then used to create lots and lots of plastic discs people could play at home, and eventually in their cars, etc.
Much specialized equipment was used to optimize the audio from tapes for use on the master discs, which needed to be as fault-free as possible, since millions of records were going to made from this disc. Mastering engineers became experts at optimizing already-recorded audio such that it would sound its best when it reached consumer ears. That is why we still have mastering engineers today, and why mastering is still considered a separate process from recording and mixing.
Mastering engineers became experts at optimizing already-recorded audio such that it would sound its best when it reached consumer ears.
What kind of optimizing are we talking about here?
While recording and mixing is primarily concerned with capturing good tones and blending them properly, these processes are not always carried out in the most pristine of listening environments. And the ears of a mixing engineer are trained to make sure that the different sounds work and play well together. So these folks use effects like EQ, reverb, and compression, etc. to accomplish this. These engineers then send a mixed-down (see our article: What Does It Mean to Mix Down Audio?) version of the audio to a mastering house.
The mastering house has rooms that are designed to allow for totally unbiased listening, meaning that what the mastering engineer hears is as close as humanly possible to what is actually coming out of the speakers. Most regular listening spaces (especially the converted bedrooms of the intrepid home recordist) impart any number of changes to the sound so that what leaves the speakers (assuming they, themselves are reproducing what they get electronically) is not what reaches our ears.
So in addition to the finely tuned listening spaces, mastering facilities contain the best loud speakers and the best in equalization, compression and limiting tools. Armed with these tools in these rooms, engineers whose ears are as sensitive as the noses of wine connoisseur or perfume testers perform audio surgery to produce music that sounds good on as many devices in as many places as possible. They can make certain sounds or instruments be more easily heard, or do the opposite and make overbearing or undesirable frequencies less prominent. Remember, they aren’t working with a multi-track session, so they can’t just, say, turn the volume down on a bass guitar. The bass is already blended in with the kick drum, piano, voices, etc. They have to turn up or down these specific frequencies on the final mix using targeted EQ and multiple-band compression and other mastering tools.
At the end of the day
Sometimes, when the mix engineer is good, the mastering is minor surgery. But all to often they are sent audio that requires many hours of major surgery, or even miracles sometimes, to optimize audio for consumers. Such is the life of a mastering engineer.
In the end, a fully mastered version of the audio is, as it was in the old days, ready to be mass-produced and distributed.
What is An AD Converter?
What is an AD converter? Well, “AD” means “analog-to-digital.”So an AD Converter is basically a translator for audio. It takes audio from one end and changes it to something a computer can understand, spitting that out the other end.
The result of analog-to-digital conversion is actually more common than you might realize. Analog-to-digital converters go by quite a few names, including A-D converters, ADC, and A/D converters.
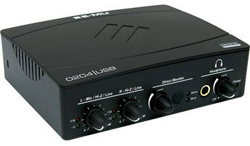
The reverse is also available, being a D-A converter, or DAC. D-A converters might be part of an interface box, such as with the EMU 0404 in the picture on the left) or a separate component.
I’ll discuss their function shortly. As we’ve discussed recently (see the post 16-Bit Audio Recording – What The Heck Does It Mean?), analog is the physical, continuous signal that our bodies can make and understand (hear). Digital signals are the only thing computers can understand, so converting between the two signals is necessary for any modern recording project.
So What Is It?
There is no way for a computer to store an analog signal without it being first converted to a digital signal. Even though you may not have anything that you know as an ADC, it may be an internal component to other items. Even a cheap $5 PC mic has an ADC inside of it! Different qualities of converters make the conversion in different resolutions. The resolution of a converter is the same as the bit depth of the recording it produces.
Think of this “resolution” as the vocabulary that the converter can use to describe the analog information to the computer. An 8 bit recording only knows 256 words, while a 16 bit recording knows 65,536 words.
If that seems like a great improvement, how about 24 bit recordings which use over 16 million words? There’s not actually some robot inside each ADC writing wordy reviews of your recordings for the computer, but the reality isn’t too far off. With higher bit depth and resolution, the digital recording will be much cleaner. You might not notice a huge difference between 16 and 24 bit recordings, but you will certainly be able to hear the difference between 8 and 16 bit.
Some A-D converters will also make the reverse conversion via the audio-out plug. Remember that humans can only understand analog signals, so it’s necessary to convert from the digital information on the computer and turn it into an analog signal for the speakers to turn into audible sound.
How Do I Convert My Audio?

The internal A-D converter that comes with some products is usually of moderate quality. The quality of your recordings will not be higher than your lowest quality piece of equipment, so an upgrade to a separate interface box will eventually be necessary.
There are plenty of options on different converters, so getting the right one for your home recording needs might not be as simple as it sounds. You might be surprised at how many different options there are.
You can start to get decent converters in audio interface boxes starting around $100 these days (not so only as recently as 5 years ago), but as with most things used in recording there are also cheaper versions and much more expensive versions available. The EMU 0404 (which is an interface that happens to contain excellent AD converters) I mentioned at the beginning of the article runs about $130. Something like the M-Audio/Avid Fast Track also has decent converters inside but only runs about $110 dollars.
Then at the very high end you have dedicated A-D/D-A converters like the Apogee Ensemble 8-Channel Converter, which you can have for a mere $1,729.
So go convert some sound into ones and zeros and make some awesome audio.
Cheers!
Review of iRig MIDI by IK Multimedia
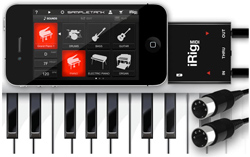
IK multimedia has added yet another cool product that can turn you iPHone, iPod Touch or iPad into a professional audio recording tool. This time it’s the iRig MIDI interface ($69.99), which allows you to connect a MIDI keyboard (or other MIDI device like drum machines, guitar and floor controllers, etc.) to your iOS device. For my review I used my iPhone 4. The iRig MIDI works with iPhone 4S, iPhone 4, iPhone 3GS, iPod Touch 3rd and 4th generations, and both iPad versions. The primary use for this thing, at least from a home recording perspective, is as a virtual instrument. You can use it with several different instrument apps for the iPhone/iPad, but IK Multimedia’s own SampleTank app was designed specifically to work in connection with it. The standard, computer-based SampleTank virtual instrument program costs close to $200. But with the iRig MIDI you can start using it free by downloading the SampleTankFreeapp onto your device. SampleTankFree comes with 8 sounds (2 drum kits, 1 electric piano, 2 bass guitars, 1 guitar, 1 keyboard synth, and 1 oboe). If you download the full SampleTank app for $19.99, you get 72 instruments.
Connecting Everything
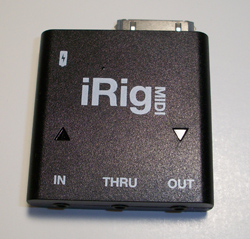 The main hardware is called ultra-compact on the IK Multimedia website. It is a square plastic housing measuring 1.75 inches by 1.75 inches with a standard male iPod/iPhone connector, a power input, and 3 midi ports (IN, THRU and OUT). Make sure you have ample space to connect everything. My home recording work space is pretty small by design, and my MIDI keyboard (Korg microKontrol) takes up most of the room. My mouse, mouse pad, monitor stand and desktop microphone take up most of the remaining space. This became a logistical problem when trying to hook up the iRig MIDI.
The main problem I had was with the power plug for the tiny unit. You can charge it up with the included micro USB cable, but I had just opened the box, so I needed to have it plugged in to use it, which was a problem because the cable is only 15 inches long. In the end I had to bring a laptop computer into the studio and grab a TV tray to set next to my keyboard in order for the cable to reach AND to keep my iPhone in front of me. You can avoid this if you charge the little device up before hand though.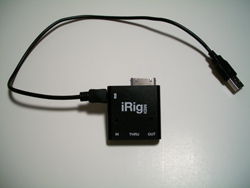
The other main connections remaining were the MIDI cable and headphones, which you technically don’t need, but to really appreciate the awesome sounds in SampleTank you should use them. Alternatively you can connect them directly into your audio mixing setup if you have one. Anyway, I used one of the two provided MIDI cables (standard 5-pin MIDI connector on one end and tiny RTS (ring/tip/sleeve) pins on the other). Here’s where I ran into another glitch, which is not a slam against the product, but was something I didn’t know until I spent a bunch of time doing trial-and-error. My Korg keyboard has both USB and standard 5-pin MIDI cable connections. The USB connector also can power the keyboard. So I had packed a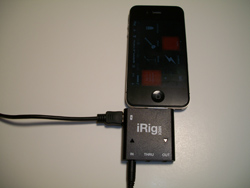 way my power cable. No problem I thought, I’ll simply plug the iRig MIDI cable into the Korg’s MIDI OUT jack and we’ll be in business. Not so. The iRig MIDI has a triangular light above both the MIDI IN and MIDI OUT ports to indicate when data is being went or received. With my Korg connected to the iRIG MIDI IN port, the light above that port should have been blinking red. I even went and got the the power cable for my Korg and hooked it up. Still no blinking red light. Next, I moved the switch on the back of the Korg. Still nothing. It wasn’t until I physically disconnected the USB cable on my Korg keyboard that the light started to blink. It would have been helpful to know this in advance, though it is not unreasonable for IK Multimedia not to have specs on every conceivable MIDI keyboard out there.
Now I was ready to rock and roll.
Playing The SampleTank Free Instruments
Now it was time to play. The free SampleTank app comes with 8 instruments as I listed above. However, you can listen to ALL of the sounds play loop patterns, even the ones you don’t technically “have.” In the “Sounds” window you can tell which sounds you have because it will appear in white, plus it will have the word FREE next to it (which are yours if you just have the Sampl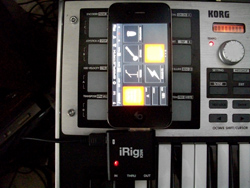 eTankFree app). Well, yours truly did figure this out for about an hour. I couldn’t figure out why I couldn’t play the sounds with my Korg keyboard, especially since I could hear the sounds using the Play button in the Sounds screen. After much confused frustration I noticed that the sounds I didn’t technically own were grayed out. Normally when something is grayed out on a computer screen, it means it cannot be selected or used in any way, which as I mentioned, was not the case with the SampleTank app. The grayed-out instrument sounds could both be selected AND heard if only to audition. Hence my confusion. When I finally selected one of the FREE sounds, voila! I was able to play the sounds with my Korg keyboard.
Now that I finally had crested the learning curve for getting started, things were very cool. I played around with the acoustic guitar for awhile. Take a listen to some of what I recorded here:
[jwplayer config=”Custom Audio Player-250″ mediaid=”8659″]
This is only one of the instruments, obviously. The built-in recorder allows you to overdub and do 4-track recording, with a different instrument in each track (“part), like bass, drums, guitar, and piano.
You can record your performances and then export them as stereo AAC audio files, either via e-mail or the iTunes File Sharing app.
This
Free Overnight Shipping on Pro Audio Gear
The “over-night” special is over. But these items still qualify for free shipping in the US.
Now is the time – Gifts for loved ones are being purchased, and need to be delivered. B&H Photo-Video-ProAudio is offering free overnight shipping until 3 PM EST on selected Pro Audio items.
For more information and to order with free overnight shipping, CLICK HERE.
This deal ends at 3:00 PM EST!
Here are the items in the deal:
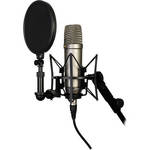
Rode NT1-A
Tascam DR-40

Apogee Jam – Studio Quality Guitar Input for iPhone/iPod/iPad

Apogee Duet 2 – Portable USB Audio Interface

Roland R-26 6-Channel Digital Field Audio Recorder

For more info, click the big button below:
