 There is a tendency for musicians to want loud mixes. This is not an inherently bad thing. There is even a term now to describe the phenomenon: “loudness wars.” Who will win?
But often people do bad things to their audio, such as squash it with compression so they can turn everything up to the max and ruin their dynamics. But there are ways to mix for loudness and still have the audio sound good, which will help us get the better audio from our home recording studio.
Here is an article with some tips on how to mix for loudness from Audio Fanzine:
http://en.audiofanzine.com/recording-mixing/editorial/articles/mixing-toward-loudness.html
Review of the Audio-Technica ATH-M50 Headphones
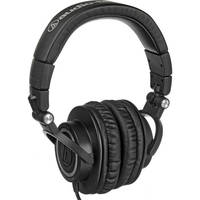 I have been using a new pair of headphones – the Audio-Technica ATH-M50 – and saying bad words, because they are revealing details (not the good kind) of my recordings about which I have been blissfully unaware. This is a GOOD thing. The ideal for any kind of monitoring in your home recording studio is accuracy. The more flaws you can detect in your audio, the more you can tweak and fix that audio. As a result, your finished product will be that much better.
The Audio-Technica ATH-M50 is designed for professional monitoring and mixing. This means that they aren’t designed to make your audio sound good by boosting certain frequencies, as you’d expect from consumer headphones for your iPod, for example. They are designed to tell you the truth, warts and all, about your audio; and as I mentioned above, this they do extremely well.
But despite the fact that they are designed for reference monitoring, they still do sound fantastic listening to well-recorded music. They are even quite popular among the audiophile crowd.
The Basics
These “cans” (as they call them in the biz) are of the closed-back design, making them perfect not only for critical listening, but also for artists to wear when recording. The closed back keeps the music or click-track from leaking into the mic. They will also provide isolation from extraneous sounds (cars, cats, lawnmowers, etc) while you concentrate on the audio.
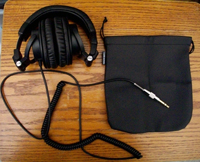
They are also circumaural, which means the padding goes around your ears instead of smashing them against your head. This lets you wear them comfortably for long periods of time. Additionally, this model has the spiral coiled cable rather than the straight cable. I prefer the coiled variety because I’m less afraid of clotheslining myself. But if you prefer the straight cable, the ATH-M50 offers those as well. Be sure you know which one you order though, when buying, so you don’t get the wrong kind. Both varieties are single-sided, meaning that the cable only comes out of one ear cup rather than both. This makes them less apt to tangle around things.
 Other Specs
- Large 45mm neodymium drivers
- 15Hz – 28Khz frequency response
- 3.5mm mini plug with 1/4-inch threaded adapter
- Swiveling ear cups that can rotate out 180 degrees – useful if you only want to listen with one ear
- Collapsible for convenient stuffing into the carrying bag that comes with them
The listed dynamic range for these phones is HUGE, especially considering that the range of human hearing is considered to only be 20Hz to 20KHz. This is one reason why they sound so freaking awesome though.
The Real World
Enough with the numbers – how did they perform in the real world? Well there is no question that these are serious headphones, designed for professional use. The sound, as I may have already mentioned, is awesome. That’s going to be the main factor with headphones. Since I, like anyone whose home studio is in a converted rectangular bedroom, have an imperfect listening space, having high quality headphones that can give me accurate sonic information is crucial. And the $159 cost for these headphones is certainly less expensive than paying someone to come out and install acoustic treatment in my studio, followed by purchasing top-of-the-line loudspeakers, many thousands of dollars in all.
My only quibble is that these headphones weren’t as comfortable as my old ones, the Sennheiser HD-280 Pro, which are also closed-back, circumnaural cans. They seemed a bit tight on my big noggin. A bit of looking around on the web about this, though, showed that this is common for some people when the phones are new. But everyone says that they stretch and loosen after wearing them for awhile, like a new pair of shoes. So I don’t expect this to be a problem for me.
In summary – if you are looking for a pair of really good, professional headphones that will take your recordings to the next level, and you want to do that for under $200, then these headphones are perfect.
ReaFIR Madness – The Hidden Noise Reduction Tool in Reaper
Reaper 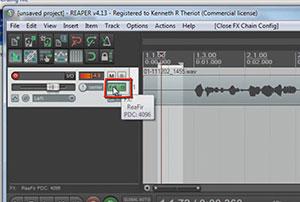 audio recording software is awesome, and is what I recommend to everyone. I use it every day. And I also seem to learn something new about it every day. It has an incredible noise reduction tool built right in that I just discovered recently. The reason I didn’t know about it sooner is primarily due to the fact that reducing recorded noise is not its only or primary function. It just happens to do it REALLY well, and non-destructively (if that’s not a word already, I hereby create it). The tool is called ReaFIR. I know! Who’d have thought to look for noise reduction editing chops under a moniker like that?
Review of What Noise Reduction Does
First though, let’s do a quick review of what noise reduction does for us in the world of recording. There is almost always a bit of background noise in recorded audio. It is especially noticeable in recordings of just one thing, like a single voice. The noise usually comes from a combination of stuff happening in the space/room where the recording takes place, and the electronics of the microphone and other gear involved. Recordings sound much better if you can reduce the noise, and that is what noise reduction tools are designed to do.
But since the noise and the voice are both together in the same recording, it isn’t a perfect process. What noise reduction tools try to do is filter and removing as much noise as it can without also removing too much of the voice. In order to do this, the software has to know what noise looks like so it can separate it from the signal (voice). So you have to highlight a section of the recording where there is ONLY noise, and no voice, and feed that sample to the noise reduction tool. Once it has the noise profile, it can do its thing.
Enter ReaFIR
Reaper names its effect plugins by using “Rea” as a prefix (for Reaper), and then the name of the function after it. So ReaFIR means Reaper FIR. So what does FIR mean? It stands for Finite Impulse Response. If you would really like to geek out on what it really means, including all the scary math involved, you can read about it at the Finite Impulse Response Wikipedia page. But the simpler definition for ReaFIR itself from the Reaper manual is:
ReaFIR is a EQ and dynamics plug-in that includes an FFT spectrum analysis window. Amongst other things it can be used as a precision EQ, a gate, a fast attack/release precision compressor, a noise reduction tool.
Obviously it is that last thing we’re interested in. In the video above, I walk you through how to use ReaFIR to reduce the hiss noise that happened when I recorded a short voice over. BTW, this video is and excerpt from our new (to be released on May 1st, 2012) recording tutorial course, The Newbies Guide To Audio Recording Awesomeness – Part 2.
How Does It Work?
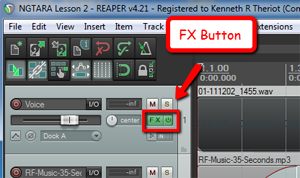 So see it in action in the video above. But here is is a written summary of how it works. Once you have recorded some audio onto a track, click the FX button in the track control panel. Then select VST: ReaFIR from the Cockos collection of FX plug-ins.
Next, go ahead and click the “OK” button and then close the ReaFIR window by clicking on the red X in the upper right corner.
Now just highlight/select a section of the voice-over audio that has no voice actually saying anything. In other words, pick a small area that was only noise. Then click on the Toggle Repeat button (down by the Play and Stop buttons). This is important because it will prevent any of the actual voice signal being played when sampling the noise for ReaFIR. With that area still highlighted, click on the FX button again to open the ReaFIR window.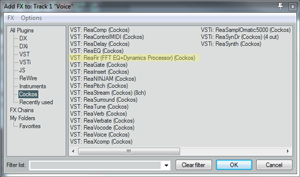
In the Mode window of the ReaFIR tool, select Subtract, and put a tick into the Automatically build noise profile box. Now hit the Space bar on your keyboard (which will play the audio, which is just the noise at this point). You’ll hear it for a second and then it will be gone. That’s ReaFIR getting rid of the noise. Now hit the Space bar again to stop playback.
The next part is very important! Uncheck the box that says Automatically build noise profile. Otherwise ReaFIR will try to grab your voice and anything else on the track, and treat it as noise. Once you’ve done that, go ahead and close the ReaFIR window. Now all you have to do is click on the Toggle Repeat button again to turn it off, and listen to the entire track.
Voila! The noise is gone and only the voice remains. Pretty darned cool huh? And I think the result is better than a lot of tools dedicated to removing noise. I didn’t hear much, if any, of the weirdness that sometimes happens after noise reduction. The audio takes on a kind of swirly, under-water-y artifact sometimes. But I didn’t hear that in this example. However, there noise we got rid of was a low-level and consistent hiss type of noise. The louder the noise and the more varied the noise (if it contains lots of frequencies and intermittent clicks, pops, etc.), the more likely you are to have that swirly artifact left over after noise reduction.
So now you know about the secret noise reduction tool at your disposal if you use Reaper. Use it wisely.

Audio Fanzine Picks The Top 10 Products of Musikmesse 2012
 Musikmesse is a huge fair/expo/trade-show focusing on all things to do with music, from creating it to recording or performing it. This year’s Musikmesse was held in Frankfurt, Germany and just wrapped. The folks at Audio Fanzine (an awesome site for folks with a home recording studio) had boots on the ground for the festivities and have compiled a list of the top 10 products on exhibit this year.
Among the winners on this list are:
Alesis IO Mix – This is my favorite of their picks; a piece of hardware you insert your iPad into, turning it into a 4-track portable studio with mic inputs, mixer, and everything. This thing is unbelievable. I want one NOW. Unfortunately, it isn’t available to the public yet. but be sure to check back here often because I will let you know when you can get one for yourself.
The other products on their list are:
- Rotodrum
- Seelake AudioStation
- Rupert Neve 5059 Satellite
- Steinberg Nuendo Live
- Clavia Nord Electro 4D
- Zynaptiq Unveil
- Jupiter 50
- Bogner Pedals
- Pioneer RMX 1000
Check out the details about htese cool products here: http://en.audiofanzine.com/audio-music-gear/editorial/articles/best-of-musikmesse-2012.html
Fast and Cheap Ways To Improve Your Recordings and Mixes
 Like I always say (yes, there is never a time when I am not saying it;)), audio recording quality is more about knowledge than about the gear you use. If you can’t afford to upgrade your home recording studiowith better microphones or interfaces or software, there are still several things you can do to upgrade the quality of your recordings and mixes. Des offers 9 tips for doing just this. From listening to your test mixes on multiple systems to simply working with other musicians to get out of the performer’s chair for a while and stop wearing so many hats, these things involve little more than your time, and could have (probably will have) a much more profound positive effect on your audio recordings than new gear.
Check it out here: http://www.hometracked.com/2008/05/31/improve-your-recordings-and-mixes-on-the-cheap/

