Your home recording studio hardware, namely mixers (if you have one) and/or audio interface boxes will have places where you can poke cable plugs into them. Not surprisingly these are called inputs. But lest you think that’s the end of the story, just a simple hole designed for one and only one kind of plug/cable carrying one and only one kind of audio, you’d better think again. There are frequently choices to be made by pressing a button down or leaving it in the “unpressed” position, depending on what kind of “level” you are dealing with. These types are usually line, instrument or microphone (mic) levels.
Here is an article explaining what the difference is:
http://www.audiorecording.me/whats-the-difference-between-line-instrument-and-microphone-levels.html
Alesis VideoTrack Handheld Audio and Video Recorder
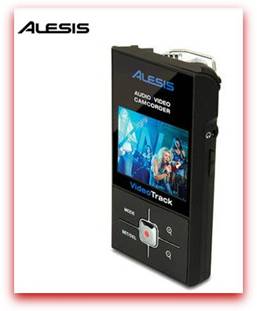
80% OFF! – The Alesis VideoTrack Handheld Audio and Video Recorder (note – sadly this item is no longer available. Probably the closest match for this product is the Zoom Q2HD) is 80% off the normal price of $199 until supplies last – with free shipping.
This means you can get one of these for $29 – and did I mention free shipping?
What’s so great about the VideoTrack? Well the biggest problem with most video these days is not the video quality itself, but the quality of the audio on the video. With the VideoTrack, you get high-quality stereo condenser microphones so you can have both excellent video AND audio.
The VideoTrack uses standard SD/SDHC flash memory cards and has a USB port for easy connection to your computer, making it easy to rapidly upload your videos to social media websites such as Facebook and YouTube.
$29.00 for this recorder is an amazing deal.
<—–Click the picture to buy or just to learn more.
How To Be a Famous Singer
 If you are asking how to be a famous singer, you will probably get a dozen different answers from a dozen different people. But one thing you can be absolutely sure of is that you will need a recording of yourself singing. This article will show how you can do that.
Last night’s excellent episode of Glee (the Saturday Night Fever one) posed some fantastic questions that hit a little too close to home (yes, I was in “vocal band” in high school, which is what passed for the kind of glee club or show choir they have on Glee). I so wish I could send this article to my high school self. Anyway, the teacher, Will Schuester, was worried about some very talented seniors in the glee club – NOT because they weren’t talented, but because though they wanted to be famous, they didn’t know how.
Santana, was totally sure that she would become famous. She just couldn’t tell anyone how or for what. Mercedes knew for sure she wanted to be a famous singer, but she didn’t know what to do to make it happen. So many kids have the dream of being famous singers. They just don’t have a plan. Since there are so many paths to this goal, I’m not going to espouse any particular one. But no matter what path you decide to take, you’re going to need a demo recording at the very least, and a preferably an entire album that people can buy.
How To Record Your Own Album or Demo
In the past there was really only one way to record your singing, and that was to go to a recording studio. It was expensive then and is expensive still, typically around $40-$50 per hour. It takes a long time to record just one song, so the cost gets really high, really fast, especially for a full album.
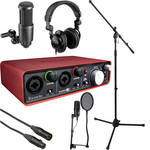
Until very recently the only way to get truly professional quality recording done was via the above commercial studio route. In fact, there are people who still believe that. They are wrong. Here is what you will need to record professional audio from home.
- A computer – In 2013, just about any computer will be all you need.
- An audio interface – This is a small box that plugs into your computer (usually) via USB. You’ll plug your microphone into this. Get the Focusrite Scarlett 2i2, which has two mic inputs ($150).
- A microphone – There are lots of types. You’ll want a studio condenser type of mic such as the Audio-Technica AT2020 ($82).
- Recording software – There are lots programs. Get one called Reaper, which is awesome and only $60. Download it now.
- A few extras – Get a mic stand, a mic cable, a pop screen, and a pair of headphones.
The above represents what I consider to be a starter studio capable of producing pro audio at the lowest cost. Everything above will run about $300, which would be about the same amount it would cost to record 2, maybe 3 songs at a studio. I worked with B&H Photo-Video-Audio to create a home recording starter bundle – pictured on the right – for only $260.25. CLICK HERE for more info or to purchase that.
So many kids have the dream of being famous singers. They just don’t have a plan. Since there are so many paths to this goal, I’m not going to espouse any particular one. But no matter what path you decide to take, you’re going to need a demo recording at the very least, and a preferably an entire album that people can buy.
Recording Your Songs
There are too many variations in music styles to go over every possibility, so I’ll describe how to do it with an acoustic guitar and singer, a very basic and simple example.
Open Reaper software and create one track. See this video on how to do that (plus a few other things to get started with Reaper) – Reaper Tutorial Video.
Record the guitar part (if you don’t play guitar, obviously you’ll need to ask a friend who does to come over) using the same method from the video. Just face the mic about 6-10 inches from the part on the guitar where the neck meets the fret board or around the 12th fret.
Once the guitar part is recorded, disarm the record button (just press/click it until the red light goes off) on the guitar track, and open a second track so you can record your voice. Again, the video shows how to do this (open a second track). This time make sure any speakers are turned off. Otherwise the guitar playback will get picked up by the mic when you are singing. Of course, you’ll need to hear that guitar track somehow in order to sing along, right? That is what the headphones are for. Plug those into your interface box (the Fast Track or whatever kind you have) and put them on your noggin.
Now arm track 2 for recording (make doubly sure track one is NOT armed to record) and record your voice by singing along while listening to the guitar part. I recommend doing this step (recording your voice) 2 or 3 times (on tracks 3, 4 and 5, for example) so you can choose the one that sounded the best.
Once you have a vocal track that sounds good, mute (click the “M” on the track control panel) or even delete the vocal tracks that were not keepers. Then play your song and adjust the volumes (yes, this is shown in the video too:)) of the guitar and voice until they sound good together.
Save the song in Reaper, and do this again for the next song, and the next, until you have all the songs for your album or demo recorded. Save all the songs (called Rendering in Reaper) as 16-bit stereo wav files and put them all in the same folder on your computer.
Creating and Selling Your Album
Burn your songs to a CD
This used to be so hard and now it is incredibly easy. I love living in the 21st century:). OK, so what to do with your song files – decide what order you want them to be in and then simply burn them to a CD using a program like NERO or even Windows can burn CDs now.
Album Art
Once that is done, you’ll need some album cover art. You can do this in any graphics program like Photoshop, Gimp or Paintshop Pro.
Create Album in Kunaki
When you have the songs recorded and the artwork done, go to a site called Kunaki, which is an incredible service (a FREE service!) that lets you upload your songs and artwork, and then they create the album for you! You can get physical copies of that CD mailed to you for $1.00 per CD, and the artwork looks fantastic! But don’t get too many physical copies just yet. Remember that we live in the digital age. You’ll want to make your album available on iTunes and all the other digital stores. Here’s how to do that.
Make Your Album Available on iTunes
Once you have received at least one copy of your physical CD from Kunaki, and made sure there were not typos and that the CD plays OK, it’s time to go to CD Baby, another awesome internet service that costs just $49 per album. You simply visit the site and follow their directions for setting up your album. Send them a copy of your CD, which is easy with Kunaki. Just tell Kunaki to mail a copy to CD Baby. Once the album is all set up on CD Baby, they do all the work of making it available not just on iTunes, but also Amazon, Spotify, Facebook, CD Baby itself, and 2000+ record stores. How’s that for awesome?
Now all you have to do is tell your fans or soon-to-be-fans how to get your CD/album/mp3s. You can send them straight to your page on CD Baby, or to you iTunes link, or to your Facebook page. They can listen to clips of your music for free and then buy either the entire album or individual song mp3s. CD Baby even has an awesome widget that sets up a store for you on your Facebook page. When someone buys the physical CD from CD Baby, they (CD Baby) will handle the order processing and shipping (excellent!). Periodically, CD Baby will ask for more CDs. When they do, just have Kunaki ship them.
That is really all there is to it. You now have an album/CD people can buy. Yes, this was a simple album example. But the process is the same regardless of what kind of music you record. You may have to buy some extra and different equipment to suit your individual needs. If you have a full band you want to record, for instance, you might want an interface that records 8 or more tracks at a time.
Here at Home Brew Audio we are constantly posting new articles on how to do recording. Right now we have well over 200 articles available to anyone to peruse. We also have video tutorials available, such as our courses, The Newbies Guide To Audio Recording Awesomeness, How To Build A Home Recording Studio, and more. If we don’t have an article or tutorial that shows you how to do what you need to do, please let us know by the comment section below and I will make sure we get one done ASAP.
There are many roads to becoming a successful singer, but they will all involve having your own recording. Now you know that you don’t need to save up thousands of dollars for a recording studio whenever you want to record. Learn how to do it yourself in the comfort of your own room at home. We’ll show you how.
If you’d like to see and hear some examples of songs recorded on my modest home studio right here in a converted bedroom, check out the following:
Cover of That Thing You Do!
Cover of My Eyes (from Dr. Horrible’s Sing-Along Blog)
Harmony examples (where I sang all the parts) – click the “music” player on the top of the page
Ken Theriot CD Baby page – This is my music, all recorded as described in this article and an example of what you can have on CD Baby
SE Electronics sE X1 Project Studio Bundle
The following is a guest post from Steven Williams.
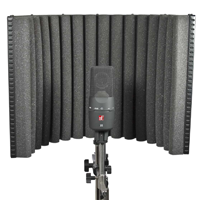 The sE Electronics X1 Bundle is an affordable complete recording solution for vocalists, acoustic guitarists, strings etc. This combination consists of the award winning sE X1 large diaphragm condenser microphone and sE Project Studio Reflexion Filter to ensure only the highest quality recording yet maintaining a cheap price tag.
I’ll start by looking at the large sE X1 microphone, and at first glance you may not find anything differentiating features from a standard large diaphragm condenser microphone. But when you look a little deeper all is clear, the X1 has a cardioid response pattern ranging from 20Hz-20KHz which is more than you could even use. It also has a pad 10dB switch, along with a low frequency roll-off switch. Perhaps the most noticeable feature of a mic at this price is its black rubber finish, which comes with several advantages. Not only does it look and feel nice but it makes the mic less visible in well-lit environments e.g. on stage. But most importantly it reduces the resonance on its chassis; yes black rubber is that important!
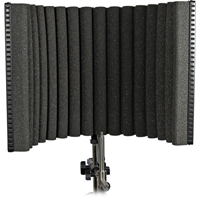 The Project Studio Reflexion Filter is in many ways similar to the X1 in the sense that it has features way above its price point. Its patented Reflexion filter design essentially acts as a vocal booth. It works by isolating the microphone from the room by a barrier that is acoustically non-reflective. This isn’t exactly ground breaking stuff but what separates the RF from its competitors is its multi-layer design that stops it from adding its own flavour to its recording. Its lined polyester fiberboard has amazing absorption properties, which is far greater than foam alternatives.
Though this bundle does not come with one, I highly recommend adding a pop-filter, which removes unwanted plosives (the little blasts of air made when pronouncing ‘B’ and ‘P’). Not only are they unwanted but can actually overload the sensitivity of the microphone and ruin the recording. sE Electronics has a couple to choose from: the metal pop filter or their dual professional pop screen.
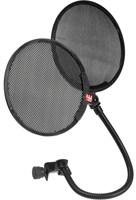 They’re both great products individually but together they create an ultra-affordable bundle that rivals even the most expensive mics found in professional studios. In fact in a blind listening test consisting of mics well above its price range. As you’d guess the sE X1 finished outright winner, and it hardly lacks credibility as the test it was carried out by professional UK producers, sound engineers and recording technology press. I’ll leave on that very high praise indeed.
3 Tips For Recording Stereo Voice
 There are several ways you can create a stereo effect when recording a voice, like a lead vocal in a song or as an effect in a voice over production. But first, let’s talk about why you might want to do this.
A clean and clear solo voice is the most natural and usually the best way to produce a vocal track. But there are times when you might want to add spaciousness or thicken up the sound of a voice. This effect is used a lot in music recording, often to create an intensity at certain points (like before the chorus) in a song, or even as the primary sound of a particular singer or band. Jon Anderson, from the group Yes, is an example of the latter.
I’ve been listening to The Beatles a lot lately and it seems a huge majority of their songs have the lead vocal coming at you in some sort of stereo, or at least doubled way. By “stereo,” I mean that the part (whether that be a voice or anything else) is actually two versions of itself and sounds as if it is coming at you from various directions as it does in real life. In the case of The Beatles, most of their recordings were produced in mono, so technically the vocal doubling wasn’t stereo. But the techniques they used to get thicker and spacey voices do produce a stereo effect if each of the signals is panned so that one comes from the left channel and the other from the right. In fact, that is exactly what happened when Beatles songs were remixed for stereo versions.
So what are these 3 tips for recording a stereo vocal?
Use 2 Mics When Recording
Of course the most obvious way to present a sound in stereo is to record it that way. Use two microphones to record one voice. This could be done using a stereo microphone (which is really two microphones in one), or two separate mics. Then in order to create the stereo effect, the output of each mic must go to its own track when recorded they can be panned left and right. If they stay together in the center of the mix (not panned at all) the result is a thicker (for lack of a better word) sounding voice like in the Beatles’ mono recordings. This is an effect all its own, called doubling, that is very common these days, but not technically stereo.
Anyway, using two mics for a stereo effect requires one more thing, which is to create a difference between the two recorded signals. This is because two identical signals, even if panned left and right, will still sound like only one un-panned signal coming from in front of you. In real life we take in audio through our ears (yeah, I know – alert the media), which as you have probably noticed, are on opposite sides of our head. Also in real life, sound comes to our ears only after it has bounced off of walls, floors, ceilings, and other surfaces. Each ear receives a slightly different version of the sound, allowing us to determine which direction the sound came from.
So in order to provide our listeners with a slightly different version of the voice for each ear, we have to make sure each mic points at the signal at a different angle. In a stereo mic, each of the two mic capsules point (usually) across the singer’s mouth instead of at it, almost as if the mics were aimed at imaginary people to the left and right of the singer. These two different angles provide the differences we need.
You can do the same thing with two separate mics if you make sure to put them really close together. But another way is simply to separate the mics by a few feet, and then unlike the previous method, point each mic directly at the singer’s mouth. Again, each mic will pick up the voice with different directional information and allow for a stereo sound when panned in the mix.
Sing Twice
The second way is to record the singer singing the part onto one track with one mic, and then record the singer again, singing it a second time (typically using the same mic) and recording this version onto a different track from the first. The differences in performance (subtle timing, breathing, phrasing, differences, etc.) will be more than sufficient for a stereo effect when panned in the mix. The Beatles used this method a lot in the early years prior to 1966.
One drawback of this method is that it sometimes singers don’t like it. John Lennon was particularly critical of doing things this way. He disliked it so much that EMI engineer Ken Townsend invented a way to create a similar effect without requiring the singer to sing twice. This technique came to be known as automatic double-tracking and common in modern recording. Essentially this technique electronically creates a second copy of the voice (or whatever is being recorded) and introduces changes to it that provide the required difference for the stereo effect. And that brings us to the third tip.
Copy The Voice
You can create stereo even if you only have one recorded performance. In today’s computer recording world it is simply a matter of copying and pasting like in a word processor. In Reaper, for example, you can click and drag an audio item while holding down the “ctrl” key and instantly create a copy in a second track. But that isn’t enough is it? Remember that you need to make them different from each other somehow, and then you need to pan them left and right to get stereo. Two copies of the same thing, regardless of how you pan them, is really just the same thing, only louder.
Perhaps the most common way to create the difference we need is to time-shift one of the versions by a slight amount. In most recording programs, simply dragging the audio item left or right in its track will shift it in time. Obviously if you move one of the tracks too much, it will be less stereo, and more of an echo. We’re only looking for a time difference 25 t0 35 milliseconds. It is a fascinating trait of human audio perception that we can hear two things separated in time by that amount and not consciously detect that we are hearing two things. But that small time difference is enough for our unconscious minds to hear a stereo effect if the two tracks are panned left and right.
Besides time-shifting other differences can be introduced, such as timber and tonal alterations to further increase the intensity of the effect. This is taking advantage of something called “The Haas Effect,” which you can read about in our article What Is The Haas Effect?
Use any or a combination of these three techniques for creating a cool stereo effect for a voice – or anything you’re recording for that matter.