 The term preamp, most often paired with the word microphone is something you’ll see a lot if you do much reading about audio recording. So what is a preamp? Well first off, it’s short for “preamplifier.” Second, yes – it is a thing that amplifies something before it goes to an amplifier. I know, I know – more confusing terminology in the audio recording world. Shocker. That’s one of the reasons I write these articles.
OK, so what are they talking about when they say “microphone preamplifier” or “mic pre” for short? Here it is. Microphones put out really quiet levels. But audio recorders (and other devices that ultimately amplify and send signals to speakers) need something a called a line level, which is quite a bit louder than mic level. So you need a device to boost (amplify) a microphone level to line level. And that device is called…you guessed it…a preamplifier.
Anything you can plug a microphone into (well, that EXPECTS to have a mic plugged into it – I guess technically you could plug one into your ear) will have a mic preamp built in. A computer sound card, for example, has a little hole with the word mic written write next to it. There will be a preamp in there somewhere. Likewise, most mixers have microphone inputs which have preamps in them. But neither of the above examples of preamps are ideal for recording.
To keep cost down, mixer manufacturers use inexpensive preamps since there are a bunch of them on board. Built-in sound cards on computers are also very cheap since most folks aren’t using them to record pro quality audio.
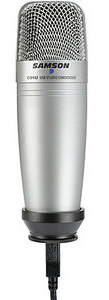
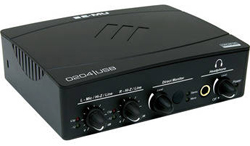
So if we are going to record great sounding audio with our computers, we need good mic preamps. Most audio interface units these days (meaning circa 2012) only have 1 or 2 mic preamps built in (such as with the E-MU 0204 interface), and that is what you are mainly paying for. They are much quieter and cleaner than the ones in mixers or computers, which is why they sound so much better. Oh, and something else handy to know is that USB mics (like the Samson C01U) have preamps built right into them.
So that’s my answer to the question “what is a mic preamp?” You didn’t want to know much more than that did you? Well, if you do, you can do the bonus reading below. I asked someone to give me 400 words on what a preamp was and I got what I asked for; a technical and academic sounding description. But hey, some folks may be interested so to you I say “read on!”
Cheers!
Ken
Extra credit reading on preamps
A broadly used term in the world of audio is the word “preamp”. Defined, a preamp is an amplifier that prepares electrical signals for increased amplification prior to them being received by the main amplifier. By design a preamp is supposed to do one or a combination of the following functions: increase the gain or the amount the signal level, convert unbalanced levels to balanced, change the tone, and/or lower output impedance.
Essentially the preamp works to make sure that there is an effective relationship between input and output so that the power it takes to receive and produce a sound isn’t compromised. Without going too deep into the technical explanations of each of the before mentioned uses of a preamp, one could say that the preamp is a multifaceted audio device.
When speaking of preamps it’s often discussed in relation to a separate power amp. The preamp is the signal processing component of an amplifier. Traditionally, the way you got better sound quality was to separate the two sections of the amplifier. Separating the preamp from the power amp redesigns your power supply so it is capable of managing electronics of more complex or sensitive signals without the interference from a nosier amplifier. In most cases when discussing preamps, users tend to mean amplifiers that are separate from the power amp. This would require a detached power amp to power speakers. An amplifier with both sections in it is called an integrated amplifier or just a plain old amp.
The versatility of a preamp as an audio tool shapes the sounds of an amplified microphone or instrument. The preamp usually includes dials that act as tone controls that adjust low, mid and high frequencies. The dials allow users to increase or decrease bass and treble as they see fit. Once the signal is processed the user now has the tone and sound they desired.
Preamplifiers may be found incorporated into home audio systems where the term takes on additional definitions. Most often, home audio preamps simply mean the device that switches between altered line level sources. In this sense no true amplification takes place; however the preamp does supply voltage to the amp. This is enough voltage to power loud speakers although it doesn’t register as a significant current gain.
Preamps can also be found implanted in other pieces of equipment like turntables, microphones and electric/bass guitars.
Doing Dubstep On Your iPad
Here is a cool video of how to create a dubstep drum/rhythm track on you iPad using the Korg iMS20 app. The app gives you a classic Korg synthesizer (looks just like the real thing) and sequencer. It is so amazing what you can do in the audio recording arena just using iPad and other iDevice apps these days.
Anyway, I’ll step aside and you can just watch the video:
Saving A Pro Tools Session For The Mix Engineer
The recording engineer is actually more than one job. It is three jobs at least, the tracking job, the mixing job and the mastering job. I wrote about this in the article: Recording Engineer, Mix Engineer and Mastering Engineer – Oh My. With that in mind, if your project requires all three distinct jobs – most music recording projects will – it might be handy to know how to save things at the end of one job before passing it on to the next engineer, assuming you aren’t doing everything yourself. If you are using Pro Tools , you might find this article I just came across to be useful.
It’s very short – just a checklist, really. But a very useful one. Check it out here: http://mixmasteredstudios.com/2012/07/save-protools-session-for-mix-engineer/
Microphones On Big Brother TV Show
 Reality television shows present something of a challenge for the sound folks on the set. This is especially true of the shows, like Big Brother, where the cast members are often shirtless, or otherwise clad in something difficult to hook a clip-on (also known as a lapel, lavalier or just “lav” for short) microphone to – bikinis at the beach or by the pool, etc.
So you may have noticed (from 2013) Frank, “Boogie”, Ashley, Ian, Jenn, Joe, and companions wearing lanyards around their necks and carrying around little boxes with antennae on them. In case you hadn’t already guessed, these are lavalier (clip-on) microphones and bodypack transmitters (since these are wireless systems like the Sennheiser Evolution Series.)
Shotgun Mics
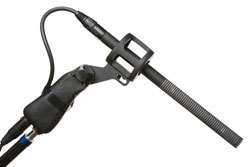
On a set where people wear shirts and the scene is blocked and scripted, the actors’ voices are picked up by shotgun mics (like the Sennheiser MKH 416), which allow for excellent sound when the voice is a couple of feet away from the mic, which is just off-screen.
And indeed they do have some shotgun mics hanging from the ceiling around the Big Brother house. But in a reality show, you can’t have a sound guy following every actor around with a shotgun mic on a fish pole. So the shotgun mics are usually too far away to get good sound.
The voice has to be close to the mic or it sounds too echo-y and reverb-y. And the cast can’t all wear headset mics like in the picture at the top left. So the only way to get good sound quality on the voices of the Big Brother house guests (HGs) is to have them wear lapel/lavalier mics.
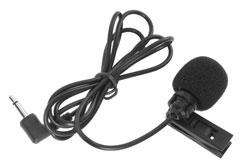
But you have to attach them to something. Lavs usually come with an alligator clip so you can clip them onto ties, lapels or folds in a shirt or blouse, etc. But it would be pretty painful to pinch these onto your skin.
So the alternative is to hang them around the neck on a rope, cord, or “lanyard,” like the Countryman Magnetic Mount. That is what the HGs are wearing around their necks – microphones attached to neck lanyards.
But these are wireless microphones, so in addition to the mic necklace, HGs have to carry around bodypack transmitters.
The way wireless lav systems work is that the mic plugs into the bodypack transmitter, which then wirelessly transmits the audio to the receiver (another box) that is hooked up to the audio recording device or directly to the video camera.
So wonder no longer! Often times the thing that makes the difference between amateur and professional video is the audio quality, and a lav mic is much better (if you don’t have a shotgun mic) than using a mic that is built-into the video camera, which is too far away to get decent sound. To hear this for yourself, see my review of a wireless lavalier mic here: Audio For Video: Do Not Let Bad Sound Ruin Great Video.
Newbies Guide To Audio Recording Awesomeness 2 Is Finally Here
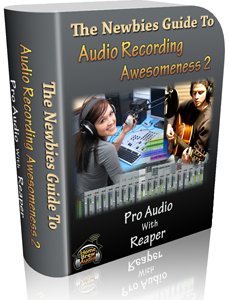
Yes, after far too long a time, it is finally here. Today The Newbies Guide To Audio Recording Awesomeness 2: Pro Recording with Reaper, is available! This new course raises things to a whole new level, taking you well into the realm of professional quality audio recording using the incredible software called Reaper.
The first in the “Newbies Guide” series, The Newbies Guide To Audio Recording Awesomeness 1 (which is what it shall be known from now on) focused on getting you started if you had no skills at all and no budget at all for gear. The new course takes you a LOT further down the road using decidedly professional software (even though the price is still amazingly low) called Reaper.
The assumption about having little-to-no audio recording experience is pretty much the same, but the budget for gear and software will need to be a little higher (though nothing like what one might imagine) – say, $60 for Reaper and less than $100 for a USB mic.
Here is a break-down of the lessons:
- Lesson 1 – Recording “Level-Up”: USB Mic and Reaper Software
- Lesson 2 – Your 1st Recording With the Upgraded Studio (Voice-Over w/Music)
- Lesson 3 – Producing (Mixing and Rendering) Your First Recording
- Lesson 4 – Voice-Over Recording Tips: Split 1 Audio Item Into Many – Auto Trim/Split
- Lesson 5 – Voice-Over Recording Tips: Quickly Reposition & Align Multiple Audio Items
- Lesson 6 – Voice-Over Recording Tips: Multiple Voices/Conversation
- Lesson 7 – Saving one file as lots of Little Files with Their Own File Name
- Lesson 8 – Multi-Track Recording: The “Killer App” Of Computer Recording
- Lesson 9 – Multi-Track Recording: Singing Harmony With Yourself (or Others)
- Lesson 10 – Multi-Track Recording: Vocal Doubling
- Lesson 11 – Intro To MIDI: The Magic Music Helper (3 part lesson)
- Lesson 12 – Loops
- Lesson 13 – EQ and Frequency
- Lesson 14 – Recording a Pop Song: The “My Eyes” Tutorial
And the price of 18 videos of pure awesomeness? Only $47. I know, right?!
CLICK HERE to buy!