 Home recording can be pro recording. Oh yes. Let’s say you realized you absolutely needed to start creating your own audio and need a home recording studio. Maybe you need narration for a video you’re making. Maybe you have to start podcasting or creating e-learning programs; or my favorite…maybe you’re a musician who really wants to make a CD or maybe just some demo recordings. Whatever the reason, many folks think they only have a few choices; hire a voice actor to record any narration you may need, go to a recording studio and narrate yourself, or buy expensive specialized equipment and learn to use it so you can set up and record from a home recording studio.
All of the options above are valid and effective. But they are not the only viable options, especially if you are short on time and/or money. Studio time is on average, about $40 per hour (on the low end!). If you ask your local music store guy what you’d need to start a home pc recording studio, he’s going to suggest starting with a budget of at least $500 just for the bare minimums. So what other choice do you have?
Honestly, I expect folks not to believe this because it sounds “too easy.” But the truth is that if you have a computer made in the last 10 years that has a sound card, and a microphone…even one of those plastic PC mics costing $5.00 or less, all you need is to download free audio software ( I recommend downloading a program called Audacity, which is open-source) and you’ll have yourself a home pc recording studio capable of multi-track recording and audio editing! I’d wager that a huge percentage of folks reading this can put the above collection together without spending one penny. Lots more will only have to shell out the $5.00 for the mic;).
Once you have the starter studio set-up, all you need is to learn audio recording. “Hah!” you may say. “I knew it couldn’t be that easy!” Oh but it is. I’ll show you right now.
First, you’ll need to plug your mic into your sound card’s pink input jack. This is usually located on the back of your computer next to the green jack where your speakers are probably plugged in. Then you just need to set up a couple of things in the software before you start. Open Audacity and go to Edit/Preferences to open the Audacity Preferences window. Put a tick in the box next to “Play other tracks while recording new one.” Then click “OK.” Next, go into the “Sounds and Devices” window from the Control Panel in Windows. The icon looks like a grey speaker. Go to the tab marked “Audio,” and in the section called “Sound recording,” click on the “volume” button. That will bring up the Windows Mixer.” Find the channel that says “Stereo Mix” or “Wav Out” (depends on what sound card you have), and put a tick in the “Mute” box on that channel. Just close the Windows Mixer and you’re ready to rock!
Now record yourself saying (or singing) something. First, press the button in audacity with the big red dot (the universal symbol for “record”) on it. An audio “track” will appear as if by magic. Start making sounds into the microphone. When you’re done, click the button in Audacity with the big yellow square (meaning “stop”). Go back to the start of the song by clicking on the button in Audacity with the double purple arrows pointing to the left. Now listen to what you just recorded. Done! Want to add another track to play simultaneously with your voice? Just click on the record button again and a second track will start recording underneath the first one. If you’re using the mic for that next track (as opposed to just putting some pre-recorded music or sound effects on it as background), you’ll want to make sure you unplug the speakers from their green jack on the sound card. Otherwise the mic will pick up what’s coming through the speakers as well as what you’re actually trying to put on track 2. In the latter case, you’ll probably want to plug some ear-buds or headphones (the kind used for mp3 players will work fine) into the green jack on the sound card so you can hear the first track while you record the second.
You just made a multi-track recording! It really is that easy. If you’d like a bit more of a detailed walk-through, just put your e-mail into the form at the top right of this page for some free starter video tutorials on recording audio with Audacity that explain these concepts so anyone can understand them. If you know you’re ready to get started now, check out our home recording tutorial courses here: https://www.homebrewaudio.com/tutorials/
Happy recording!
What Is Phantom Power Really?
 Recently I posted something called Phantom Power – A Dizzying Description in which I called attention to the fact that audio recording terms like phantom power are often hard to describe if you try to get into the details. I had asked someone to put together a 400-word essay on it for me and was stunned with how academic (to put it euphemistically) it came across. My eyes glazed over halfway through.
I went ahead and posted those 400 words for those who are more academically and technically inclined, but promised a now-what-is-it-really-and-only-tell-me-what-I-need-to-know post on phantom power very soon afterward. This is that post.
Okay, so to cut right to the chase – there are basically 2 types of microphones, dynamic and condenser. Ribbon mics are sometimes called a 3rd category but really are a variant of the dynamic.
What you need to know:
Dynamic mics don’t need electric power. Assuming the thing you plug them into – a mixer or PA of some sort – is plugged in, all you have to do is poke the microphone cable from a dynamic mic into a mixer and you’re good to go. That type of mic works by the sound coming into it (your lovely voice, perhaps) physically moving the parts (magnet and wire coil) inside. Those movements are then converted to an audio signal.
Condenser mics DO require electricity beyond what a plain old mixer or other interface can provide. That’s because condenser mics convert air movement (caused by your lovely voice) to audio in a different way (changing capacitance if you must know, which you don’t;)). That different way needs about 48 volts of electricity just for the mic to work.
As you may have guessed by now, that 48 volts of extra juice is called phantom power, probably because it comes into the mic not via the way you power up most things, namely with a plug of some sort. Phantom power comes into the mic through a mixer or interface by flipping a switch on the mixer. Sometimes the switch is labeled “phantom power.” But often you’ll just see “48V” or something similar on the device, usually next to a switch and an indicator light (so you know if it’s on or off).
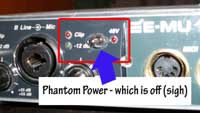 It is not at all uncommon (meaning I do this all the time!!) to plug the condenser mic in and get all ready to record only to find there is no sound coming through the mic because someone (me) forgot to turn on phantom power. You have been warned.
One other thing you should know. It is possible to carry your own phantom power, which is handy if you are a musician doing gigs. This just happened to me a few months ago. I was at a venue that used a condenser microphone on-stage. Their amp died and the owner came back with a combo mixer/amplifier thing that is very useful for live PA stuff. But since for live PA stuff, most people use dynamic mics, there was no phantom power on the mixer. We couldn’t use it for the venue.
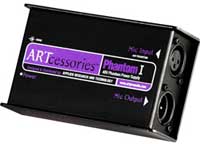
But a musician friend of mine had a portable phantom power unit similar to the ART Phantom I unit pictured on the left. All you need then is an outlet and an extra mic cable. We just plugged the condenser mic into the ART, then plugged the extra mic cable into the output of the ART and into the mixer. Voila! Phantom power. The day was saved.
So that is all you really need to know about phantom power. Condenser mics need it. Dynamic mics don’t. If you are all set up to record (or play live) with your condenser mic and you are getting no sound, chances are good that you forgot to turn on the phantom power.
Phantom Power – A Dizzying Description
 Phantom power is not supernatural, nor is it anything to do with with Andrew Lloyd Weber (snicker). So that is what it isn’t. What it is can be – gasp what a surprise – a bit confusing and “techie” sounding when someone tries to explain it. I asked someone for 400 words on what phantom power is and below was the result. Hint: take a big hit on your coffer, soda or 5-Hour Energy drink before proceeding. I will put up a now-what-is-it-really-and-only-tell-me-what-I-need-to-know post on phantom power soon.
Phantom Power
Phantom power is a technical term used by audio aficionados which is the direct current smeared likewise through the two signal lines of a balanced audio connector. When the concept of phantom power was brought about, one of its benefits was that the same type of balanced and shielded microphone cables that well equipped studios were typically using for microphones, could now be used for condenser microphones. This is different than the uses for the usual dynamic microphones. The traditional circuitry of most of the microphone equipment requires special multi-conductor cables. Phantom power alleviated some of these needs.
Supplying phantom power can be achieved by microphone or other device and obtain DC power from either allowing two capacitors to block DC power from registering at the output or running a signal line to a ground terminal. Appropriate settings for R1 and R2 has to be 6.8k ohms for 48 volt phantom, and R3 will not be used in this case. Phantom power can effectively and seamlessly supply voltage to well-adjusted microphones that do not use it. Most vibrant microphones would be included. The only difference in voltage amid two signal lines of a balanced signal will be noted as phantom powering spaces identical DC voltage on either signal lines of the balanced connection.
In contrast to earlier methods of powering, in which DC had a direct overlay onto the indicator in disparity mode. This method was of German origin and referred to as “Parallel Powering” or “T-Powering”. The connection of a orthodox microphone to an input that had one or the other between T-powering or parallel powering facilitated can harm the microphone.
Phantom powering isn’t without its flaws. It can cause significant damage or equipment malfunction when cast-off with adapters or cables that connect either of the sides of the common input to earth. This is especially the case when different equipment besides microphones are linked to it. To avoid theses perils numerous mixer boards have a switch that serves as a tool for switching phantom power on or off. Most high-end gear this is achieved individually by a channel setting. On lesser mixers most if not all microphone channels can be set either on or off. This can also be done in groupings of most mid-range boards as well as some of the small ones. Disconnecting an individual channel from phantom power shouldn’t prove to be too difficult. This can be completed by means of a 1:1 seclusion blocking capacitors or transformer.
Record Your Voice And Sound Like A Pro
 When you record your voice, are you happy with the result? Well, let me ask it a different way because a lot of people simply hate the way their voice sounds to them when they hear it played back on a recording, regardless of the audio quality. That’s a different thing. I’m referring to whether the sound is nice and clear without a lot of noise in the background.
A lot of people don’t really know if their voice sounds “good” or not. If they can be understood and heard by others, they feel it is good enough. And it may be good enough for what you’re doing! I mean, if all you want to do is chat with family and friends over Skype or some other internet meeting, it may not be all that important that your voice sound “professional.”
But if you are recording your voice for any kind of business reason, such as for podcasts, videos, or voice-overs, then it might be time to listen critically to a recording of your voice and assess it for how professional it sounds. Is there a lot of hiss or other types of noise in the background? Maybe the audio is “thin” sounding? Heck, even then you might not hear anything wrong! I have a friend who is a successful internet marketer, video-blogger, and podcaster. She had no idea that her audio sounded bad enough that it made her sound like an amateur. It wasn’t until someone recorded her with a decent microphone that her eyes were opened (maybe the metaphor here should say “ears were opened,” but I digress). she didn’t realize how bad her voice sounded until she heard how it COULD sound with the right equipment – in her case, just a slightly better microphone.
The Microphone

Notice I said “slightly better microphone” above. When people think of home studio microphones the often think expensive, assuming they will have to spend hundreds or even thousands of dollars. My friend was using a USB headset mic costing about $35. Someone recorded her voice with a microphone costing only about $100 called the Blue Yeti, which is also a USB mic, meaning all you have to do is put it on your desk and plug it into your computer. No mixers or interfaces are involved. Anyway, when she heard playback of her voice recorded on the Yeti, she was stunned! “Oh my god,” she said. “I had no idea.” For only about $75 more than the headset mic she was using, her voice went from sounding “OK” to “Oh my god.”
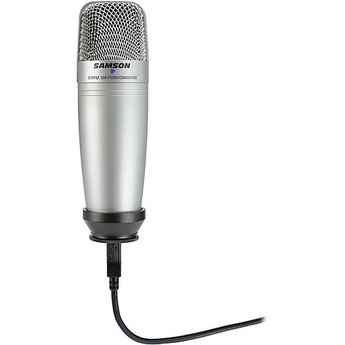
The Yeti is a good microphone, but the good news is that my friend could have gotten the “oh my god” reaction with an even less expensive USB mic such as the Samson C01U, which you can pick up at your local Best Buy store for around $75 (only a $40 difference from “OK” to “oh my god” this time).
 The main reason the Yeti and the Samson C01U mics sound so much better than the headset type mic is the size of the microphone element or diaphragm inside. The bigger mics are called “large diaphragm condenser” mics. There are other differences as well, such as the fact that headset USB mics are usually dynamic type mics which are typically less sensitive than condenser mics. But you probably don’t care much about that.
What is important is that if you need to record your voice and have it sound professional, a really smart way to make that happen quickly and easily (not to mention cheaply) is simply to use a large diaphragm condenser (LDC) type USB mic. There are many levels of “OMG” above even that of course, which involve different kinds of microphones at higher cost. But for most people, the upgrade to an LDC USB mic for less than $100. It is a small price to pay for professional quality voice audio.
I’d love to hear some before-and-after audio if you decide to make this change. Send in a comment below and maybe we can post some examples.
Cheers – and happy recording!
What Is The Best Mic For Home Studio Recording Projects?
Microphones – Here is the other (very!) frequently asked question by folks new to recording at home. And I confess I asked it when I was just starting out. Though I do agree with the “it depends” part of the answer to a large degree, all the person asked for was “a clear mic” for under $300. The advice as basically this: you can either get a $300 mike (the AT and the AKG are about that), or you can use dynamic mics (the Shures) for about $100. Really? those are the only choices? See the Home Brew Audio answer at the end.
Q: I’m looking to buy a microphone for a home recording studio. I want a really clear mic for under $300. I’d love help from someone who has a good one, or knows one.
A: It really depends on what you want to record with it. What are you recording to? A good vocal mic you can use is Rode NT2-A, which is my “everyday mic”. It is it a large diaphragm condenser mic, so, it will need phantom power to make it work. You can also use it to record acoustic guitar, or just set it up in a room to record music.
Another good mic is the Audio-Technica At2035 microphone. It’s an outstanding microphone to put in a room and just record what is happening. Again, it is a condenser mic so you need phantom power.
Another good mic is the Shure sm57 and sm58. They are both dynamic mics so you don’t need phantom power. these are good study mics that you can use from vocals to guitar to drums.
All in all, its hard to record music with one mic, but you can do it. It’s better to have a couple mics set up so you can get better levels on what you want to record. Good luck.
Here is the Home Brew Audio answer:
While the two condenser mics mentioned above are good, they push or exceed the budget of the person asking the question. I don’t think the either of the Shure mics are particularly “clear” (something else the questioner asked for) for recording purposes (mainly because they are dynamic mics as opposed to condenser mics – see our article What Are The Different Types of Microphones? for a review of that).
the other budget issue for mics like the Audio-Technica At2035 or Rode NT2-A is that though they sound great, they need an audio interface like the Focusrite Scarlett Solo in order to plug them into your computer, adding another $100.
What I would recommend is one of the new crop of affordable-yet-clear sounding USB mics. The one I have and recommend for the price is the Samson Q2U for about $59. Not only is it cheaper than any of the mics mentioned in the answer above, but for PC audio recording it is definitely better than either of the Shure mics for clarity. You might do even better with some of the more expensive USB mics on the market too, such as the Samson C01U or Blue Yeti. At that point it is all down to budget.
Our two cents.