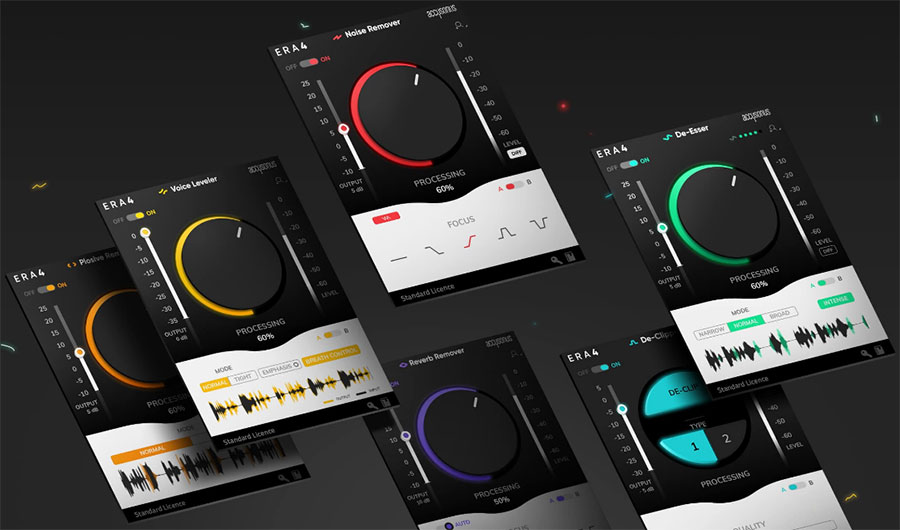
This bundle of vocal plugins allows you to quickly and easily edit your audio recordings without having to know all the technical stuff you’d normally need to know with standard editing. Each tool has basically one control – a large knob. So in order to apply noise reduction, for example, you simply highlight your audio and turn the knob up or down until the noise is gone and the audio sounds good. That’s it! It’s the same kind of thing for all the modules in the bundle, including Noise Remover, De-Esser, Plosive Remover, De-Clipper, Reverb Remover, and Voice Leveler. ERA Bundle has saved me so much time!
My Star Rating –
I have spent the past week or so testing out the ERA Bundle of vocal plugins from Accusonus. All I can say is “Wow!“
If you record vocals for any reason, you probably already know that it takes a bit of know-how and quite a lot of time to edit/clean up a voice recording. This is especially true if you are doing voiceover work – narrating videos, podcasts, audiobooks, etc.
So What is the ERA Bundle?
It is a collection of what they call ” single knob audio cleaning plugins.” The Standard bundle includes the following tools:
- Noise Remover
- De-Esser
- Plosive Remover
- De-Clipper
- Reverb Remover
- Voice Leveler
One step up from the Standard bundle is the Pro bundle, which adds:
- ERA-D (a combination noise and reverb removal plugin)
- De-Esser Pro (gives you more control over frequencies, and provides a visual display of where the effect was applied)
What’s so great about ERA vocal plugins?
Simplicity and speed! One of the biggest problems with editing vocal recordings is that:
- It is very time-consuming to do things like noise reduction, p-pop removal, de-essing, etc. It usually takes 5-to-10 times longer (or more) to edit a voice recording than it takes to record it.
- Editing audio is technical! While you don’t have to be an audio engineer to learn to use the usual tools like EQ (equalization) or compression, the fact is that you DO need to have a basic understanding of things like audio frequencies and other often hard-to-grasp technical concepts. One of our missions at Home Brew Audio is to make it as easy as possible for ANYONE to record and edit audio. These tools make that much easier.
The ERA Bundle solves BOTH problems
ANYONE can use the ERA vocal plugins. Each tool, as you can see in the pic at the top of the page, is literally a single big knob. And each knob’s factory default setting is usually exactly where it needs to be for most audio needs. So often times you don’t even need to TURN the knob!
You literally (in most cases) open the effect/plugin, and it “just works.” But if it is a bit too much or too little effect at first, just turn the knob for more or less of the effect. When it sounds how you want it (noise gone, p-pops gone, etc.), you’re done.
I found certain of the tools in the bundle to be more useful than others for voiceover recording. There is no music to hide audio problems. I found myself using 3 of the tools more often than any of the others.
Above is a video demonstrating how these tools work.
For example, the Noise Remover is the very first thing I used on every recording when testing the bundle. Next, I ran the Plosive Remover for p-pops and other low-frequency blasts. Then I ran the De-Esser. Lets talk about these one at a time.
Noise Remover
The steps you have to go through to apply noise reduction normally look something like this:
- Highlight a section that ONLY has noise in it, being very careful not to highlight any voice, or breath, or bumps, etc. It has to be the steady background noise in a room
- Open your noise reduction effect, and click on the control for sampling noise.
- Close your noise reduction effect.
- Highlight all of your audio.
- Open the noise reduction effect again. This time click the control to apply noise reduction.
This is pretty involved and a lot can go wrong if you don’t follow those steps exactly. But with the ERA Noise Remover, the steps look more like this:
- Open the Noise Remover plugin.
- Click “Apply”
That’s really it! OK, you might have to use your mouse to move the great big single knob left or right to dial in JUST the right amount of noise reduction while previewing the effect. But I didn’t have to most of the time. It really is like magic.
Check out the before/after audios below. I didn’t even move the knob. I used the default setting and followed those 2 steps above. It was that fast and easy. Use headphones when listening to get the full effect.
This is the most amazing noise reduction vocal plugin I’ve ever used! And it is my new go-to for removing noise in audio.
Plosive Remover
Ah the bane of voiceover editing – p-pops! Even using a pop-filter, plosive sounds (blasts of air that cause a low frequency popping sound) still manage to make their way into the recorded audio. So we are stuck editing these after the fact. The way I do it is very time-consuming. These are the steps:
- Highlight the “p” (also sometimes “b,” “k,” “th,” can cause plosives) causing the problem. Be VERY careful to JUST highlight the “p” consonant and NOT the vowel sound of the word, because the fix for a plosive can make a non-plosive vowel sound thinned out or otherwise unnatural.
- Open the EQ (Equalization) effect
- Reduce frequencies gradually, starting at about 200 or 250 Hz.
- Apply the effect.
- Highlight the next plosive and repeat the above for EVERY plosive in your recording! This surgical way to do it ensures you don’t make the non-plosive audio sound weird.
It isn’t usually feasible with just an EQ to apply it to an entire audio file just to fix all plosives. If you do that, ALL the audio that does NOT need it, will be filtered through the EQ as well as the plosive ones. And that will make everything sound bad.
But with ERA Plosive Remover, the steps are these:
- Open the plugin.
- Listen to the audio and move the knob until it gets rid of plosives. while all other audio still sounds the same.
- Apply the effect.
This is the biggest time-saver in the entire ERA Bundle.
I recorded some text here with lots of plosives in it. Then I applied the Plosive Remover. Again, I didn’t even budge the knob. I literally opened the plugin and clicked “Apply.” The entire process took 10 seconds. I timed myself editing out the plosives my traditional way (using EQ to surgically fix each one). That took 2 minutes and 45 seconds for a 39-second audio file. And that was with my plosive EQ setting applied to a keyboard shortcut in Adobe Audition! That not only reduced the time spent by 94%, but I didn’t need to know a thing about audio frequencies.
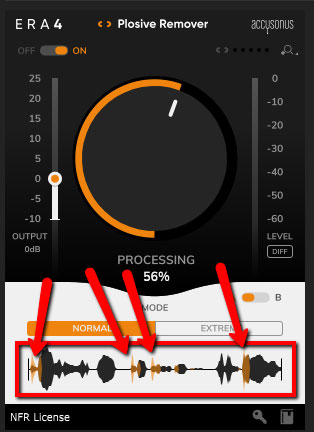
One feature I REALLY like with this tool is the display of the audio showing WHERE the effects is being applied. See pic below. I put arrows pointing to the orange areas of the wave form where plosives are being reduced:

Take a listen to the before and after audios below. As before, using headphones will allow you to hear this best.
De-Esser
My setup with my voice tends to result in some pretty harsh sounding “Esss” sounds – usually called “sibilance.” The accepted standard method for editing this type of problem is to use something called a “de-esser.” Usually this is a setting in a compressor plugin that targets only a certain set of frequencies – typically those between 4 KHz and 8 KHz.
If you’re not already into the technical aspects of audio editing (like most voice actors or singers!), that description alone is probably enough to make your eyes glaze over. Why can’t I just apply a tool with a simple, say, single knob to reduce harsh sibilance? You probably know what I’m going to say next. Yup, the ERA De-Esser, like the rest of the bundle, is a single knob you can adjust to get rid of harsh “ess” sounds without adversely affecting all the rest of the audio.
I recorded a sample with lots of “ess” sounds in it so I could test the ERA De-Esser. As with the other tools, this one did a good job of easily and quickly fixing harsh sibilance.
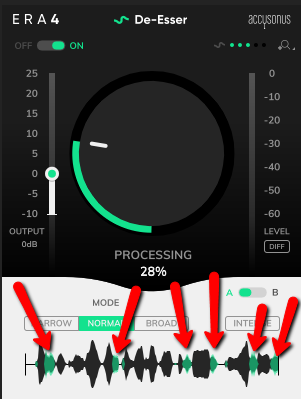
As with the Plosive Remover, the De-Esser displays where on the wave form that the effect is being applied. See pic below, where the waverforms are colored green at the points where the effect is being applied:

Take a listen in headphones to the before and after audio below.
Voice Leveler
I seldom had need for the Voice Leveler, whose main task is to try to even out audio volume, turning quiet parts up and loud parts down. It is very much like a compressor, though the way it works is different. If you have a recording with super variable volume in a vocal, then I can see this being useful.
De-clipper
I did use the De-clipper once, just to see how well it worked. In digital audio, if you record something too loud for the system to process, the audio will “clip.” That means it will flatten out at the top and bottom of a track where it exceeds 0dB. The result is distortion – a nasty buzzy sound that you usually can’t get rid of once it’s recorded. But the ERA De-clipper did a pretty darned good job at “un-fuzzing” a bit of clipped audio. It worked much better than the built-in “DeClipper” tool in Adobe Audition. Plus it was much easier and faster.
Take a listen to the result below.
Hopefully you can hear the difference. ERA De-Clipper did an excellent job of repairing distorted audio, which is pretty amazing. As with most audio problems, it’s MUCH better to prevent the clipping in the first place. Make sure you have proper levels set. But if you must fix it after the fact, the ERA De-Clipper can work wonders.
I also never really had much need for the Reverb Remover. The idea with this tool is that if you record in a room with lots of echo and reverb coming through from poor acoustics – hard walls or floors, etc. – you can reduce that reverb after the fact with this tool. My studio has acoustic treatment, so I didn’t have a need to remove room reverb. But if your room does NOT have treatment, this could be really helpful
To test this, I recorded a sample in my bathroom, where I could get a lot of reverb into my audio. Take a listen to the results below. It’s actually pretty darned amazing.
My advice for this tool would be to add it to other methods of reducing room sound, starting with preventing as much of it as you can. You can use acoustic treatment on walls, put a blanket over your head (this really works!), record surrounded by lots of hanging clothes in a closet, and just get quite close to the mic. Once you have the audio recorded, if there is any room sound still audible, apply Reverb Remover to make it it even better. But as you can hear from the audio samples, even if you end up with lots of reverb in your recording, Reverb Remover can do an incredible job getting rid of that.
ERA-D (Pro Bundle)
There are two additional tools available if you upgrade to the ERA Pro Bundle. The first is super useful if you have work with noisy, echo-y audio a lot. It’s called ERA-D.
It combines noise removal AND reverb removal into a single tool. This actually makes a lot of sense, since there is often a huge amount of overlap between room sound (the reverberant quality of a space), and steady room background noise.
There is a video on the Accusonus site, which you can see here, showing ERA-D improving a pretty badly recorded audio. This will give you an idea of what ERA-D is capable of.
There are a lot more controls to learn with this plugin. This gives you a good ability to customize and fine-tune the effect. But it does mean it is not quite as easy for the non-technically-inclined person to figure it out right our of the box like the other tools.
I don’t ever record in reverb-y AND noisy rooms, since I have acoustic treatment on the walls of my studio. So to test ERA-D, I recorded audio in a bedroom that does NOT have acoustic treatment on the walls. So it had a decent amount of standard “room sound” reverb. Also, the air conditioner was running, so I had a fair amount of noise as well.
As you might expect with a tool this advanced, it did a pretty great job getting rid of noise and reducing reverb. And I just used the Default setting here. I probably could have make this even better if I’d tweaked things with the extra controls ERA-D gives you. Take a listen to the before/after audios below. Again, you’ll hear the effect best with headphones:
De-Esser Pro
The other tool you get with the ERA Pro Bundle is De-Esser Pro. The main difference between the De-Esser in the standard bundle, and De-Esser Pro is mainly the amount of control you have. With the pro version, you can do more fine-tuning of which frequencies to target with the “Focus” control. And there is a “Shaping” tool that allows you more customization. You can move the slider toward “Soft,” for a more gentle application of the tool. Or you can move the slider towards the “Sharp” side, leading to a a tighter result.
If you work with lots of different singers or voice actors, or you have particularly challenging problems with sibilance in your own voice, this more advanced version of the de-esser tool will be helpful to you.
Price
The ERA Standard Bundle goes for $149, which is astounding for what you get. Compare this to a similar suite of audio repair tools like iZotope RX, which costs $279.
The ERA Bundle Pro brings the cost up to $499. If you work with audio that has been recorded in many different places, from many different sources mostly out of your control, it would be worth it to upgrade for ERA-D alone. And of course you get the De-Esser Pro with this bundle.
To find out more or to purchase your own ERA Bundle, visit Accusonus here.
Ken,
Can these be used in Audacity, or only some platforms?
Thanks,
Graham
Yup. I have tested them in Audacity.