 Here is a guest post from Rebecca Armstrong of McGowan Transcriptions.
Just 200 years ago, no human voices had been recorded. Ever. Music, rousing speeches and even just day to day conversations were essentially lost forever, surviving only in written records at best.
The first real technological developments in audio recording materialised in 1859, when Édouard-Léon Scott de Martinville invented the phonautograph. By our standards today it was pretty primitive in that it could record sound but not actually play it back. Instead, it displayed sound waves as squiggles and lines on soot-blackened paper and glass.
The phonautograph did – despite its limitations – set the stage for far more groundbreaking innovations and a total change in society. The progress in audio technology from the late 19th century onwards resulted in the birth of the modern music industry, the invention of sound films, and a far greater ability to record and document important speeches and events.
Following the phonautograph came Thomas Edison’s phonograph in 1877, and with it the first ever musical records which took the form of hollow wax cylinders. An upgrade arrived just ten years later in the form of the gramophone, and the new disc format used essentially doomed Edison’s cylinders to extinction.
Throughout the 20th century, these developments continued in earnest as humanity moved from basic acoustic recording to electrical recording, magnetic recording, and finally to today’s advanced digital recordings. Our ability to store, edit and transform sound has increased exponentially – the first 7 inch gramophone discs could only store around 2 minutes of sound in total. Compared to today’s smartphones and computers, this is miniscule!
To find out more about these incredible developments in audio technology over the past 160 years, take a look at this infographic designed by McGowan Transcriptions. It will take you through all the key developments in audio technology history, along with some fascinating stats and figures that show just how groundbreaking these changes have been.

Archives for June 2018
The MusicTech Buyer's Guide to the Top 16 iOS Interfaces
Most of us start off on a shoestring,and that certainly included those infected by the music-making bug. And an iOS device and an iPad can be enough to start the music-making dream. But, there are lots of iOS interface options available, even to music-makers of constrained means.
For example the iRig 2 is very affordably priced, and gets the job done with great extras, such as cross-platform compatibility. The Personus Audio Box Range offers lots of software for a moderate bump in price. Also moderately priced, the Korg plugKey turns your device into its own sound module by rerouting the audio. There are also a host of interface options at around 100 plus that will work with your device, some with greater or lesser portability, all with a range of featirfe. Once the dream is allowing you to do more than break even, however, there are some interfaces in the 600 to 1000 plus range that have superb connectivity, at times no need for a computer at all, that can go with you pretty much anywhere.
Key Takeaways:
- Interested in finding a good iOS-compatible interface to help with all of your recording and production needs?
- Well, fortunately, there are a whole host of different products on the market out there for you to choose from.
- Be sure to put together a list of features that you need, and then compare against what is offered.
“The AudioBox iOne and iTwo have iOS connectivity and one and two preamps respectively, 24-bit/96kHz recording and a bundle of software.”
Read more: http://www.musictech.net/2018/03/top-16-ios-interfaces/
Anchor's iPad app is an all-in-one podcast studio
Anchor’s iPad app includes editing tools which allows users to trim, cut and drop in segments and effects at their whim. Best news is, you can get it on the App Store for FREE.
This new app allows us to record, produce and edit your podcast recording with using any fancy equipment and by just using your tablet. This is perfect for those who don’t want to have a lot of stuff but has a full sound studio in their hands.
Read more about this here: https://www.engadget.com/2018/06/19/anchor-ipad-app-complete-podcast-studio/
What Is Audio Compression and Why Should I Care?
 “Compression” is one of those many audio terms that you hear a lot but maybe don’t truly understand. You wouldn’t be alone. There are lots of ways to get confused.
First of all, “audio compression” is different from “data compression,” which refers to making a large file smaller (like turning wav audio file into an mp3) to optimize it for use on the internet. We’re NOT talking about that. Audio compression is something very specific.
Okay, so what the heck IS audio compression?
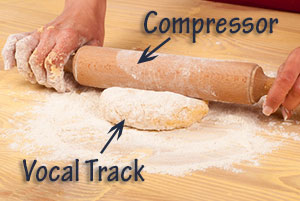
The most basic way to explain it is this: Compression “turns down” only the loudest parts of an audio file so that the overall volume is more even. If you then turn up the overall volume, the quite parts are more audible and the loudest parts are not as loud. Things are much more even and consistent.
So in a way it is sort of like a trash-compactor for sound. Why use compression? Have you ever been in a car, and a song started, and you could barely hear it? So you turn the volume up only to have your eardrums shredded when the loud parts of the song come in. You may have found yourself turning the volume up and down several times during a song to compensate for the extremes in quietness and loudness.
What you were doing while turning it up and down was manually compressing the audio! You were compressing the audio by turning the loudest parts down and the quietest parts up.
So a “compressor” automates that
Wouldn’t it be easier if you could just push a button on your car stereo and have that happen automatically? Well you probably can! The factory radio/CD player in my last car had a button that simply has a “C” on it. I had no idea what it meant until I looked it up in the manual. Guess what the “C” stands for? Yup, “compression.” Check your manuals; there might be something similar on your car’s audio controls.
Using compression for audio recording
So what about the folks recording or producing audio, or those who want to learn? How can you use compression? Well, for one thing, you can check out these other articles I’ve written: – Improve Or Ruin Your Audio With an Effect Called Compression, Vocal Compression Using Reaper’s ReaComp Effect Plugin. and Using An Audio Compressor For Voice Over Jobs.
Every audio recording program out there has built-in compressor tools. That’s how common and important it is in audio production.
The first thing you’ll probably want to do when recording music is apply compression to individual tracks, such as the vocal track or guitar track, etc.
Lead vocals pretty much always need some compression. Pop music tends to put a lot of compression on a lead vocal. That’s because it’s the most important thing in the song and in order to keep it loud enough to be heard through the music as it gets louder, but not overpower the music during the softer bits, a compressor is used to automatically even out the levels of the vocal track.
One warning here though…if you overdo the compression on a vocal track, it tends to make the singer sound like they are lisping, and some other odd things.
Compression for the entire mix
Another useful way to use compression is to boost the average volume of an entire song (or whatever kind of audio you’re listening to). This is because the loudest an audio file can be without distorting (you know that nasty buzzing sound you hear when you turn the TV on too loud for your speakers?), the very loudest part of that audio file must not exceed a certain volume level (0dB if you care :-P).
Many audio programs simply won’t allow you to turn audio up if the loudest bit of it will exceed that “distortion” ceiling. So if the audio is not loud enough, but you can’t increase the volume because there are just one or two places where it got really loud, and those are “bumping” up against that ceiling, you could just reduce the volume of ONLY those two places, leaving the rest of the audio alone. At that point, the loudest parts are much lower, and you can turn the whole thing up much louder before any of it bumps up against that ceiling again.
That last technique is often used when editing an entire song in order to make it seem much louder. Louder can often be interpreted as “better” by some people. But be careful here too. The more you compress a final mix, the less dynamic range the song has, which basically means it won’t get softer and louder as much. That can suck the life right out some audio.
So now you know what compression is. Cool, huh? If you want to experiment with recording and producing audio, there are lots of tutorials out there on the web. Of course I think you’ll like the ones you can check out free here. But I may be biased. Either way, go forth and make the world safe for better audio, or both!
Focusrite Clarett USB 2Pre & 8Pre Review – Quality on USB
Interested in building up your recording studio capabilities? If so, then the Focusrite Clarette USB model is a piece of equipment that you might deem essential. Build to the exacting standards of professionals, and with the inputs of some of the top names in the business, this handy little module brings all of the functionality that you would expect. It features a host of different input and output capabilities, and performs well across the entire audio spectrum.
Key Takeaways:
- Interested in a new and useful addition to your recording studio and production gear?
- If so, then this little package from Focusrite will be sure to have what you're looking for.
- This product comes about as the successor to a long line of products designed with input from top pros.
“You’ll need to get your head around a bit of recording history to truly understand one of the SPs of the new Focusrite Clarett USB range but, don’t worry, I’ll be as concise as I can.”
Read more: http://www.musictech.net/2018/03/focusrite-clarett-usb-review/