 If you could have access to some super high-end recording gear to record vocals, what would that be? Most people cannot afford to have this stuff for their home recording studios. And for most people, that’s OK.
In 2017, there are tons of affordable mics and interfaces that get you so close to the high-end stuff that it’s good enough.
But if you DID have the budget for the high-end gear, there’d be no reason no to get some, right? I’ve been saying something similar to this to my wife for years:-P.
Anyway, Booby Oswinski just published an interview that mentioned – among other things – the gear used to record Queen and ELO, two of my favorite bands ever!
In thearticle, an interview with the engineer called Mack goes into some interesting techniques and specific (high-end) gear he used to record Queen and ELO, as well as a few other famous bands.
I have long been a particular fan of the way both of these bands sound – particularly their stellar vocal harmonies. So I was very interested to hear about the gear used to get that sound.
For vocals, he said he normally uses U47s. By that, he is referring to the Telefunken U47. But it seems like he is saying that he now uses a Neumann M 147 tube mic. As I mentioned in my post The Frank Sinatra Microphone, the M 147
For the preamp/converter, he says he uses “HD3C Millennia with the built-in Apogee converter. “I think he may have meant the Millennia HV-3C. I couldn’t find one with built-in converters. It must be a custom thing. But the kind of converter he is talking about is the type you can find in the Apogee Element thunderbolt interface.
About Jeff Lynne and ELO:
Interviewer: “The ELO stuff was always so squashed, even back then. But that’s Jeff Lynn’s sound, isn’t it.”
Mack: “Yeah, he always liked any compressor that was used set to “stun” and he still does that today. And he didn’t want any reverb or effects. You always had to sneak some stuff in to make it a little more roomy.”
The entire original post is here: http://bobbyowsinskiblog.com/2017/06/28/mack-recording-queen-elo/
Archives for July 2017
Ample Sound's Ethno Ukulele
Known for several guitar plugins, Ample Sound has yet to stop in pursuing other string instruments recently coming up with an upright bass and now a ukelele. Ample’s Ethno Ukelele available in 32-bit and 64-bit plugins is a detailed virtual ukulele for both iOS and Windows and even offers a stand alone version.
Using a high-end hand-made koa wood ukulele from Hawaii to keep up with its high standards for instruments. The Kamaka HF-3 is the exact model used for Ethno sounds very different from inexpensive ukulele competitors. Warm and less brittle with the luxury of an automatic double tracking option.
Read more here: http://bedroomproducersblog.com/2017/06/21/ample-ethno-ukulele-review/
Platform – A Studio Desk By Output
Output, a company well known for its virtual instruments, unveils a first for them. I refer to Platform, a studio desk fit for musicians.
Known for innovative instruments like Analog Strings and REV to name a few, Output breaks the mold by releasing its latest product answering the call to the lack of quality and affordable furniture for musicians. Their goal according to CEO and Founder, Gregg Lehrman is to help musicians, producers, and composers to make music and in doing so is not limited to software and instruments. Platform unlike any other furniture out there was meant to be at the center of your studio.
Read more here: http://www.musictech.net/2017/06/output-unveil-platform-desk/
Outlook By Mode Audio
ModeAudio has released something new and it’s a hybrid. Combined with this analogue synths are the delicacies of orchestral and acoustic instruments, Outlook which is available in your choice of format, Acid WAV, Rex2, Reason, ReFill, or Live Pack. Packed with the numbers with 55 samples, 89 drum percussion 87 MIDI files, and 155 loops there is just so much you can do with this hybrid is truly a beautiful sounding set. Outlook also features acoustic and electronic instruments and percussion 445MB of 24-bit audio and 10 live 9 projects. Available in Ableton version where you can get 10 more projects with each kit in session view.
Read more here: http://www.musictech.net/2017/06/mode-audio-outlook-review/
Audio Normalization: What Is It And Should I Care?
 If you’ve heard the term “audio normalization,” or just anything like “you should normalize your audio?” you may well wonder “what the heck does that mean? Isn’t my audio normal? Do I have abnormal audio?” And you would be right to wonder that. Because the term is not really very self-explanatory. So what else is new in the audio recording world?
To answer the questions in the title – let’s take them one at a time, but in reverse order, because it’s easier that way:).
Should I Care What Audio Normalization Is?
Yes.
That was easy. Next.
What Is Audio Normalization?
You COULD just use the definition from Wikipedia here. But good luck with that. As is typical with audio terminology, that definition is super confusing.
It’s actually pretty easy to understand and not really that easy to put into words. But I’ll try. When you “normalize” an audio waveform (the blobs and squiggles), you are simply turning up the volume. Honestly, that’s really it. The only question is “how much does it get turned up?”
The answer to THAT takes just a little tiny bit of explaining. First, let’s recall that with digital audio, there is a maximum volume level. If the audio is somehow pushed beyond that boundary, the audio gets really ugly because it distorts/clips.
Some Ways That Digital Audio Is Weird
This maximum volume level I mentioned is at 0 decibels (abbreviated as “dB”), by the way. Digital audio is upside down. Zero is the maximum. Average levels for music are usually between around -13 decibels to -20 decibels, or “dB” for short. Really quiet levels are down at like -70 dB. As the audio gets quieter, it sinks deeper into the negative numbers.
Yeah, digital audio is weird. But as long as you buy into the fact that 0 dB is the loudest the audio can gt before clipping (distorting), you’ll know all you need to know.
So Ways All Audio Is Weird
In case you didn’t know this, sound/audio is caused by waves in the air. Those waves cause air molecules to vibrate back and forth. The way a microphone is able to pick up audio is that those “air waves” ripple across the surface of a flat thing inside the mic. That causes the flat thing to move back and forth (in the case of a dynamic mic) or to cause back-and-forth electrical pressure in the case of a condenser mic. For more detail on this, check out my post What Is the Difference Between Condenser and Dynamic Microphones?
Some What Is The Weird Part?
Audio waves show up in audio software in a weird sort of way. For instance, you might expect the quietest audio to be at the bottom and the loudest to be at the top. But that isn’t the way it works with audio.
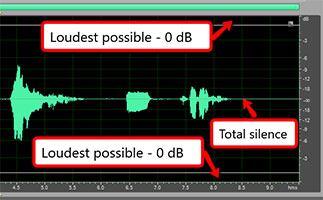
Because of the fact that audio comes from waves – the back-and-forth motion of air molecules – the loudest parts of audio are shown at the top AND bottom, and absolute silence is in the middle. Since pictures make things easier, see Figure 1.
So rather than thinking of the maximum allowable volume level as a “ceiling,” which is what I was going to do, let’s think of it like a swim lane. And in this swim lane, BOTH edges are boundaries not to be crossed.
This also means that when looking for the loudest part of your audio, you have to look both up AND down. Admit it. That’s a little weird. As it happens, the loudest part of the audio in our example below is in the bottom part of the audio.
Normalization Math
OK, back to normalization. Let’s get back the the question of how much audio is turned up when it’s being normalized. The normalization effect in audio software will find whatever the loudest point in your recorded audio is. Once it knows the loudest bit of audio, it will turn that up to JUST under 0 dB (you can set this in the Normalize controls to be AT 0 dB or whatever level if you want). So the loudest part of your audio gets turned up to as loud as it can be before clipping.
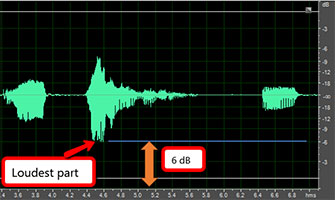
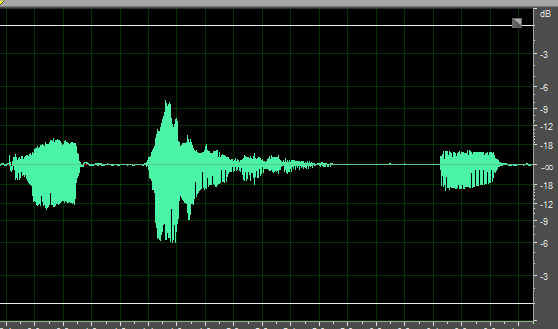
Let’s say the loudest part of your audio, which is a vocal recording in our example, is a part where you shout something. See Figure 2 for an example.
And let’s say that shout is measured at -6 dB. The normalization effect will do some math here.
It wants to turn up that shouted audio to 0 dB. So it needs to know the difference between how loud the shout is, and the loudest it could possibly be before distorting.
The simple math (well, that is if negative numbers didn’t freak you out too much) is that 0 minus -6 equals 6. So the difference is 6 dB.
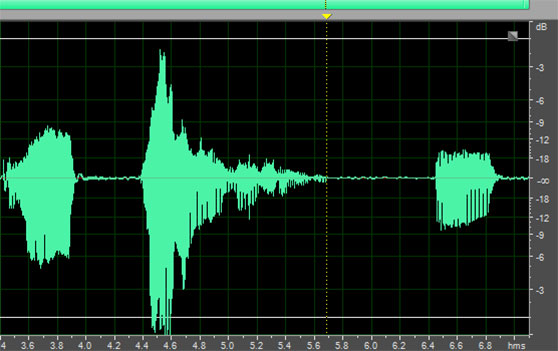
Now that the software knows to turn up the loudest part of the audio by 6 dB, it then turns EVERYTHING up by that same amount.
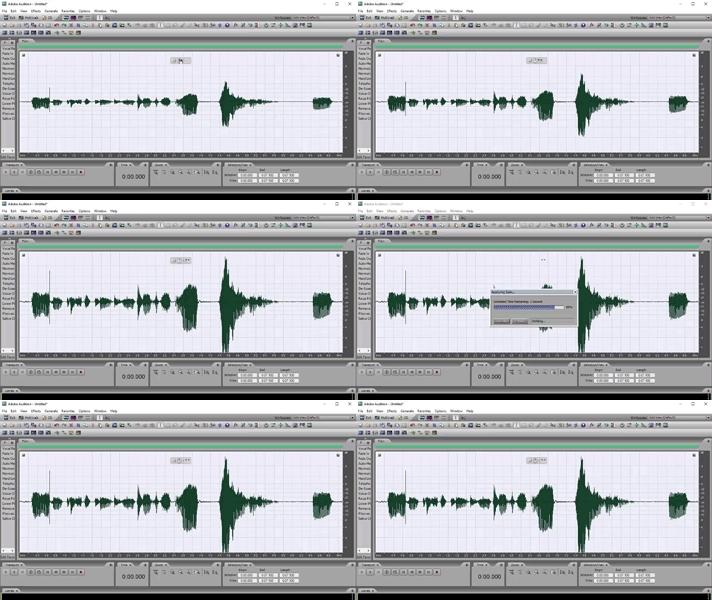
Let’s look at a “before” picture of our example audio.
And here is what it looks like AFTER normalization.
That’s It?
Yeah. That’s it. Remember I said that audio normalization was really just turning it up? I know it took a fair amount of explaining, but yeah. The only reason to normalize your audio is to make sure that it is loud enough to be heard. That could be for whatever reason you want.
Use With Caution
As I have preached again and again, noise is the enemy of good audio. Before you even normalize your audio, you’ll want to be sure you’ve gotten rid of (or prevented) as much noise as possible from being in your audio recording. See my post series on how to do that here: Improve The Quality Of The Audio You Record At Home.
The reason it’s so important is that by normalizing your audio, you are turning it up, as we have seen. But any noise that is present in your recording will ALSO get turned up by the same amount. So be very careful of that when using this tool. Audio normalization is powerful, and so can also be dangerous.