 A lot of people get monitors but never get the most out of them. They never get the maximum potential out of the monitors, this is often due to placement and position of monitors and desks. To find out more, check out this article by Mitch Gallagher at sweetwater.com to find out more http://www.sweetwater.com/insync/six-ways-to-get-the-most-from-your-studio-monitors/
Archives for August 2015
2 Brand New Sound Library Collections From Kontakt
DJSH Music is a new sound developer who is offering up two new sound library collection in partnership with Kontakt. Each collection includes roughly 100 patches with pads, textures and atmospheres that can be changed using a variety of effects and filters. These libraries are incredibly versatile, and can be used for film, television and music. To check out more info about it, click the link to the article from en.audiofanzine.com http://en.audiofanzine.com/other-virtual-synth/djsh-music/nova/news/a.play,n.20940.html
Basic Overview Tutorial Of The SWS ReaConsole
T he SWS ReaConsole is a way to much more easily use REAPER Effects. From selections to volume to bypass fix, the SWS ReaConsole is the way to go.But how does it work? Well, click the link to the article at reaperblog.net to find out http://reaperblog.net/2015/07/the-sws-reaconsole-basic-overview-tutorial/
Adding An Effect To Just Part Of An Audio Track In Reaper
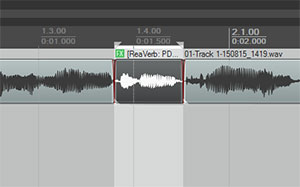 Have you ever been working on mixing audio tracks in a digital audio workstation (DAW) program (such as Reaper, Pro Tools, Sonar, Ableton Live, Logic Pro, etc.), and wanted to apply an effect to only one small section of a track? There don’t seem to be any obvious ways to do it, since effect plugins are almost always applied to the entire track. Well though it isn’t obvious, there is a quick and easy way to do it in Reaper. Here’s how.
What’s In A Track?
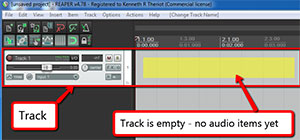
First it might be handy to review what a track actually is. Basically, it’s just a container that we see on the screen of a DAW, usually stretching horizontally across the screen. See Figure 1.
When you record (or insert) some audio, it goes into a track – you can see the “blobs” (the non-technical term for how audio wave forms are visualized:-P) in the track as you record them. When you stop recording, you have created an “audio item” in a track. See figure 2.
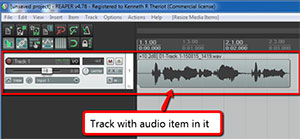
You can add more audio items into the same track, either by recording more audio or inserting a previously recorded audio file. You can also slice up a single audio item. There are several reasons someone might want to do this, but let’s say you have recorded a voice onto a track and want to apply an effect – say, reverb, for example – to JUST one word or phrase of that audio.
Usually, when you want to add an effect in Reaper, you click the “FX button on the track control panel (the area on the left of the track with all the buttons and knobs), and select your plugin. The assumption is that you’d want to apply that effect to the entire track. But that doesn’t help us here, does it? We only want that one phrase to have the reverb on it (this could be any effect though, like EQ or compression, etc.).
Split That Audio
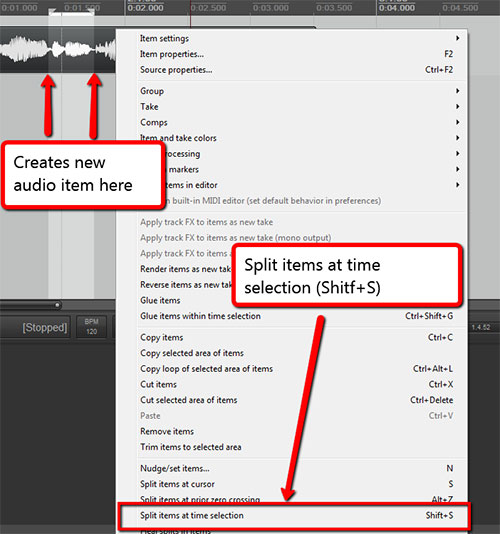
Reaper allows you to apply effects ONLY to an audio item in a track, even if you don’t have an effect selected in the track control panel. So in our example, you’d need to make your phrase its own item by “splitting” it. To do this, highlight the phrase and then right-mouse click anywhere on the audio item. This displays a drop-down menu of all sorts of things you can do to your audio item. We are looking for “Split items at time selection.” See Figure 3.
The keyboard shortcut for this action is “Shift+S.” It places a split at the edges of your selection. So be sure those edges start just before your phrase and end just after it.
Put Effect Only On Your New Item
So now that you’ve created a new audio item for the phrase you want to put reverb on, right mouse-click on your phrase to launch that drop-down menu again. This time, choose “Item Properties,” which brings up the Media Item Properties box. See Figure 4.
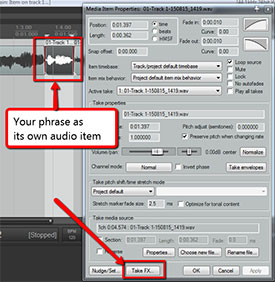
You want the button at the bottom that says “Take FX.” The term “take” is another word for “item” – as in “take 1, take 2,” etc. Anyway, clicking that button allows you to choose a plugin the same way as the “FX” button on the track control panel. But it will only apply that plugin effect to your item – exactly what we wanted. Cool, huh?
It takes a lot longer to explain that to actually do. It’s really easy and can be very useful for a number of things. Maybe you want to use EQ or compression to fix some audio problem in only a couple of places on a track. You can also use this technique to turn the volume down quickly on just a piece of audio by dragging the top of the item down.
So if you were wondering how you could apply an effect to just one small part of a track without affecting the rest of the audio on that track, now you know how to do that in Reaper.
Unlocking The Great Mix Hiding in Your Tracks

There is more potential in a track than we realize. We never know, there could be a killer final mix just lingering inside one of our tracks, just waiting to come out. So, if you want to unleash the hidden potential inside your tracks, check out the article from therecordingrevolution.com http://therecordingrevolution.com/2015/07/27/how-to-unlock-the-great-mix-hiding-inside-your-tracks/