 I was working on a long voiceover recording job last week. After it was all recorded, I began the long process of editing it for the client. That involved not only optimizing the volume and minimizing the noise, but also creating 27 separate files. Things were progressing nicely, but then I heard an odd sound behind the voice at one point. You can probably guess by the title of the post what that sound was. Sigh.
Keep in mind that most voiceover jobs do not involve multitrack recording. That is to say, there is only one single track of audio being recorded. So if you hear a bird’s hoot AND your voice together on the recording, you can’t just “delete” the bird sound. In multitrack recording – such as you would use for most music recording – you purposely put different sounds on their own tracks so you can adjust the volume of each sound until it all mixes together nicely. THEN you render (mix down) the result to a single file. But I did not have the luxury of simply turning down the bird hoot. How in the world do I get rid of it?
OK, sure. I could just re-record that part when the bird is NOT outside my window. But that smacks of effort. I like to do things the easy way if I can. Yes, you may substitute the word “lazy” into that last sentence:-P. Anyway, there are some audio editing tools that you can use to reduce (or even eliminate) one type of sound, while leaving the desired audio alone. One of the best of these tools is EQ (short for “equalization”).
If the undesired audio has a much different frequency than the desired audio, then EQ can help filter out what you don’t want to hear. Sadly, this is not always the case. Sometimes, in order to remove one sound, you end up removing some or most of the sound you want to keep. But in this case, I was in luck.

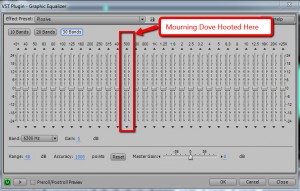
One other piece of good fortune was that a small amount of the dove noise was sounding during a section when the voice was not talking. It wasn’t enough to sample into a noise-reduction effect (unfortunately – because that is another good way to filter out the bad while leaving the good). So I highlighted the small bit of audio that had ONLY the mourning dove hoot in it. Then I opened the Graphic Equalizer tool in Adobe Audition (I still use version 3, but Audition is also part of Adobe CC – Adobe Audition CC [Digital Membership]
Awesome. Now that I knew that this particular mourning dove hooted at 500 Hz, I went back to the audio with both the voice AND the bird hooting in it, and highlighted that section. Then I just opened the Graphic Equalizer and started moving the slider at 500 Hz down, which turns down the volume at just that frequency. Now voices also produce sound at 500 Hz, so it I turned things down too much, the voice would also be affected. But in this case, by the time I moved the slider down enough to get rid of the dove, the voice still sounded fine. It probably helped that it was a female voice.
And the bird was gone! the entire process took about 60 seconds, which is a lot less time than it would have taken me to re-record the voice.
So the next time you have a bird outside your window threatening to ruin your recording session, remember this method. It might save you time and money. Of course, you could always build you own vocal isolation booth to record in. But that’s another topic altogether.
Cool! Could you post a before and after clip of the dove noise fix so we can hear how well it worked?
Thanks,
Dan
Dan. That’s a great idea. I thought about that after I finished the post. I’ll have to go through the 30 minutes of audio again to find out where it was again:). But I’ll, try to do that. I may actually have to wait until the bird is outside the window again and record and exemplar to re-create the issue. I’ll let you know if I manage it. Thanks for the suggestions!
Ken
Hi Ken. The most important thing for me now is to: 1) establish a click track with clicks visibly separated. 2) Record music on a second tract with the click tract audible through ear phones and seen clearly on screen; 3) record a third track in sync with both previous tracts heard through earphones and seen on screen. 4) repeat item 3 many more times. Please tell me how to do this.
I also downloaded the most recent Audacity with my Windows 7 operating system. I cannot record any sound. I can establish the click tract, but the beats are visually too close together. I tried to get help on the forum, but that was hopeless. The password you gave me for Newbies course was the word password. I will appreciate your help. PJ
Paul, the use of a click track is pretty common. But having it be visual is less so. What is the reason for wanting it to be visual? However, its a pretty simple matter in Audacity. You said you were able to generate one, but if the pulses were too close together, it means that your tempo was too fast. All you have to do to generate one with the pulses more spread out is to choose a slower tempo. In Generate/Click Track (in Audacity), just drag the slider next to the first window where it says “Tempo [beats per minute]” to the left to get a smaller number. The default is set to 120 beats per minute. Try something like 90. Then just keep experimenting until you get the right space between the beats.
Does that help?
Ken