 Wow! Even the title of this post started to make my brain seize up before I was even done writing it. The phrase “bored already” comes to mind.
But I left it that way because folks who have done lots of recording before will understand what a submix bus (sometimes – even by me, depending in part on how much caffeine I’ve had – spelled “buss“) is.
If you don’t know what it is, see my article What is a Buss in Audio Recording?
OK, now I expect everyone to know what a submix bus is. You DID read your assignment didn’t you? I thought so. In most multitrack audio software programs (usually called digital audio workstations, or DAWs for short), if you want a submix (like the example of “one track to rule all the harmony tracks,” remember? From your reading?), you first have to create a special kind of track – a bus.
Then for each of the tracks whose audio you want inside the submix, you have to disable the “sends” going to the master bus. That’s because a bus track merely taps the audio on its source tracks – like creating a clone of it. It doesn’t stop those tracks from ALSO sending their audio to the master track. If your goal (as it often is with a submix) is to be able to control the volume of ALL the tracks in the submix group (like all the harmonies, say) with just a single knob/slider (the one on the submix bus track), then ALL of the audio from each of the original tracks needs to be routed through the submix track. Otherwise (I’m going back to the clone simile here), you could make the harmony clones be quiet by turning down the volume on the harmony submix track. But the originals – the “not clones” – are still yapping away, making all kinds of loud harmony-type sounds. Your submix track can’t control the originals! So you must destroy the originals (Insert dramatic music here) by disabling those “sends” headed for the master bus.
Enter The Track Folders
In Reaper – my favorite DAW – they have something called track Folders. They make it soooooo (is that enough “Os”?) easy to create a submix. Here is how you do it. Don’t look away because you might miss it (it’s THAT quick and easy)!
- Insert a new track (no need to worry about what KIND of track or anything) above your harmony tracks.
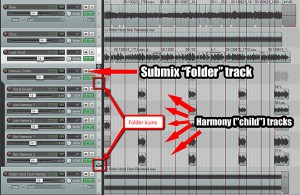
- Click on the little folder icon on the right side of the new track’s control panel.
- Click the folder icon of the last harmony track twice. Done!

It took longer to type that than to actually do it. Assuming you have the correct mix (relative volumes) of the harmony parts against each other, all you have to do to control EVERY harmony in the folder track – put on reverb, turn them up or down in volume, compress them, etc. – is do it to that top track.
As I mentioned above, the tracks that get put into a folder are shown as indented (see the picture on the right), and are considered “child” tracks in the folder. The folder track at the top is the controlling or “parent” track for the submix created by the folder.
Using folders in Reaper is a HUGE time saver, and the best way to create a submix that I know of.
By the way, you can still do everything in Reaper “old school,” like creating “sends” from each harmony track and directing them to a new track that you call a “bus,” etc. if you want to. Maybe you have some special need for doing things the hard way, or maybe you want to teach someone how it used to be done in the old days. Some folks may want to do it this way for a very specific and unusual effect or something. But as far as I’m concerned, folders are the way to go!
Always glad to be the inspiration for a blog entry!
That’s twice in as many weeks! Keep ’em coming:).
Ken
I pretty much only use Reaper, but I also have Studio One. My question is… is it possible to move the “Parent” folders to all be next to each other, but still keep them as parents to the child tracks? Basically what I am asking is, is it possible to keep all of the “master/parent/buss” tracks all right next to each other on the screen/in the mix window, without having all of the other audio “Child” tracks in between them? I feel like that would make for much more efficient mixing, instead of having to scroll up and down to find the parent folder you are looking to manipulate, if you have a large session, say 80+ tracks.
Thanks!
-Chris
Chris, if I get what you’re asking, then the answer is yes. You can move tracks around wherever you want them to organize them. You can also minimize child tracks to save space. Also, if you’re done treating/mixing a certain track(s), you can hide those tracks completely. And once I get beyond 12-20 tracks, I make a LOT more use of the Mixer panel along the bottom, which allows you to see a lot more tracks simultaneously, as it is laid out like a traditional mixing desk (vertically, not horizontally). Does that help?
Hi Ken, thanks for The post. Though I have run now into a VERY big problem with folder system.
Say you have a drum submix (the folder way you praise and the way I also did, up until yesterday) and now imagine you have a send from the snare to a reverb aux. The problem is that when you lower the Volume of the drum submix you are not lowering the volume of the reverb of the snare. In fact, if you turn you drum bus all the way down, the snare will keep yaping away in the reverb aux. Any idea how to counter this Huge problem?
Because I used to love folders and have some volume automations there to finish the mix. And now I just realise that all my Aux were not following what I was doing concerning the true volume of the tracks when you think that their true volume is their natura one plus the sound coming out of the aux.
I’ve tried just about everything but I’m beginning to wonder if we really do have to do things the old way..
JR,
Why use a send on the snare track for its reverb. Just add the effect to the snare track using the FX button on the track. I don’t bother with sends unless it’s absolutely necessary. What am I missing?
Ken
@Ken Theriot, if you are using send instead of inserting the FX directly on the snare, then you can send other tracks as well to the same FX return (reverb) channel. This saves you CPU, but more importantly, you mingle different tracks in the same FX, making your mix more coherent. Last but not least, you can flexibly manipulate the return channel (adding eq or modulation, etc.).
@JR, you can tackle the issue you mentioned by linking (grouping) the faders of your drum folder (or submix channel) and the reverb channel.
Thanks Can.
Ken
I have a little problem with a group of processed drum tracks. If i group them or route them to a bus, there will be a constant white noise if the drums are not playing in the song. You even could see it in the mixer. Hope you have an idea to solve this. Is this a Problem of bridged x86 plugins?
There are too many things it COULD be for me to know for sure. But it SOUNDS like noise got into your drum mics. If each mic had background noise, and you combine them into a folder/buss, that noise will not only be multiplied by however many mics you had, but will obviously be audible when the drums are not playing. My advice in any case is to put a noise gate plugin on your drum folder track. That way there will at least be no noise when they are not playing. I’d alternately try putting the gate on each drum track, rather than (or experiment with “in addition to”) the Folder track.
I hope that helps.
Ken
I love Reaper, but a have big problem. Sands sound not like original tracks? And Buss too. Sounds like a little chorus fx + EQ. But folder sounds good, same like original. It’s only on my system?
Dmitry,
Reaper doesn’t add effects to your sounds unless you tell it to. There is no chorus or EQ added. Not sure what is happening with your audio, but it isn’t Reaper doing it unless you’ve somehow got it automatically adding those effects.