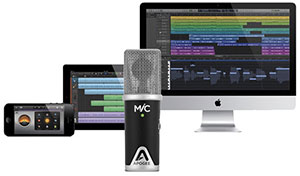
In 2011, Apogee Electronics was one of the first companies to come out with a microphone designed specifically for iOS devices – iPhones, iPads, etc. The microphone was the Apogee MiC. It could record studio quality (24 bit up to 44.1/48kHz) audio on an iPad, iPhone or Mac computer (via USB) without having to use Apple camera connection kit. You just plugged it right into your device with the 30-pin connector (or USB cable for the Mac) and could start recording immediately.
Now in July, 20214, comes the new version of the Mic: The MiC 96K. It comes with a Lightning Cable for the new generation of iOS devices. and as the name suggests, it can record at a higher sample rate (how many times per second the built-in converter sample audio) of 96KHz. The new version also comes with a mic stand adapter (the original only had a desk stand).
The Apogee MiC 96K is now available! Find out more about this fabulous microphone – or buy one for yourself – by CLICKING HERE.
Archives for July 2014
Filter The Mourning Dove Hoot Out Of The Voiceover Recording
I was working on a long voiceover recording job last week. After it was all recorded, I began the long process of editing it for the client. That involved not only optimizing the volume and minimizing the noise, but also creating 27 separate files. Things were progressing nicely, but then I heard an odd sound behind the voice at one point. You can probably guess by the title of the post what that sound was. Sigh.
Keep in mind that most voiceover jobs do not involve multitrack recording. That is to say, there is only one single track of audio being recorded. So if you hear a bird’s hoot AND your voice together on the recording, you can’t just “delete” the bird sound. In multitrack recording – such as you would use for most music recording – you purposely put different sounds on their own tracks so you can adjust the volume of each sound until it all mixes together nicely. THEN you render (mix down) the result to a single file. But I did not have the luxury of simply turning down the bird hoot. How in the world do I get rid of it?
OK, sure. I could just re-record that part when the bird is NOT outside my window. But that smacks of effort. I like to do things the easy way if I can. Yes, you may substitute the word “lazy” into that last sentence:-P. Anyway, there are some audio editing tools that you can use to reduce (or even eliminate) one type of sound, while leaving the desired audio alone. One of the best of these tools is EQ (short for “equalization”).
If the undesired audio has a much different frequency than the desired audio, then EQ can help filter out what you don’t want to hear. Sadly, this is not always the case. Sometimes, in order to remove one sound, you end up removing some or most of the sound you want to keep. But in this case, I was in luck.
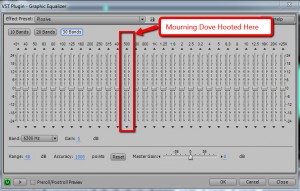
One other piece of good fortune was that a small amount of the dove noise was sounding during a section when the voice was not talking. It wasn’t enough to sample into a noise-reduction effect (unfortunately – because that is another good way to filter out the bad while leaving the good). So I highlighted the small bit of audio that had ONLY the mourning dove hoot in it. Then I opened the Graphic Equalizer tool in Adobe Audition (I still use version 3, but Audition is also part of Adobe CC – Adobe Audition CC [Digital Membership]). While listening to the hooting on a loop, I just started dragging down sliders (each slider is set to a specific frequency). If it didn’t silence the bird, I reset the sliders and tried the next one. It only took me about 10 seconds to locate the right frequency, which happened to be 500 Hz.
Awesome. Now that I knew that this particular mourning dove hooted at 500 Hz, I went back to the audio with both the voice AND the bird hooting in it, and highlighted that section. Then I just opened the Graphic Equalizer and started moving the slider at 500 Hz down, which turns down the volume at just that frequency. Now voices also produce sound at 500 Hz, so it I turned things down too much, the voice would also be affected. But in this case, by the time I moved the slider down enough to get rid of the dove, the voice still sounded fine. It probably helped that it was a female voice.
And the bird was gone! the entire process took about 60 seconds, which is a lot less time than it would have taken me to re-record the voice.
So the next time you have a bird outside your window threatening to ruin your recording session, remember this method. It might save you time and money. Of course, you could always build you own vocal isolation booth to record in. But that’s another topic altogether.
Incredible New Mic Stand Technology: Triad-Orbit
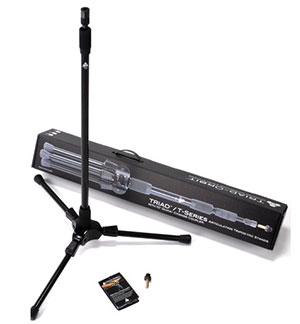
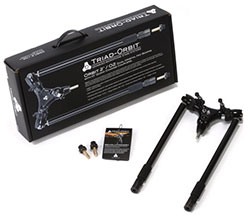
I am having one of those “I-have-got-to-get-me-one-of-these” moments right now. I just found out about a new microphone stand that solves a lot of problems I really need solving. I know, what in the way of “innovative” can be brought to the lowly mic stand? the answer is the Triad-Orbit modular mic stand system. The Triad-Orbit has interchangeable parts that allow you to – are you ready for this? – snap on/off a shock-mount or microphone in like 3 seconds! I can’t tell you how much time I’ve in my life changing microphones. Studio mics tend to have their own clips, and/or their own shock-mounts. Usually, to move my primary microphone (Rode NT2-A) from its normal position on my desk boom to a mic stand in the middle of the room, I have to remove the heavy mic from the shock-mount. Then I have to unscrew the shock-mount from the desk boom. Next, I screw the shock-mount onto the new stand. And finally, I screw the mic back into its mount. The entire operation takes 3-to-5 minutes. With the Triad-Orbit system, I could uncouple the mount with the mic in it from the desk boom and clip it onto the new stand in about 5 seconds. And that is only 1 of the cool things the Triad-Orbit system can do. Each Triad stand uses the standard 3-leg set-up, but those legs have 4 ratcheting positions. That means you can change the angle of each leg. If floor space is an issue, this allows you to shrink the stand’s footprint. And since each leg can be adjusted independently, the ratcheting ability allows you to angle the stand into unusual positions.
There are several other advantages to the Triad-Orbit system, including different attachments like the Dual-Arm boom, which allows you to do stereo mic set-ups with just one stand, get multiple mics into multiple positions – like drums – with just one stand, etc. And then there’s the iOrbit 1, which is an orbital iPad holder. So you can put a mic and an iPad on the same stand with the Triad-Orbit mic stand system. For more details, CLICK HERE.
The New Zoom H5 Handy Recorder Finally Available
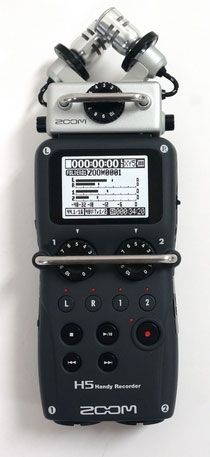
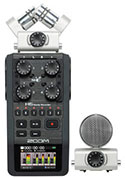
The long-awaited Zoom H5 Handy Recorder (the smaller, more affordable version of the H6) is finally here!
The Zoom H-series of hand-held digital recording devices are incredible – allowing you to record pro quality audio with an all-in-one unit (mics, power, preamps, conversion, storage and even some editing!) that you can hold in your hand (hence…..the term….hand-held:-P).
Anyway, the Zoom H5 Handy Recorder was recently announced, boasting all the essential features of the much more expensive H6, but smaller and more affordable. However, though the tantalizing description has been out there for a bit, you couldn’t actually get your hands on one. Now you can get your own if you CLICK HERE.
So what is the H5? Well, let’s start with one of its predecessors, the Zoom H4n. It was incredible for any number of on-the-go recording applications, and it became the “holy grail” for videographers and film-makers (especially the ones using DSLRs) because it allows you to record fantastic audio while doing location shoots, something very difficult to do. Also, you could use the H4n as an audio interface for your computer because it had two XLR (standard 3-pin) mic inputs. It was fabulous for any number of mobile recording purposes.
Zoom then improved on the H4n, which was already recognized as a world-class “next gen” portable audio recorder, by coming out with the H6, which is mind-blowing. It fixed all the things that were a bit bothersome about the H4n, like sometimes not providing enough gain, noisy level buttons, etc. Plus there are tons of new features with the H6 – the most amazing of which is the modular/interchangeable mic system that allows you to switch out the standard X-Y stereo mic on top with an array of other mic modules, including a shotgun, mid-side (MS), and dual XLR/TRS. They also added improved preamps, a color screen, and a number of other bells and whistles. And for all of this awesomeness, the price of the H6 ($399.99) is just about double that of the H4n.
Enter The H5
The H5 scales back on some of the features on the H6 – things like the color screen, number of inputs, etc. But the H5 retains all the essentials. For example, it has the same audio recording quality, modular mic system compatible with all the H6 Mic Modules, physical transport controls, etc. as the H6. It’s also quite a bit smaller, making it more convenient. And the best news of all? The price! The H5 is only $269.99, 130 bucks less than its big sibling. That makes it much more accessible for hobbyists (or anyone else on a tough budget), while continuing to provide professional level quality.
So now that they are in stock at B&H, CLICK HERE to get yours:).
Cheers!
Ken
Folders In Reaper Instead Of Submix Busses
Wow! Even the title of this post started to make my brain seize up before I was even done writing it. The phrase “bored already” comes to mind.
But I left it that way because folks who have done lots of recording before will understand what a submix bus (sometimes – even by me, depending in part on how much caffeine I’ve had – spelled “buss“) is.
If you don’t know what it is, see my article What is a Buss in Audio Recording?
OK, now I expect everyone to know what a submix bus is. You DID read your assignment didn’t you? I thought so. In most multitrack audio software programs (usually called digital audio workstations, or DAWs for short), if you want a submix (like the example of “one track to rule all the harmony tracks,” remember? From your reading?), you first have to create a special kind of track – a bus.
Then for each of the tracks whose audio you want inside the submix, you have to disable the “sends” going to the master bus. That’s because a bus track merely taps the audio on its source tracks – like creating a clone of it. It doesn’t stop those tracks from ALSO sending their audio to the master track. If your goal (as it often is with a submix) is to be able to control the volume of ALL the tracks in the submix group (like all the harmonies, say) with just a single knob/slider (the one on the submix bus track), then ALL of the audio from each of the original tracks needs to be routed through the submix track. Otherwise (I’m going back to the clone simile here), you could make the harmony clones be quiet by turning down the volume on the harmony submix track. But the originals – the “not clones” – are still yapping away, making all kinds of loud harmony-type sounds. Your submix track can’t control the originals! So you must destroy the originals (Insert dramatic music here) by disabling those “sends” headed for the master bus.
Enter The Track Folders
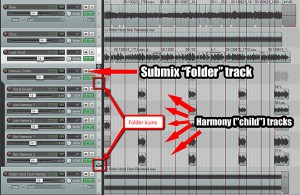
In Reaper – my favorite DAW – they have something called track Folders. They make it soooooo (is that enough “Os”?) easy to create a submix. Here is how you do it. Don’t look away because you might miss it (it’s THAT quick and easy)!
- Insert a new track (no need to worry about what KIND of track or anything) above your harmony tracks.
- Click on the little folder icon on the right side of the new track’s control panel.
- Click the folder icon of the last harmony track twice. Done!
It took longer to type that than to actually do it. Assuming you have the correct mix (relative volumes) of the harmony parts against each other, all you have to do to control EVERY harmony in the folder track – put on reverb, turn them up or down in volume, compress them, etc. – is do it to that top track.
As I mentioned above, the tracks that get put into a folder are shown as indented (see the picture on the right), and are considered “child” tracks in the folder. The folder track at the top is the controlling or “parent” track for the submix created by the folder.
Using folders in Reaper is a HUGE time saver, and the best way to create a submix that I know of.
By the way, you can still do everything in Reaper “old school,” like creating “sends” from each harmony track and directing them to a new track that you call a “bus,” etc. if you want to. Maybe you have some special need for doing things the hard way, or maybe you want to teach someone how it used to be done in the old days. Some folks may want to do it this way for a very specific and unusual effect or something. But as far as I’m concerned, folders are the way to go!