I just read an article with some tips for setting up a recording session. The post mainly focuses on recording a music session but the ideas are also applicable to any recording session.
It starts with the idea of pre-recording prep. The first item talks about making sure your instruments sound good. That means that guitars are tuned, not only to themselves and to a correct reference pitch, but to any other instruments that will be used. those include other guitars, basses, pianos, etc. I can relate to this one very well. My latest client often ends up playing my guitar rather than his own, and we have wasted time trying to get my instrument tuned when I didn’t do it before the session.
The checklist goes on to list other tips such as testing and/or replacing drum heads, warming up the singer, checking amps for hum and buzz, etc.
To the list the author provides in the article, I humbly suggest you add the following things:
– Have the computer on and the recording software already open.
– Set up the mic stands with the mics already on them and cables all ready to plug in.
– Have some snacks and water ready for the talent – and for the engineer;).
– Make sure the recording software program is set up to record the kind of session you’re planning. For example, sometimes I use different interfaces for various reasons, and I find my program (usually Reaper) does not have the current interface (the one I want to use for the session) selected. This can be confusing and cause a big delay if you’re not careful to check it before hand.
Check out the full article here: https://www.audio-issues.com/recording-tips/ultimate-guide-getting-great-recordings-even-dont-clue/
Archives for May 2013
Tips For Removing Breaths From Voice Recordings
 Recently, over at the Audio Daily Blog, the voice-over audio production blog at Voices.com, there was a post with suggestions about how to remove breaths from voice recordings. I figured I’d add my primary method for doing this to their list of 6 tips.
I typically record all my audio into Reaper, an outstanding multi-track recording program that rivals Pro Tools for a fraction of the cost. With music, and with move complex voice-over projects, I’ll do all my mixing in Reaper.
For voice-over jobs that require multiple parts – say a conversation between two or more people or a series of phrases that need exactly 3 seconds between them (I have done a lot of both types of jobs), Reaper is the tool I use to get everything in the right order and sounding good.
The Audio Editing Program
But after I create a single file by mixing it all down in Reaper (“rendering”), I open that single file in a different program – an audio editor – to do the final polish. Some folks consider this overkill, since so much can be done from within Reaper. But coming from a music recording background, I’m used to mastering my mixed-down/rendered audio. And to do that I use a separate audio recording software type called and audio editor. In my case, I use Adobe Audition. But there are much more affordable editors out there. I show you how to do this in Audacity (free) below, for example.
Adobe Audition
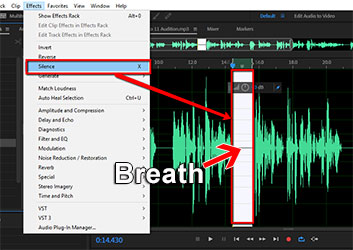
So once I open the rendered, “almost-finished” audio in my editor, I put the headphones on so I can hear every little breath, click, pop, etc. My primary tool within Adobe Audition for this is called the “Silence” tool (Effects > Silence). This tool removes all audio in a selected area, which is different from “deleting it!” If you delete the audio, you also delete that section of time. Silencing leaves the time alone, simply making it audio-free time.go through the audio, selecting breaths, and then silencing them with that silence tool.
Anyway, I actually silence all the sections between phrases to get rid of extraneous little noises that become audible when there is no vocal, including lots of the breaths. It works really well, and its fast.
Audacity
You can do the same thing in the free (but incredibly powerful) editing software, Audacity. The process is very similar. highlight just the breath sound between phrases and then locate the “Silence Audio Selection” button on the Audacity tool bar. See pic below.
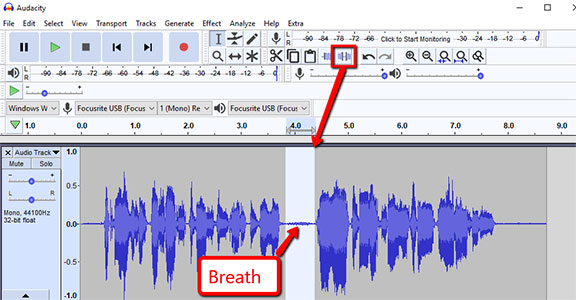
I love that there is a quick, visible button to use for this in Audacity. Adobe Audition (since moving to Creative Cloud) removed the quick button thing, which used to be there in the desktop versions. So you have to use the menu drop-down. That actually makes it easier to do in Audacity! Anyway, once you remove the breath using the button, you can just “Repeat Last Command” (CTRL-R) for the next breath and the next, instead of having to click the button every time, if you think it’s faster.
True Things No Matter What Editing Software You Use
Heed this warning though. A lot of breaths are just part of the way we speak, especially the breaths before a phrase (both my wife and I tend to put a little exhale or quick intake of breath sound at the end of our phrases. Most of these get silenced out. But many of the breaths that come before a phrase get left in, since people are used to hearing people breathe before they talk.
One more warning – if you silence most of the space between phrases, the start of a pre-phrase breath may be cut off. THAT will make the breath sound unnatural. You can fix that problem either by making sure the section you select for silencing does not include the start of the breath. Or you can use the “fade-in” tool if the start of a breath gets cut off. Creating a fade-in makes it sound natural again.
I hope this helps you get much better-sounding voice recordings!
By the way, the Audio Daily Blog post I referred to at the beginning of this article is here: http://blogs.voices.com/audiodaily/2013/05/6_tips_for_removing_breaths.html
Sound For Video: How To Get Good Audio On Your Videos
 It’s odd, but sound for video is often given little, if any, thought.
There are a lot of great-looking videos out there all over the web. Sadly, as many as half of these videos may look great, but they sound terrible.
Let’s talk about one particular kind of video – the talking-head video, meaning videos where someone is talking on-screen. Typically this is a person talking directly to the camera with usually only their head and shoulders being visible. That’s where the moniker “talking head” comes from. But any video where people are talking on-screen suffer the same problem and of course, have the same solution.
The primary cause of poor audio on talking-head videos is that there is too much distance between the speaker and the microphone. Combine that with the fact that a lot of web video is shot with camcorders, or even mobile devices now, using only the built-in mics, which are usually not designed for great audio. If you toss in a common 3rd element to most videos, the fact that the recording room or other space is not acoustically ideal, then you have a recipe for poor video sound.
Better sound for video: The solution for two of the root-causes
If you can somehow close the distance between your mouth and the microphone, you can hugely improve or even eliminate two of the problems I mentioned: the far-away sound and the poor acoustics sound. The reason for the latter is that the closer a mic is to your mouth (in most cases), the less of the ambient sound the microphone picks up. This makes the voice sound more immediate and clear. So the solution is to get the mic close to your mouth. Within a foot or two is optimal.
If your video camera has an external microphone input jack, you can plug a microphone into that. Many folks use lapel mics that clip to their clothing, putting it very close to the mouth. Another way to do this is to hold the mic close to your lips, as you’ve seen many a TV news reporter do.
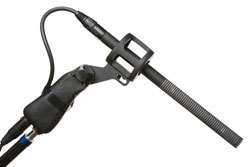
If you don’t want a microphone in your shot, you can do like they do in the movies. That is to put a microphone on a boom stand, or held by and audio guy with a boom pole, just a couple of feet over and away from the speaker’s face, just out-of-frame.
What kind of mic should I use for this?
Movies and TV shows typically use a specific kind of mic for this, called a shotgun mic. I did a review on a popular shotgun mic called the Sennheiser MKH 416, which you can see (and hear) here: Sennheiser MKH 416 Shotgun Microphone Review.
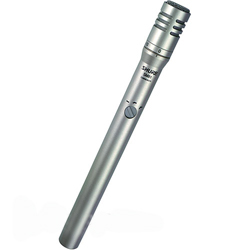
A popular alternative to shotgun mics, especially when shooting indoor video, is a small-diaphragm condenser mic (for a review of what that means, see our article What Are The Different Types of Microphones?). Sometimes these mics are called “pencil” microphones. For indoor shoots, pencil mics are usually less sensitive to room echo than shotguns.
So getting a decent microphone close to your mouth is the single best thing you can do to improve sound for video. But what if you don’t have an external mic jack on your video camera? Most camcorders don’t have seem to have them, if my shopping experience is anything to go by. Well if your camera cannot accept a microphone, you still have options. In fact your best option is to once again look to the folks making the TV shows and movies. Record the audio completely independent of the video.
So how do I record the audio separately?
If you have a computer in the room you’re using to record the video, you can use that, along with an audio recording interface. The one I used in the video below is the Focusrite Scarlett 2i2. I just plugged my pencil mic (Shure SM81) into the interface, which plugs into my computer via USB, and put the mic on a boom stand just out of frame.
The pencil-mic-into-an-audio-recording-interface combo can cost a few hundred dollars at least. So if you’re on a tight budget, you can actually use a USB mic in the same way! You can hear the result in the video below. I used a $49 USB mic called the Samson Q2U.
How do I sync the separate audio to the video?
In either case, what you do next is open your video in your video editing program (I used Vegas Pro in the video below), import the audio into it, sync it up with the camcorder audio (which will record its awful through the built-in mics on the camera) by putting it into a new audio track below the camcorder audio track. Then once the audio files are in sync (you can manually do this just by sliding the good audio around under the camcorder audio until they match up), simply delete or mute the camcorder audio, and voila! You have the good video with the good audio.
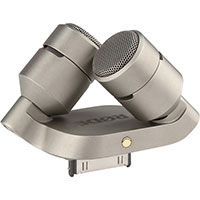
If you can’t get at least a laptop to where the video shoot is happening, you can use a mobile digital recording device like a Zoom H4, or any of a dozen other similar brands and models. These record high quality audio, usually onto SD cards, which you can then import into your video program. Of course you can get mics nowadays that plug straight into your smart phone. Some really good examples of these are the Apogee MiC or the Rode iXY. Rode even makes a lapel mic now that plugs into an iPhone or iPad – the Rode SmartLav.
In the video below, you can see and hear exactly what I’m talking about.
http://homebrewaudio.wistia.com/medias/umogpgxapc?embedType=async&videoWidth=700
If you have any tips on getting better sound for video, please leave a comment!
Cheers,
Ken
You Don't Need To Spend 860 Bucks On A Starter Studio
I just saw a video over on CNET that described setting up a home music recording studio for under $1,000. And that was supposed to make you think it was a great price. Holy cow! You can do much better.
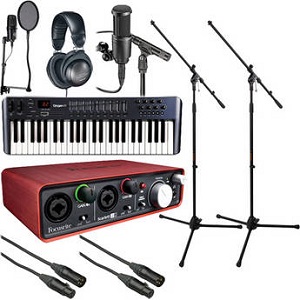
The CNET studio items are excellent. There is no doubt of that. But if you are not ready to drop $860 dollars for a starter studio, check out the same basic setup that B&H Pro Audio put together with my specs, and that will cost you only $399.99 – The Musicians Home Recording Starter Kit.
One thing that is important to note here is that the CNET package did not include mic stands, and it only included one mic – the large diaphragm condenser (Rode NT1-A). Our package has 2 mic stands, a large diaphragm Audio Technica AT-2020) AND a small diaphragm condenser mic (the latter being excellent for acoustic guitar and as a shotgun mic replacement on video shoots).
Yes, the Rode NT1-A is a very good mic. And so are a lot of mics over $200. But you know what? There are some excellent mics under $200 as well. The Rode is not necessarily the best choice for your first studio. Once you know that audio recording is going to feature prominently in your life or business, upgrade to the more expensive mics one at a time.
Oh, and you also get Pro Tools SE along with our package as well, just like the CNET recommendations.
So if you want a musicians starter studio that can record pro quality audio, you can get that for $496.95 from B&H, or build your own according to the CNET video for $896. Your choice:).
Check out the CNET recommendation here: http://cnettv.cnet.com/build-your-own-mobile-recording-studio-under-1/9742-1_53-50146360.html
Happy recording.
Ken
Video Tutorial – FL Studio Appegiator
There used to be a nice simple 4-channel digital drum machine program, released in 1998, called Fruity Loops. It allowed you to create sequenced drum and rhythm patterns, doing cool things like matching tempos of drum loops that you imported to the program. Well, a lot of things have changed in those 15 years, and one of them is that Fruity Loops has morphed into a pretty feature-packed full digital audio workstation (DAW) called FL Studio, used a lot by electronic musicians and DJs.
Below is a video by David Crandall showing you how to use the arpeggiator tool in FL Studio: