 In 2012 the likelihood that a decent recording microphone will be horribly mismatched with a decent mic preamp (included in the audio interface units I talk about on this site) is, in my opinion, really low. Now, when I say “decent,” I’m talking about microphones from well-known and respected manufacturers like Shure, Audio-Technica, Rode, Neumann, AKG, Blue, Mojave Audio, etc. Preamps (see our article – What is a Mic Preamp?) these days are almost always integrated with the audio interface, and in the case of a USB mic, integrated directly into the mic (so need for worrying about mismatches). When I say “decent” in the context of audio interfaces, again you’re unlikely to go wrong with units by companies like M-Audio/Avid, EMU, CEntrance, ART, PreSonus, Focusrite, Behringer, etc. Obviously there are more, especially in the very high-end market. But my point is this – if you have an Audio-Technica AT2035 microphone (see our review here: Review of the Audio-Technica AT2035 Microphone), you don’t need to worry whether plugging it into an M-Audio Fast Track C-600 interface. It’ll sound great!
However, I’m a fan of the old saw – knowledge is never wasted. And there are still times, especially when working with very high-end equipment looking for the pinnacle of conceivable performance specs, when it could be handy to understand how the electronics interact with one another to degrade or enhance the resulting sound. In that vein, I refer you to this article explaining the terms and numbers involved in mic and preamp specs:
http://www.prosoundweb.com/article/selecting_the_right_preamp_for_your_microphone/
Archives for November 2012
Creating Subgroups In Reaper and Pro Tools
 I just watched a video tutorial showing how to create instrument subgroups in Pro Tools. I was very pleased to see (in a petty kind of way) how much easier it is to do the same thing in Reaper;). But first, a bit of an explanation.
What is an instrument subgroup?
If you have 10 or 11 tracks of drums (one for the kick, one for the snare, one for the hat, and so on) in your song mix, it might be really handy once you get the relative mix of the drums just right (the volumes of the kick, snare, hat, etc. working well with each other) to control the volume of ALL the drums with just one volume slider when working to get the volume of the drums to work well with the rest of the tracks (vocals, guitar, bass, etc.). Well that’s exactly what a subgroup does. You set it up so that all the drums feed into a single new stereo track that you can call “Drums,” and then when you move any control on that new Drum track, it will affect ALL the drums. And it isn’t just the volume you can control this way. You can apply effects like reverb or compression or EQ to the Drum subgroup track, and those effects will be applied to all the drums. So now, not only can you control all the drums with just the controls on a single track, but you can save load on your computer’s CPU, since the effect is loaded only once (for the Drums subgroup track), rather than 11 times – once fore each individual drum track. And an added benefit is that you can make the drums sound more cohesive by putting them all through the same effect with the same settings.
Creating a subgroup in Reaper

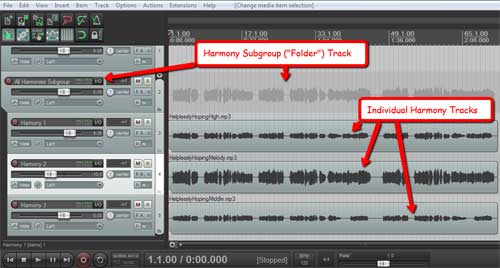
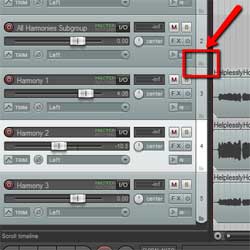
Let’s start with 3 harmony vocal tracks that you’d like to control with just a single subgroup track. Just create a new track above the 3 harmony tracks like in the picture on the top left. In the bottom right corner of the new, blank soon-to-be subgroup track (called a “Folder” track in Reaper) you’ll see a little folder-shaped icon. See Figure 2. All you have to do is click on that little folder button and it’s done! Every track underneath it gets indented to indicate that they are now inside that folder track, so to speak, and you can now control the volume and everything else – mute, solo, effects, etc.) of all the harmony tracks with just that one new subgroup/folder track.
One thing to be aware of here is that if you have other tracks below/after the harmony tracks that are not harmonies, tracks you don’t want in the folder, then you’ll need to click the folder icon (bottom left of the track control panel) for the last harmony track to tell Reaper that it’s the last track you want in the folder. This is because as I mentioned earlier, clicking the folder icon indents (incorporates into the folder) all the tracks below/after it be default.
Creating a subgroup in Pro Tools
In Pro Tools you still need to create a new track, and tell Pro Tools . Then you have to tell Pro Tools to use “aux (auxiliary) input.” Then you have to select an input for the new track, a “bus” input. Then you have to change the outputs of all the drum tracks (can do this at once by selecting them all) to the bus you used as the input for the subgroup track. You can see all this in the video below from PureMix. By the way, this video shows color coding of tracks. You can also do this in Reaper, which I show you how to do in my article here: Color Coding Tracks To Organize Your Mix
Louis Litt's Dictaphone Continues To Play A Supporting Role
 Who knew a digital voice recorder would star in a TV network series? When I wrote the article about the dictaphone owned by Louis Litt from the TV series, Suits, on the USA network, I didn’t have any inkling that this ” XJS 5000 Dictaphone” ( a fictional portable voice recorder that is, in reality, the Sony ICD-SX712 digital voice recorder) would continue to play such a pivotal role in the series. But every week since the voice recorder made its appearance, not only do we see Louis using it, but we see major plot points revolving around it.

Two episodes ago, the recorder was a comic device. We saw Louis making funny and ridiculous little recordings. One example is when Harvey says “you’re the man,” and Louis records it. Then when Harvey leaves the room, Louis plays it over and over, stopping to talk to his little machine saying things like “who’s the man?” and then hitting the “play” button to hear Harvey’s recorded voice saying “you’re the man” again, ad infintum. There were more funny recordings revealed in last night’s episode (July 26th) when Mike gets a hold of it and finds Louis’ recordings of “Goal number 7: perfect a British accent. Hey, top of the morning mate! Would you like some tea and crumpets?” and “You have been Litt up!”
But it seems all comedic actors eventually want some darker, more serious role. A few episodes ago, Louis left the recorder hidden in Harvey’s office and learned a secret Harvey was keeping from the newly-returned founding partner, Daniel Hardman. Louis then used that information to curry favor with Daniel and get back at Harvey for – well – anything really. There is no love lost between them. But I digress!
Last night Mike gave Harvey the recorder and revealed Louis’ treachery. Harvey then confronts Louis and another good dramatic role was had by the little digital voice recorder that could.
Since writing the original article, several folks have written in to vouch for how awesome the Sony ICD-SX712 digital voice recorder actually is. If you’d like to join Louis Litt in ownership of this cool little device, check it out here.
How To Remix "Upon a Summer's Day" For Two Couples
 Many recorded versions of traditional music require a particular number of dancers for the number of measures of music. What if you have more, or fewer dancers? For example, the standard number of repeats of Upon a Summer’s Day from Playford’s The English Dancing Master is correct for 3 couples, as the dance is described. But what if only 2 couples want to dance? Many recorded versions of traditional music require a particular number of dancers for the number of measures of music. What if you have more, or fewer dancers? For example, the standard number of repeats of Upon a Summer’s Day from Playford’s The English Dancing Master is correct for 3 couples, as the dance is described. But what if only 2 couples want to dance?
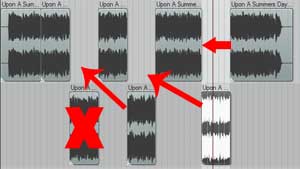
Fear not! With modern technology you can slice and dice the song on your computer to your heart’s content. For example, the recording we have for Upon a Summer’s Day has 3 repeats of the chorus section per chorus, which is perfect for 3 couples, but won’t work for 2. So we need to slice out 1 of the chorus repeats for each of the 3 times the chorus occurs in the song.
In this video, we take you step-by-step using the excellent recording software called Reaper, and show you how to slice out those 3 sections of the song, making sure that the remaining pieces fit back together seamlessly without skipping a beat.
You can use this technique to create “mash-ups” of several songs combined into one, slice, dice and remix, etc. to create something new out of just about any audio. But as usual, take care not to violate any copyright laws by publishing anything that isn’t public domain, or that you do not control rights for.
Have fun!
Making A Weak Vocal Track Sound Stronger And Punchier
Lead vocal tracks almost always benefit from at least some compression. See my tutorial on using Reaper’s ReaComp compressor plugin to see a video of how to apply compression to a vocal track here: Vocal Compression Using Reaper’s ReaComp Effect Plugin. In that tutorial I applied mild compression and I only did it once. That’s pretty much the norm. But you can use more compression if the vocal track is very weak, tentative, and/or particularly uneven (volume-wise).
But how do you avoid the nasty side effects of over-compression, which include things like hyped sibilance, pumping or just very flat-sounding audio? One way is to use something called serial compression. What that means is that you apply subtle compression to the vocal track, but you do it multiple times. That way you can get the desired effect of more-than-usual compression without ass the side-effects.
Bjorgvin talks about what that is and how to use it in his article here:
http://www.audio-issues.com/music-mixing/vocal-compression/