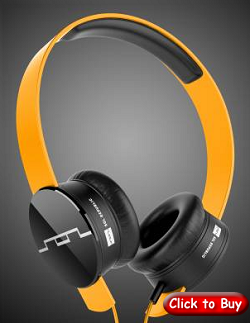
As part of my effort to point out audio stuff in pop culture, I wanted to write about those really cool headphones that American swimmer, Michael Phelps, was sporting prior to each of his events at the 2012 Olympics. They were colorful and sleek – very stylish. They were the SOL REPUBLIC Tracks.
The headbands are colorful, yes, but they are also twisty and bendy, nearly indestructible, and interchangeable. The last one is pretty unique. You can switch them out with others of different color, depending on what you feel like in the moment.
The headphones themselves, the actual “audio” part, are also awesome, boasting extremely high quality sound and comfort.
One other cool thing is the “mic + remote control” feature. There is a detachable microphone and remote control you can use to operate your iPod as well as answer and hang up calls.
Athletes frequently wear headphones like these because it helps them focus as they isolate themselves with noise reduction and great audio quality for music. American Diver, Troy Dumais for example, wears the Bose QuietComfort 35 Acoustic Noise Cancelling Headphones. American Olympic swimmer, Anthony Ervin and diver, Kristian Ipsen, and Chinese swimmer Sun Yang wore Beats Isolation headphones/
Update: Since Michael Phelps seemed to be changing our his bands for every swim, we were ticking off all the different colors. But on one of the latest headphone appearances was a logo for something we couldn’t quite make out at first. Then we paused the TV (gotta love DVRs) and got up real close to see that the logo was for dance music producer/DJ (he doesn’t actually like being called a “DJ,” apparently) Deadmau5. Not sure if the bands came already branded, or if Phelps put a Deadmau5 sticker on the band, but it does point out another cool thing about these headphones – you can easily put writing and/or artwork on the bands to further express your personality.
Archives for October 2012
Getting Tracks Ready For Final Mixdown
Here is great video – another one from WinkSound – about organizing all your tracks in preparation for mixdown. Remember, mixing down your tracks is one of three major steps/jobs in a recording project. Recording/tracking is the first step, then comes mixing, and finally there is mastering. See our post here: Recording Engineer, Mix Engineer and Mastering Engineer – Oh My for a reminder of that.
Anyway, when you have a lot of tracks to mix down, usually in a music project (not so much with a voice-over project usually), you need to organize things a bit before you dive into the mixing job. In this video, Michael White shows you how to do just that. This works for any multi-track recording software, Reaper included.
Fix It In The Mix? That's The Road To Hell
If you ever hear yourself uttering these words – Meh, I’ll just fix it in the mix – as you record something, I want you to stop what you’re doing and ask someone to kick you in the butt. I know, I know – everyone does it. And there are some things that simply cannot be made “right” until they are playing with the other tracks. But what you’re really saying is I know I messed up just now. I can fix it later.
This reminds me of a metaphor from when I used to teach and consult in the quality management field. American quality toast was to burn the toast, and then scrape off the black stuff. This was in comparison to Japanese quality toast, which was to fix the toaster to prevent the problem occurring in the first place. In almost every quality-cost situation, it is better (in terms of less time and money spent) to catch a problem and fix it as soon as humanly possible in the feedback look – with the ideal being to prevent errors and waste altogether. Audio recording is no different. Try to get all your tones recorded and sounding as good as possible BEFORE you start to mix your project.
Here is a little post calling this “the secret weapon of mixing,” written by Joe Gilder. Heed this advice and you shall be happier in your home recording studio.
Read Joe’s post here: http://www.prosoundweb.com/article/in_the_studio_a_secret_weapon_for_full_mixes/
Of Synthesizers and Oscillators
If you’re like me, then you probably are just a tad (shya!) baffled by all the knobs and buttons associated with a synthesizer. When I was a kid, I certainly could not afford a real, hardware synthesizer. And by the time I was recording regularly, most of them were already digitized into software versions of their hardware predecessors.
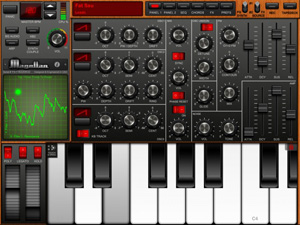
I like playing with them, but I still don’t really know what all the little knobs mean. My latest experience with this was just last week when I downloaded the new Magellan Synthesizer (see picture on the left) from the Apple App store to my iPad 2 for – wait for it – a whole 5 bucks! Un-freakin’-believable. It comes, as many synths do, with lots of preset sounds. So you can spend hours just picking those and playing with them without having to worry about the knobs and sliders.
But the way these instruments work is that they have things called oscillators, which are sound sources. Then through some combination of filters and other wave-altering tools, you can create any number of cool sounds, which can then be used to make music (or frighten the cat, depending on your desired outcome).
If you have started working with synthesizers like these (not to be confused with samplers, sometimes called soft-synths, which really just allow you to play and manipulate audio that was sampled (recorded) from actual instruments), then you might be interested in some of the cool creative things you can do with them. The real fun happens when you move beyond the presets and start to create you OWN sounds.
You can learn about some of these ideas in this video by Mo Volans. This one uses the Thor Synthesizer, which comes with the Propellerhead Reason recording software. But the concepts can be applied to any synth.
Amateur Audio On Excellent Video
Here is yet another example of a really entertaining and otherwise excellent video made to appear amateur-ish by the audio quality. I have written repeatedly about why this seems to be so common while simultaneously being pretty easy to fix. See these articles, for example:
Audio For Videos: Do Not Let Bad Sound Ruin Great Video
Pro Audio For Your Video – Review of the BeachTek DXA-2T Camcorder Adapter
So my wife was on Facebook and showed me a very funny video with terrific acting and awesome content. But as I watched, I couldn’t stop wondering why they didn’t try a little harder to mic the actors. Their voices were all echo-y and reverb-y, like the sound you’d get if you just shot the video with a camcorder (or even an iPhone) and the actors 6-20 feet away. To quote a military friend of mine – “that dog won’t hunt.”
In order to get good sound quality on dialogue in a video is the get a mic close to the mouths of the actors. This is done either by using hypercardioid (very directional while rejecting off-axis noise) on a long pole just out of frame, or by using lapel mics.
Sure, wireless lapel mics are a couple hundred bucks, but putting even a cardioid mic (you can get a Shure SM58 for under a hundred bucks) on the end of a pole (you can rig up a DIY version with a telescoping aluminum brush/broom pole at the hardware store, or use PVC pipe if you have to). The solution does not have to be expensive and it can make such a HUGE difference in the level of professionalism.
OK, stepping off the soap-box now. Here’s the video I was referring to. I think these guys are great: