 The Strip Silence effect isn’t as exciting as it might sound;). But it is very useful. It is a tool in Pro Tools that removes any audio that might be present in a track during the “in-between” times when whatever is on that track is actually not playing, speaking, etc. For example, if there is some background noise in the electric guitar track – say some amplifier hum – then that hum will probably still be audible even during the times in the song when the guitar is not playing. Ideally, those times should be silent, but we all know that our old enemy – noise – is always lurking. Well it doesn’t make any sense to have that noise cluttering up the rest of the mix during the parts when the guitar track isn’t needed. So wouldn’t it be great to be able to automatically zero out (make completely silent) the areas when the audio isn’t playing anyway?
That’s where Strip Silence comes in. You give it some settings, like a threshold above which is valid audio and below which is noise, and everything below that threshold gets silenced. I know, I know, you’re wondering what the difference is between noise gating and Strip Silence. Well, they both do that same basic job. But Strip silence has some options that a gate doesn’t, such as the ability to preview – actually see – the segments that will be silenced and the start and stop points for the actual valid audio segments.
You can do something similar in Reaper with the Auto Trim/Split tool (learn that and many other recording and editing tips in our new course The Newbies Guide to Audio Recording Awesomeness 2: Pro Recording With Reaper).
Here is a video from WinkSound that shows you how to use the Strip Silence tool in Pro Tools:
Archives for October 2012
Common Mixing Mistakes
 I just finished reading an article that talks about the hallmarks of an amateur mixing job. Bobby Owsinski lists seven things that a lot of beginning or amateur mix engineers commonly do (or don’t do) in their mixes that prevents them from sounding truly professional.
I agree with most of the things on his list except maybe the last one, which he calls “Dull and Uninteresting Sounds.” His main beef here is the use of sounds that are either dated, or already used by a lot of other recording artists, like generic Roland synth sounds, the extreme Auto-Tune effect a la Cher and T-Pain. I don’t really think those are mixing issues. You can have a perfectly professional sounding mix using dated and/or common sounds. Obviously T-Pain and Cher had professional mixes using those sounds.
One additional mixing mistake I would add to the list of amateur mixing issues is the lack of proper use of the stereo field. I find that folks who make amateur mixes tend to put everything either too much in the center of of the sound stage, or too far apart, leaving sonic holes or bunching things up too much. I know that my first big “aha” moment was the discovery of all things stereo – what it was, and more importantly, what it wasn’t (panning two versions of the same audio, for instance).
Take a look at Bobby’s list and see if you aren’t making some or all of those same mistakes. Check it out here: http://www.prosoundweb.com/article/defining_characteristics_of_great_vs_amateur_mixes/
Effects On the Master Mix Fader – A Little Goes A Long Way
 When mixing a multi-track project, there comes a time when you’re “done” and ready to mix it down (often called “rendering” these days). For a review on what it means to mix something down, see our post here: What Does It Mean To Mix Down Audio? Anyway, you may have a song that is 20, 30, or even 40 tracks or more. During mix-down, the outputs of all of those tracks go into the master track, which then puts out the final stereo signal (usually an audio file like a wav).
Well this final “master” track, sometimes called the master buss, can have effects applied to it just like the individual tracks, except that any effect applied to the master track will affect everything – every track. For that reason, it is advisable to use any effect at that stage VERY sparingly. The only things I ever do to a master track are adjust the peak volume either by using the master fader control, or by applying a limiter effect to prevent any clipping or distortion in the final mix. Personally I never put any EQ or exciters, or any other tone-altering effect on the master track. I prefer to create a final mix with only the individual track effects applied. Then during the “mastering” stage (see our post What Does Mastering a Song Mean?), I’ll add whatever effects I think will improve the final audio (using audio editing software like Adobe Audition, which has excellent mastering tools. Another good choice is Sound Forge). If it doesn’t sound right, I can always undo the effect at that stage and try something different. But that is hard to do when you’ve already applied the effect to the file during the mix-down process.
Here is an article by Graham Cochrane about this whole idea: http://therecordingrevolution.com/2012/10/29/go-easy-on-the-mix-buss/
What Is Remixing?
The term remix does not, as you might surmise, mean that the engineer who mixed your song does it (mixes) again. Of course it could be anyone who mixes your song again, not just the person who originally did it, but – boy am I getting off the track here. The point is that the term remix has come to mean that some 3rd party has taken a popular song, typically and older one, and added new and different sounds to it, to create an alternate version of that song. In most cases the remixer only has the final version of the original song to work with. In other words, he/she does not have the original separate tracks – like the drum track, guitar track, bass track, vocal track etc. In fact, the remixer usually does not even have contact with the original artist, producer or publisher.
This, of course, is where copyright law comes into play. If you are going to get into remixing, you’d better make sure you either have a lawyer advising you, or you have a license from the original publisher or copyright owner. Lots of people hide behind the Fair Use Doctrine or claim parody protection. But that won’t stop you getting sued if the copyright owner comes after you. So be very careful if you want to remix popular songs.
Anyway, assuming the copyright issues are covered, you can get some great ideas on how to do remixing form this article here:
http://www.wikihow.com/Remix
Kansas "Carry On Wayward Son" Harmony: Step-By-Step
Okay, so here is how I recorded the introduction to Kansas’ “Carry on Wayward Son” with just me, myself and I (meaning it was just my voice singing all the parts).
First, take a listen to how it came out:
 1. I opened my audio recording software, Reaper (see my post on Reaper here) on my computer.
2. I hit the “Record” button in Reaper and sang the melody (the high part:)) into the microphone, which was a Rode NT2-A. The mic was connected to the computer via an audio interface box like the Focusrite Scarlett 2i2.
3. When I finished singing that high part, I inserted another track in Reaper (ctrl-T) and sang that part again, giving me two tracks of my voice singing the same thing.
4. I inserted a 3rd & 4th track and repeated steps 1-2, but singing the middle vocal harmony part.
5. I inserted a 5th and 6th track and repeated steps 1-2, but singing the low vocal harmony part, “low” being extremely relative in this case;).
6. I edited each of the 6 tracks with my audio editing software, called Adobe Audition. Editing consisted of getting rid of “p-pops” and various other mouth-y noises, as well as making sure none of the notes were off-pitch.

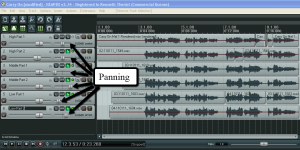
7. Back in Reaper, I panned each track to a specific place in the “stereo spectrum,” which is a fancy way of saying “somewhere between your left ear and your right ear.” both high parts were in the center (right in front of you, between your eyes (actually they were 5% left and 5% right, but they’ll sound like they’re coming from right in front of you). The two middle parts were panned 100% left (“hard left”) and 100% right (yup, “hard right”) respectively. If listened to by themselves it would sound like one was coming from your left and the other coming from your right. The low parts were panned 53% left and right, respectively. These would sound like they were between the guy singing the high part and the guy singing the middle part, kinda like 6 guys were spread out in front of you on a stage. See the figure 1.
8. The next step was to make sure each part was the right volume, not too loud and not to quiet. That’s called mixing, and you do it by adjusting the volume slider on each track so all the sounds work and play well together.
9. Next I added a reverb effect to the “master” channel.
10. I rendered (called “mixing down” in the old days) the project audio down to one stereo file, which I saved as an mp3, and voila.
Look for lots of other home recording tips in the many articles posted here at Home Brew Audio. We’ve also got video tutorials and the eBook How To Build A Home Recording Studio.
Ta for now!
Ken