 Now that you have had a bit of a primer on what a mixer bus (or “buss”) is (see the last post, What Is a Buss in Audio Recording?, I thought it would be a good time to tell you about a good article on using buss compression. Since most often the output of a buss is going to contain signal from multiple sources, you have to think about compression a bit differently than you do when simply applying compression to a single track with a single sound source like a voice, guitar, piano, bass, etc. This article from Audio Fanzine gives some tips and suggestions for settings when using buss compression.
Read the full article here: http://en.audiofanzine.com/recording-mixing/editorial/articles/buss-compression.html
Archives for March 2012
What is a Bus in Audio Recording?
 There is a term in audio recording that is a bit confusing (go figure) to a lot of folks who are not immersed in in the audio or electronics world. Oh, who am I kidding? There are scads of those terms. That is part of the why Home Brew Audio exists – to translate the techno-lingo into the common speech:). But the term I refer to today is “bus”, also sometimes spelled “buss” or mixer bus, though that just confuses the issue even more. But I digress (Really? Me? but that never happens;)).
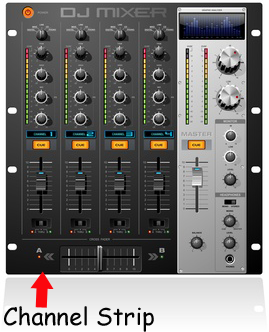
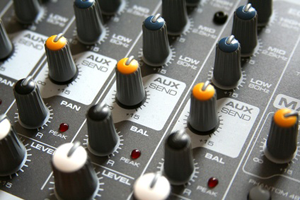
 Anyway, the term, as so many are, is a left-over from the analog days when physical mixers were necessary in audio recording (hint: they are no longer necessary in computer recording). A buss is an output channel on a mixer that has collected all the audio from any channel that is sent to it. For example, If you have a 16-channel mixer, there will be a channel strip for each of those 16 channels. The “master” channel is actually a buss, because it takes the output of all the channels on the mixer and outputs them to your speakers or headphones, etc. All channel strips on mixers are usually sent there by default. But you can also choose other busses to send these channels to. For example, there is usually an auxiliary (often abbreviated as just “aux”) buss knob on each channel strip which lets you send the audio on that channel to the (you guessed it) the auxiliary buss on the mixer. Then the aux buss will output all channels sent to it, and only those channels.
Regardless of how many busses are present on a mixer, there will always be a master-level control somewhere on the board. For example, there will be a “master” strip for the master buss, and there will also be a master Aux section (often not a strip, but a section at the top of the mixing board) with an aux output and input and level control.
 There are other types of busses and even other names for the ones I described. For example, sometimes the aux buss is called the effects buss. But at the end of the day, the only thing you need to know is that a buss combines signals from several other places on a mixing board. We use the same concept on non-physical computer mixers nowadays, which are almost always designed to mirror the way a physical mixer works, though we have a lot more flexibility to create our own virtual busses to create groups, submixes, and any combination of inputs and outputs.
OK Slow Down – What’s a Submix?
You caught me! I just casually used a term like everyone in the world knew what it meant. Mea culpa! I promise to come up with a suitable punishment for myself. But first – the submix thing.
OK, let’s say you have recorded a song with a guitar, a bass, a lead vocal, and 6 harmony tracks (I like to have each harmony part sung twice; so 3 harmony parts will need 6 tracks. I know! Awesome huh?). Then let’s say that I want reverb on all 6 of those vocal harmony tracks. I could go to each track separately, and set up a harmony effect on each one. Well THAT’S tedious! Doing the same thing 6 times. Wouldn’t it be cool if I could just set up the harmony effect once, and have all the harmony tracks share it? Hint: the answer is “yes!” And that’s exactly what you can do with a buss! Just create a buss track, set up a harmony plugin effect on it, and then route the harmony tracks through that buss, and they all share like good little harmonies. And…and (this is the best part) you can control how loud all 6 harmonies are with one volume control! The one on the buss track where they are sharing a reverb (note to the techies – you would want to disable the direct sends from each harmony track to the Master buss first).
What Good Is A Submix?
So now, if you’re listening to the test mix with your wife, and she says (as she always does) “the harmonies are too loud in the mix,” you can nudge them down with one slider/knob instead of trying to adjust the volume on all 6 tracks? One track to rule them all! Now isn’t that useful? It is.
Hopefully this information will allow you to put another seemingly baffling audio term into your vocabulary.
Review of The CEntrance MicPort Pro Audio Interface
 Today I’m going to review this awesome portable audio interface called the CEntrance MicPort Pro. But first, a little explanation of what an audio interface is.
[Update in 2019: The MicPort Pro seems to have been discontinued. Similar interfaces currently available include the Blue Icicle, the Senal XU-1648, and the Shure X2U. You can still find the MicPort Pro on eBay and a few other retailers. CEntrance Mixerface R4 is the company’s newest mobile interface].
In order to set up a computer recording studio, you will need some sort of interface between your microphone and your computer. The simplest and cheapest way is to plug a dynamic microphone (for a review of the difference between dynamic and condenser mics, see our post here: What Are The Different Types of Microphones?) directly into the sound card of your computer. But you’ll never get professional quality audio from that kind of set-up.
Usually I teach that the next best set up from the mic-directly-into-sound-card situation is to get a USB mic and plug it into (you guessed it) the USB port of your computer. If you want clean, clear, accurate and rich sounding audio though, your USB mic is going to have to be something a bit better than the ones on head-sets that cost $25 bucks. You don’t have to spend THAT much more though. You can get into pro audio with larger USB mics starting around $50.
But even then, I find that a USB mic doesn’t always give the best audio. My recommendation is to move to a set-up that is the foundation for the best possible audio quality, a condenser microphone going into an interface unit (containing a mic preamplifier and analog-to-digital converter), which connects to the computer. These interface units usually look like boxes of some sort and connect to the computer via USB (the most common), PCIe, or Firewire. This set-up is not all that mobile, the interface boxes being, as they are, difficult to stuff into a laptop bag or even your pocket.
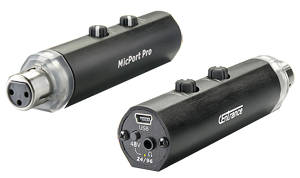
Enter the CEntrance MicPort Pro, which is a high-quality microphone preamplifier (or mic preamp as the cool kids say) that you literally CAN put in your pocket. This gives you an incredible ability to be mobile and be able to record on the go.
But rather than being just another version of a “USB-to-XLR adapter” such as the Blue Icicle or MXL MicMate, I think of the MicPort Pro more as audio interface that happens to connect to the computer via USB, just like it’s larger cousins such as the Avid Fast Track and its ilk. The thing that makes it different is primarily the zero-latency monitoring headphone connector. With plain USB-to-XLR adapters, you still have to monitor via the headphone jack on a computer, which will add a delay to what is being recorded and what you are hearing, which is called latency. That is not an issue with the MicPort due to the headphone input along with its volume control.
Other things that make the MicPort stand out are the preamp gain knob and the phantom power (driven by USB power) for your condenser mics. The 24/96 (24 bit recording and up to 96 KHz sampling rate) analog-to-digital (typically written as A/D) converter allow for high quality recording.
So How Did It Work?
Setting it up was an absolute breeze. I plugged the XLR cable from my mic into the MicPort, then plugged the included low-noise USB cable from the MicPort into a USB port on my Windows 7 machine, though it is compatible with Mac OS X 10.4 and above, and Linux. Windows detected it and installed the proper CEntrance MicPort Pro drivers automatically in seconds–true plug-and-play.
I had Reaper open already and didn’t even have to close it down before the MicPort was available as an audio device in Options. I was ready to rock in less than a minute.
My standard set-up is to use a Rode NT2-A microphone, going through an E-MU interface similar to the Focusrite Scarlett Solo. Here is a sample of a voice recording with that set-up:
Audio Player
Next I simply unplugged my Rode mic from the E-MU and plugged it into the MicPort, then plugged my Sennheiser HD-280 Pro Headphones into the MicPort and turned up the headphone volume. Then I changed the audio device in Reaper to MicPort and set out to record the same passage. The first thing I noticed was that even with the MicPort’s gain control know all the way down, the input level was way too hot. I think the Rode was too much car at the normal output setting. Fortunately, the Rode has 2 pad switches (-5 dB and -10 dB) to lower its output. I switched to the -10 pad and things were much better. I still only had to turn the MicPort’s gain knob to about 25% to get the right level. I then proceeded to record. Here is what the MicPort recording sounded like:
Audio Player
Now tell the truth, if you did not know which was which, would you have been able to tell the difference? Actually, when previewing this page, I thought I had accidentally put the same audio file in twice! I had to listen to each recording like 10 times before I found a place where I read them differently enough (where I say “the thing that makes it different”). I swear I am not making that up! There was no mistake. Pretty awesome right?
Each recording received the same treatment I give all my voice recordings, noise reduction and a little p-pop elimination, both done in Adobe Audition. One thing I noticed while doing this was that the MicPort recording had more low-level noise across the EQ spectrum. It wasn’t a lot more noise than than the Focusrite Scralett recording, but it was present at more frequencies (low, mid and high). But since the noise was very low level, the noise-reduction took care of it with no audible artifacts, so in the end it really doesn’t matter much at all.
If I had to suggest any improvements it would be to make the MicPort self-powered instead of relying on USB power. It would have to be made a bit larger to fit a battery, yes. But it would allow you to use it with other devices that don’t have enough USB power to drive phantom power requirements, such as the iPad.
To Sum Up
This thing pretty much rocks! I didn’t find the quality of the MicPort to be much different from that of the E-MU, which costs quite a bit more. And of course the MicPort is amazingly portable (not much bigger than a lipstick), which the E-MU is decidedly not. This thing could easily be your primary home recording audio interface, especially if you mostly do voice over recording. And the portability of it just adds to the awesome and makes it a no-brainer if you ever have to do any recording while traveling. Check it out here: CEntrance MicPort Pro.