If you’ve spent any time looking around in any recording and/or audio editing software, you’ll likely have come across several options for audio files. If you’re anything like me you saw a lot of options and terminology that made you think you’d better just leave everything at the “default” settings until you can understand what some of the gibberish meant. One of the terms that really seemed confusing to me at first was the term “32-bit floating point.” It almost sounds more like a medical condition:). It is, in reality, a digital audio term (go figure). It you’re curious about how bits figure into digital audio, see our article here: https://www.homebrewaudio.com/16-bit-audio-recording-what-the-heck-does-it-mean
Here is an article from Emerson Maningo that will help you to understand what 32-bit floating point actually means: http://www.audiorecording.me/32-bit-float-recording-bit-depth-vs-24-bit-complete-beginner-guide.html
Archives for January 2012
Recording Engineer, Mix Engineer and Mastering Engineer – Oh My
 In the professional recording world, audio engineers typically specialize in one of 3 areas (even 4 areas if you count those who do live audio): the recording engineer, the mix engineer and the mastering engineer. It isn’t because one person can’t do the job of all three; it’s because each plays an important role in the recording process and can focus on one given task. When you can specialize in one area, you can typically do a much better job and the end result will be sensational as opposed to just okay.
In the pro world, record companies and big-time producers can afford to hire three different services for these things, which allows the engineers to specialize and still make a living doing it. But where does this leave the solo home recording folks like most of the folks reading this? We are going to have to do all three jobs ourselves. But just knowing about how the pros specialize can still help us. The “take-away” is that we should treat the different phases of recording differently, putting on a different mindset for each, which can help us attend to the different things that are important for these different tasks.
Recording Engineer
As the name implies, this person is responsible for setting up all of the microphones and recording all of the sounds. Their sole focus is to make sure that they get the absolute best sounding audio possible, with clean and accurate tones, recorded. They will record multiple tracks, working directly with the person or band being recorded (of course). This part of the process typically takes a long time as the engineer and “talent” work together to create all the necessary tracks need to crate the final product. The engineer will then typically create a rough mix and then export all the audio so that the mix engineer can open all the files and have them already be in the proper tracks with the proper timing. This is much easier to do these days, especially if both he/she and the mix engineer use the same program (Pro Tools is pretty much the industry standard). In the old days when everything was on a great big thick reel of tape, the logistics were definitely harder. But once the transfer is done, it’s time for the mix engineer to take over.
Mix Engineer
This person is responsible for creating the final version of the song or whatever audio is being produced. Once all of the sounds, instruments and voices have been recorded by the recording engineer, he or she ‘mixes’ the elements together, producing a balanced piece with volumes of vocals and instruments balanced together and frequencies for each sound tweaked on each track. They are also responsible for other factors such as effects and pan positioning (meaning that some sounds are made to sound like they come from the left, and vice versa). They then render (or mix down) all the different sounds and tracks into one stereo (usually) audio file.
Mastering Engineer
The mastering engineer (for a review of what “mastering” means, see our article Mastering a Song – What Does It Mean?) takes the product that the mix engineer has created, usually in the form of a single stereo wav file, and using specialized gear (along with pristine listening rooms/spaces) and polishes the mix into the final product mainly using such techniques as EQ and compression. These folks use highly specialized (and usually quite expensive) gear that the other types of engineers usually don’t have). The goal here is to create a masterpiece that is ready to be heard by the consumer. They will enhance or reduce frequencies where needed and make sure that the file (already mixed-down/rendered) has the proper energy and ‘punch’ in the right places, and also that any problem frequencies and imbalances in the final mix are fixed.
In an ideal world, all three jobs would be done by three different professionals. The reality is though that in a home recording situation, the solo home recording engineer has to wear all three hats. If this is the case, then it’s important to understand the goals of all three jobs. In order to get the best results possible, perform the recording engineer’s tasks first. Take a break before mixing the material, and take another break before mastering the final product for the client/end user. If you try to do everything at once, you may lose focus and miss key elements of each task.
Now go forth and create a useful split-personality.
IK Multimedia Just Released the iRig MIX Mobile DJ Mixer
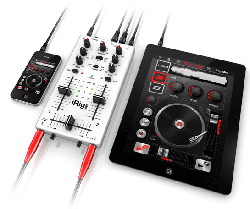 IK Multimedia, maker of many excellent audio products but most recently some fabulous iOS apps, have just announced that they have released not one but several new mobile music apps for iPhone, iPad, and iPod touch (I’ll just abbreviate that lat bit by saying “iOS” from here on out). One of these latest releases is called the iRig MIX. It is essentially a professional DJ mixer that you can stick in your pocket (if you have to). AS with many of the IK iOS products, this one combines a piece of hardware with an app that you can download – usually for free – sometimes with an option to upgrade to a paid version.
In this case the hardware part is a very small but powerful 2-channel mixer with crossfade, cue, EQ, panning and volume controls. You can use it with iOS apps for DJ mixing or with several other apps. It can also be used to mix ANY type of audio source, meaning mp3 players, CD player outputs, etc. with an iOS device and use the beat-syncing and tempo-matching capabilities.
It comes with 4 free apps that you can get from the iTunes app store: the DJ Rig mixing app, Amplitube (which I reviewed here: iRig Amplitube Review), VocalLive singer processing app, and GrooveMaker loop/groove/beat making app. So this thing is not just for DJs!
Get more information here: www.irigmix.com
Cheers!
Directional and Omnidirectional Microphones – What Are They Good For?
 Do yo have a directional microphone or an omnidirectional microphone? Are you even certain? The directionality of a microphone, that is, whether it picks up audio best from the front only, or from all around it (or some other pattern of pick-up) is frequently called the polar pattern of a mic. To get the best sound from a microphone, it’s important to understand the different polar patterns and how to use them properly. Polar patterns are also sometimes known as pick-up patterns, because their function is to ‘pick up’ the sound. There are three main polar patterns and each serves a different purpose.
Cardioid
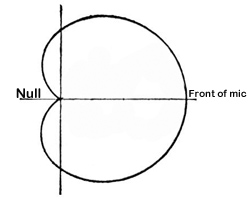 This is among the most common polar patterns that you will encounter. Meaning ‘heart-shaped’, this type of pattern will give you a good pickup to the front, with a lesser amount to the sides, and a good sound rejection to the back. Cardioids are also known as “directional” mics since they only pick up audio from one direction.
One of the main features (benefit sometimes and curse other times) of cardioids is that they can create a “proximity effect.” As the source gets closer, the audio sound will be “bassier.” You should be aware of this if you want to make your audio sound a bit deeper, especially for voiceover actors. Though sometimes you may want less bass in the audio. Knowing that you have a cardioid mic, you might be able to fix the tone just by getting further from the mic (but beware of letting more bad room sound in if you do this!) instead of futzing with EQ or other editing tools in your gear. Sometimes the simplest solution is the best.
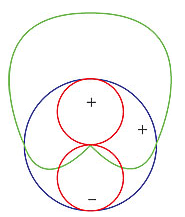 Cardioid polar patterns are recommended for most vocal applications, recordings and live recordings. It is suitable for venues where the recording environment’s acoustics are good, but less than perfect. This is because a cardioid rejects audio from behind it, so if you have reflections or other potentially unpleasant audio coming from behind the mic, its effect will be minimal. Sometimes the area behind a cardioid mic is called the “null” because it is sort of an audio no-mans-land. See picture on the right.
Hypercardioid microphones take the concept of cardioids one step further. It records from the front, and rejects everything to 120 degrees to the back. These work very well for on-stage live performances and live recordings that are in difficult or far-away situations.
Omni
Also called Omnidirectional, this type of polar pattern picks up sound equally around the microphone. These are meant to sound very natural and open are well suited environments that have good acoustics. They are also great in recording situations where natural, open sounds are the goal. And obviously, the main use for an omni mic would be when you want record sound from several different directions. One example of this would be if you had, say, a barbershop quartet in the studio. They could gather around the mic and each voice would be picked up equally. Setting up an omni in the middle of an acoustic group of musicians like a small classical string combo, bluegrass group, etc., is also a good use.
The biggest difference between omni microphones and cardioid microphones is that omni does not give the proximity effect. Omni polar pattern microphones are generally not recommended for live sound, as they can be prone to feedback issues, but they are great in recording studios, where the environment can be better controlled.
Figure-8
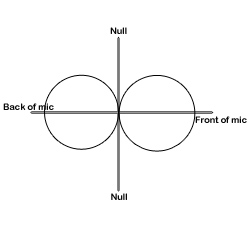 Also known as bidirectional, this polar pattern microphone will pick up sound equally from both sides of the microphone. This also means that the nulls for a figure-8 pattern are on either side, as indicated in the picture on the left.
You’ll find that the majority of ribbon microphones are configured as figure-8s. They are commonly used in mid-size recording studios. They can be sensitive, and so are not recommended for high SPL or harsh environments. They are, however, best suited for acoustic instruments, and for live recordings of jazz and acoustic groups. They are also often used for drum overheads.
Another use for a bidirectional mic is for when recording an acoustic guitar player who is also a singer. The mic can be set up so that one side is facing up at the singer’s head and the other side facing down toward the guitar.
Yet another really cool use of a figure-8 microphone is in combination with a cardioid mic to perform a stereo recording technique called mid-side (MS) stereo recording.
Mics with switchable polar patterns
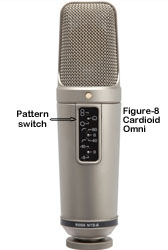
If you cannot afford to own at least one microphone that can give you all three of these patterns, you can get a mic that is capable of doing all these patterns. You just flip a switch and your mic goes from cardioid to figure-8 or omni. This is the route I took since I rarely have need of the other patterns, but definitely want the capability for those special times. The mic I use for this is called the Rode NT2-A. Take a look at the picture on the right.
Knowing which microphone polar pattern to use in each situation will ensure you get the sound you want, every single time. A basic understanding of the main types of polar patterns will help to unravel the mystery of some of this technology and give you professional quality results.
Crossfade Meaning – What Does It Mean To Crossfade Audio?
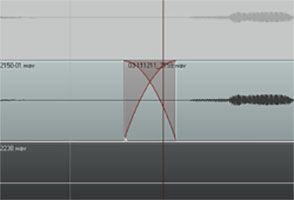 So what exactly does it mean to “crossfade audio”? Well before we talk about crossfading, we should probably first talk about just plain old regular fading. What is a fade?
Happily, this is one of those few audio terms that actually sounds like what it means. Whether you know the term or not, I’m fairly confident that you’ve at least experienced/heard fading going on before.
Pop songs used to end with a fadeout a lot back in the day. You see it on sheet music all the time. At the end it often says “repeat and fade.” It just means that instead of an abrupt or definite ending, the song would continue. The volume would just get lower and lower until it was inaudible, at which point it would end. It fades out.
Fades
Often on TV or movie soundtracks you hear the audio fade in (as opposed to the above example of fading out). The music (usually) or other audio will start out inaudible and rise in volume gradually until you can hear it at full volume.
This is the same idea for audio items in our recording projects. We use it as describe above sometimes, especially when producing voice overs or narrations that have background music.
The music frequently fades in before the narrator starts talking. If the music is not going to continue behind the voice for the duration of the program, as in a podcast or radio show intro perhaps, the music usually fades out just after the narrator starts speaking.
But the most common use of fading when doing multitrack recording projects is simply to allow audio items to start and finish more smoothly. If the edges of an audio item do not fade in or out at least a little bit, you get clicks and pops due to the sudden stops and starts of the item.
Crossfades

Now we know what fading is. So let’s talk the crossfading. It is when one bit of audio fades out at the exact time as another bit of audio is fading in (see the picture at the beginning of the article).
Let’s say you are recording a vocal track, and you mess up. What most of us do is wait a second while the program continues recording, and read/sing the part you messed up a second time, and then proceed with the recording.
Things often run more smoothly this way, as opposed to stopping and starting over all the time. However, doing it like this requires that when you have finished recording, you go back and cut out that messed up part. Crossfades to the rescue!
A common way to deal with mistakes is to simply highlight the screw-up, and cut it out. This leaves a blank space there (unless you have ripple editing turned on – see our post on THAT here: https://www.homebrewaudio.com/what-is-ripple-editing), creating 2 audio items, the part before the cut and the part after it. Now you’ll want to join these two items so you drag the later audio to the left to connect it up like a train section to the end of the earlier audio item (see figure 1).
Crossfades Are About Seamlessness
In order for the audio to sound seamless to the listener, you’ll usually want to slightly overlap the end of the earlier audio and the beginning of the later audio item. But that will still frequently give you an abrupt and unnatural sounding transition. So you want the end part of item 1 to be fading out exactly at the same time as the beginning part of audio 2 is fading in.

So most programs, including Reaper (shown in the pictures in this article), default to automatically crossfading any audio items that overlap. Take a look at Figure 2 where I have connected the same audio items shown in figure 1. I’ve drawn a box around where the item on the left is fading out as the item on the right is fading in. The red lines represent the volume of the items. It sort of looks like an “X.” I did not have to do anything extra because as soon as the items started overlap, Reaper automatically executed the crossfading.
This kind of crossfading is not done as an effect, where you’d hear something slowly fade in or out pleasantly. I had to zoom in pretty far to even see the red fade lines. That’s because the fades happen very quickly. This type of crossfading is used as a tool to help avoid the popping and clicking that frequently accompany the cutting and deleting of audio.
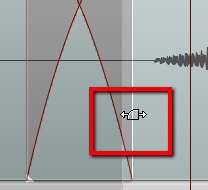
You can edit each fade if you wish. You could change the shape of the curve or make the fade longer or shorter. Do this by hovering your mouse over the edge of the audio item until the “fade” tool icon appears (Figure 3). Then right-mouse-click to change the shape of the fade. Or simply drag the edge of the item to change the length of the fade.
Items Do Not Have To Be On the Same Track To Crossfade Them
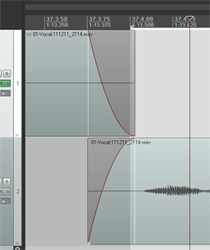
One last note – items do not have to be on the same track to use the crossfade idea. In Figure 4 I used the same two audio items, but I put the second one on a different track.
They still overlap in time. The end of the first one still fades out just as the beginning of the second one is fading in. The only difference is that they are on different tracks.
So now you know what crossfading means. And you know how you can use it to smooth out the transitions between audio items. Crossfading is a good tool to give you better audio recordings.
