 Whether you are recording your own music or working with a music file that already exists (usually a royalty free music clip for background music), there are many times when it is useful to cut, copy, and maybe paste sections of a song. Here are just a few of the more common reasons for needing to do that, just off the top of my head:
- Shorten or lengthen a song to make it fit a presentation, video or voice-over production
- Building a song by copying repetitive sections (entire bars or sets of bars) and pasting them
- Fixing a problem in a song you are recording (for me it’s usually guitar buzzing I use this for) by clipping the same chunk of music from another part of the song and replacing the problem section.
 When working with music files, it is important that any edits you make do not mess with the timing. Otherwise it will be jarring to the listener. If you want to slice up a song, say, to make it fit a video, you want it to sound seamless in terms of the beat of the song. One excellent tool for doing this is the snap tool. This is a pretty common tool for editing both audio and video. In the picture on the left is where to find the tool in Reaper.
Snap To
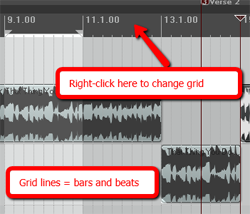
 The idea of snapping is simple enough. It is a way to ensure the edges of an item can only be be moved and placed so that they align with a grid. In the case of audio, that grid is frequently bars and beats, though you can change the grid to be other things, like minutes and seconds, etc. For our purposes in this article, we want to make sure we use bars and beats. In Reaper (see picture on the left), simply right-mouse click in the band across the top of the screen to change the grid settings.
The next important thing is ensure the song is aligned with that grid. When you’re recording your own music, this is not an issue as long as you are recording to the metronome which you set in the song project settings. And I HIGHLY recommend that you do that if at all possible. It makes things much easier in the long run.
If you have imported a song already recorded, you will have to do a few things to get its beats on the grid of the audio software. You’ll have to do a little trial and error, first setting the correct time signature for the song, then using the metronome and experimenting with the beats-per-minute setting until the song matches. Ironically, you’ll want to make sure the snap tool is turned off while you do this, so you can freely drag the song on the track to line up the visible beats to the grid.
Fixing Example
Once the song is matched to the grid, you’re free to copy, cut and/or paste and have the result be musically correct. Let’s take an example of when you need to correct a mess-up in the middle of your song (like my guitar buzz).
1. Just go to another part of the song with the same guitar chord playing without a buzz, and select the beat or beats containing that section. Make absolutely certain that the snap tool is turned ON when you do this.
2. Next, you click in the selected section and right-mouse-click to open the drop-down menu and select “copy selected area of item.”
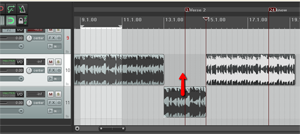
3. Now open a blank track underneath the song track (you can see this in action in the picture at the top left of the article). This isn’t strictly necessary, but I find it helps to line things up BEFORE pasting into the song, which can save you lots of time and headaches. Paste the bit you copied into the blank track right underneath the buzzing guitar part. You may have to drag it left or right to m ake sure you line it up just right. Again, the snap tool needs to be ON at this point.
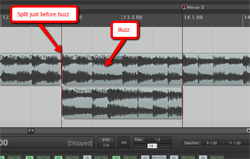
4. Next, click on the song at the beginning of the beat that has the guitar buzz and hit the “S” key on your keyboard to insert a split in the song file.
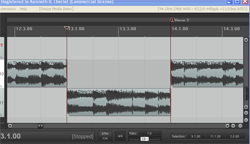
 5. Now drag the left edge of the section with the guitar buzz in it to the right, creating a blank space where you will insert the part you are pasting. Things should now look like the picture to the left.
6. Now all you have to do is drag the pasted bit from the audio you pasted in the spare track up into the blank space. Having the snap tool on will ensure it doesn’t slip or slide to either side when doing this, which is a common problem when you don’t have snapping enabled.
7. The final step here is to make sure things sound smooth and seamless. Turn the snapping tool off (yes, OFF) and drag the edges of the new part you just pasted in a little left and right. Since cross-fading is turned on automatically in Reaper, this will allow the sounds to blend a little more smoothly. Otherwise the abrupt implanting of a different section might sound a bit jarring, creating clicks or pops at the borders. Cross-fading will help eliminate that problem.
And that’s it! It may sound a bit involved, but the entire process only takes about 30 seconds, which is usually a lot faster than having to play the part again.
Now you can use the same steps to remove parts from a song. Just select (with snapping turned ON) the part you want gone, hit the delete button on your keyboard and it’s gone. Now you can drag the part on the right back to join up with the song part on the left (closing the hole in the audio). Of course, if you had ripple-editing turned on, the part on the right would automatically be pulled to the left to join the two parts up.
If you want to make a song longer, just select a part of the song you want to repeat, usually a full measure, and paste it at the end of the song. Do this as many times as you need to in order to make the song as long as you need it to be.
Hopefully this simple tip of using the snap tool will help you cut, copy and paste bits of songs to your heart’s content.
Hi Ken,
I hold a DMA in music composition and taught music theory classes at Humboldt State University for many years. Now retired, and outdated in my knowledge of modern recording techniques, I appeal to you to help me develop a DAW that will allow me to record and edit multiple tracks. I play piano and most the instruments in a brass band. I could compose, perform, and record all the instruments in a band.
I have an old Shure dyamic microphone, floor stand with arm, earphones, amplifier, speakers. I need a new computer (have monitor) software (Audacity ?) and whatever else you may advise. I would appreciate brand names for new equipment and where to order them. I enjoy your news letters. PJ
Hi Paul,
Thanks for the vote of confidence! I’d be happy to help. I actually just came from a friend’s house where we recorded here piano (an upright) and got some nice results.
I would advise you to use Reaper software rather than Audacity. It only costs $60 for the discounted license (which you’re allowed to use if you make less than $20K a year using Reaper!), and it’s the same functionality as the commercial license would give you. Nobody else I know of does this kind of thing on pricing (basically the honor system). I am not affiliated with them in any way. I just love the product. Anyway…
After Reaper (which is designed for multiple-track recording), you’ll want to get yourself an interface for your computer (which doesn’t have to be anything fancy). Something like the M-Audio Fast Track is what I used today on the piano. That plus into the computer via USB and then lets you plug two microphones into it. We used two large diaphragm condenser mics to record in stereo, which is desirable on an “actual” piano. These mics start at under $100 and go all the way into the thousands. You could start with two of the more affordable ones, such as the Audio-Technica AT2020 for $69. The Shure dynamic, which is good for live performance, is not the best for recording. Get another mic stand (so you’ll have 2) and a couple of mic cables. Finally, a decent pair of headphones like the Sennheiser HD-280 should complete your studio (you might be able to get by with your earphones for now but headphones are better in the long run for many reasons).
All of these things are upgradeable as your budget (and more importantly, “need”) allows.
I hope that helps!
Ken