 Ducking in audio recording is a technique for allowing a narrator’s voice to be heard clearly and consistently when there is other audio happening at the same time, such as background music. If nothing else, this is a rare example where the term actually describes, in plain English, what it accomplishes. Plus it’s fun to say.
So what does ducking mean anyway?
The way it works is pretty simple. Let’s say you have some background music for either a voice-over project or a video project that will have a narrator, and that this music will play at the same time as the narrator speaks. When the narrator is not speaking, the music should be clear and present – the main thing to listen to. But when the voice comes in, it should take over as the main audio, the background music becoming, well, background audio.
Sure, you can simply turn the music track volume down, but then when the voice goes away the music won’t be loud enough. You’ll have to turn it up again. This cycle will repeat as many times as the narrator stops speaking, which is a lot of work. Ick. I’m all in favor of reducing work. If only there were a way for the audio (or video) program to sense when the narrator is talking and when he/she is not, followed by the program automatically turning the music up when there is no vocal, and down again when there is. Guess what? There is! That’s what ducking is. The audio you want to be the primary thing, like the narrator’s voice, is made prominent because some other audio is “ducking” underneath it at key moments.
So how can I make my program do ducking?
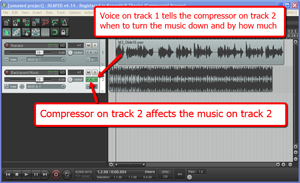 I’ll explain how to do it in Reaper, though the process is going to be the same in any multi-track audio program or video editor. There usually isn’t a tool called “ducking” in these programs since the technique uses a combination of tools working together. The main tool is compression (see our article Should You Use Compression In Audio Recording?), which is a tool that automatically turns audio down by a certain amount, but only when the volume gets loud enough to trigger it.
Usually you insert a compressor effect onto a track to control the audio on that track. So if you have a voice on track 1, and you put a compressor on track 1, the voice will trigger the compressor when its volume goes over a certain level or threshold that you set. Well the big difference with ducking is that the voice is still going to trigger the volume reduction actions of a compressor, but that compressor will be turning down the volume NOT of the voice, but of something else; in this case, a background music track. That means we have to put the compressor on the music track (say, track 2), but make it listen to track 1 for its instructions on when (and how much) to turn down the music. Pretty nifty huh? No? I lost you? Yeah, this kind of thing is much easier to explain with pictures. Take a look at the picture on the right. So it’s just a matter of having at least two tracks, putting a compressor on the one you want to get ducked, and feeding the output of the main audio (the voice) into that compressor.
Ducking in Reaper
In Reaper the first thing to do is put the compressor on the track to be ducked, in this case, track 2 with the music on. Simply click the FX button and choose the built-in compressor called ReaComp. Then close the FX window. You’ll be able to tell that the compressor is loaded up because the FX button will be green.
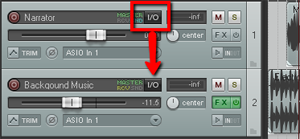 Next find the I/O (stands for “in/out”) button on the vocal track. See picture on the left. You’re going to click and drag that down to the I/O button on track 2. An I/O window will open with lots of scary-looking stuff on it. Leave everything the way it is except at the bottom where it says “1/2 => 1/2”. Just click the drop-down arrow next to the second “1/2” and change it to “3/4”. See the picture on the right.
 You have just set it up so that track 1 will send a signal to track 2. The next thing you need to do is click on the FX button in track 2 to open your compressor control. Now it’s time to tell the compressor NOT to listen to the music track for cues as to when to engage, but instead, listen to the voice on track 1. So in the compressor control window (see picture below and to the left). Find where it says “Detector Input” and use the drop-down arrow to change this from the default “Main Input L+R” to “Auxiliary Input L+R“. Now the compressor will change the volume settings of the music based on the fluctuations of the voice track. Pretty neat huh?
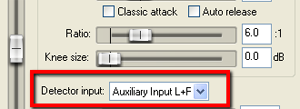 Now all you need to do adjust the compressor settings. You can experiment here by listening as you adjust. Start out with a Ratio setting between 4:1 and 6:1 and put the Threshold slider down to about -20 dB. One thing to be sure of before you do any of this is that the overall volume on the music track is already set to where you could hear the voice over it fairly well even without the ducking compressor. If the average volume of the music is so loud that the voice can’t even be heard to start with, ducking won’t help you much.
To make sure things are working properly, close the FX window and play your audio. Click the “S” (stands for “solo“) button on the music track to solo it. It ought to sound very odd, sort of choppy to you. This means it’s working. Now un-solo the music track and listen to how beautifully clear the voice is while the music is still very audible as well.
Use this knowledge for good.
Cheers!

 Normalization is another example of an audio recording concept whose term is both misleading, needlessly confusing.
 Have you ever been trying to concentrate at your computer when something you hear around you keeps pulling your attention away or distracting you? This happened all the time when I worked in an office made up of cubicles and about 2 dozen other people. Sometimes it happens at home if I can hear the TV or the stereo. I’m easily distracted. But I recently found a very cool thing online that helps drown out all that distracting noise, and it is so simple and fast. Oh, and its totally free. It’s a site called “Simply Noise.” (