 Way back in the day, voice over jobs were only given to members of various voice actors’ unions. All of these members had agents, so they had the connections to land the job, but they also had the ability to get into a recording studio with the help of their agent to record their demos. Once they landed the job, they were even able to use the recording studios for the work that needed to be done. Now in 2011, these same jobs that took special invitations, connections and resources before are not only being advertised all over the internet, you can even apply for them on the internet yourself. Yup, anyone can do it.
There are literally thousands of voice over jobs available on the internet today, but even better is that these jobs are no longer exclusive to members of the voice actors’ unions. In fact, ordinary people are now filling many of these jobs from the comfort of their own home. Therefore, if you are interested in providing voice over jobs, whether it is narrating a book or doing radio ads all you have to do is land the right job. Voice over jobs are not that easy to come by, you need to remember that the competition in this market is fierce, so knowing a few things to help get you started certainly doesn’t hurt. And mark this well: audio quality is as important as ever. Just because audio recording is easier and more accessible than ever does not mean that crappy voice overs are now somehow more acceptable.
One of the best places to go to find voice over jobs is Voices.com, but there are many other websites similar to them out there, all you have to do is search for them. Voices.com allows you to create a free account, so that helps keep your start up costs down. As soon as you get your free account set up, you can begin uploading your demos to help you land the job of your dreams. Even if you do not have any job experience you can still land voice over jobs, you just need the knowledge to do it.
One misconception that people have about voice over jobs is that you need the fanciest equipment to make the best recordings. This is no longer true folks! You can make quality recordings with a $50 USB mic and a computer, as long as you have some audio knowledge. Even if you have never made a demo before there are many websites out there that can help teach some of the basics about creating great audio. Home Brew Audio has some of the most amazing audio tutorials that you will find on the internet to teach you the key fundamentals. What you need to remember is that even if you have hundreds or thousands of dollars worth of equipment you can still produce horrible audio if you lack the knowledge necessary!
So if you want to try out a new career, visit Voices.com for some excellent “getting started” resources, including scripts for different types of demos. Then come on by Home Brew Audio for some recording tips, and start producing your demos. Upload those to your Voices.com profile and you’ve taken the first step! A paid membership in Voices.com allows you to receive dozens of job postings via e-mail every day. Start submitting auditions for these ASAP. I recommend that whenever possible, you record a custom demo for these auditions, reading from the audition script the job poster almost always supplies. And then be ready to be persistent and patient. It will feel pretty darned great when you get paid for your first voice over job.
Archives for July 2011
Cover Recording of My Eyes From Dr. Horrible
One really excellent way to learn to record music is to study what the pros are doing. By breaking down a popular song and analyzing the parts and how everything fits together, you can learn an amazing amount about music production and recording. If you can then manage to re-create the song from scratch, you get double or triple the benefit of that learning. If you can make it sound very close to the original, you know you’ve really cracked the code (well, for that type of song at least).
In order to demonstrate this concept, we used a song from Joss Whedon’s Dr. Horrible’s Sing-Along Blog. The song is called My Eyes (sometimes referred to as “On The Rise”), Music by Jed Whedon; Lyrics by Maurissa Tancharoen, Jed Whedon, and Joss Whedon.
Here is our cover version:
[jwplayer config=”Custom Audio Player” mediaid=”11848″]
Here is how we did it:
1. What Instruments Were Used?
This song was a bit of challenge in that there were a lot of different instruments used in the original recording, such as classical guitars, bass, percussion, full drum kit, English horn, string section, piano, harp, and of course, vocals.
2. Try to Use The Same Instruments
This is where virtual instruments come in very handy. If I had a bunch of classical musicians in my hip pocket, I would have used them. But since I don’t, I did the next best thing. I used virtual instruments controlled via MIDI. I’m also not adept at playing every instrument, so using MIDI and a keyboard to play the notes of virtual instruments was a giant help.
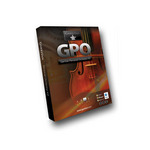
 The nylon-string classical guitars at the beginning I COULD have played, though the part is quite intricate and fast, so I would have sworn a lot and done dozens of takes. Instead, I used a modeled virtual guitar sound from my favorite virtual instrument, Omnisphere. The string section also came from Omnisphere. For the piano I used a free plugin called 4Front Piano. For percussion I played a hand drum with a brush on one track and a virtual frame drum from a drum program called StormDrum. The English horn came from a program called Garritan Personal Orchestra. The drum kit also came from StormDrum. I played a real bass guitar, and of course the vocals were real.
3. Recording Everything
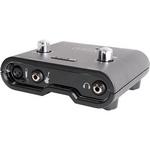
I used Reaper recording software on my computer. The bass was recorded plugged into a USB interface called a Line 6 Gear Box (which models electric bass and guitar amps…very nifty!). I also used a Rode NT2-A microphone plugged into a usb audio interface called the M-Audio Fast Track Pro for the vocals.
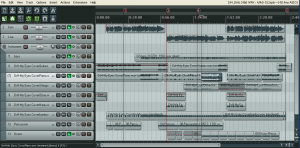
I recorded the guitar parts with a keyboard (using a virtual guitar here, remember?), creating a MIDI track in Reaper. I then edited the notes in the midi track for proper timing and getting rid of wrong notes, etc. I then copied that MIDI part and put it onto a second track, using the MIDI tools to “humanize” the note timing. This difference allowed me to pan each MIDI part (I also used a slightly different guitar patch for the second track) left and right for stereo guitars.
Next I played the piano parts a few bars at a time, since I’m not really a piano player. Listening to the original recording, I picked out the notes and chords and basically “drew” them onto the MIDI grid until it sounded right. I did the same thing with the percussion, drums, strings and English horn. Then I played the bass part the “normal way”:). After that, I sand my part and my wife, Lisa, sang her part on her track. when the thing was all recorded, we had 12 tracks of audio all playing together.
4. Mix It Down
After editing certain tracks (getting p-pops out of the vocal tracks, adjusting volume dynamics and EQ, etc, I adjusted the individual volume controls for each track until everything sounded nice together, then I mixed it all down (called rendering in Reaper) to a single stereo file. I then opened that stereo file in Adobe Audition for basic mastering. In Audition I trimmed the extra gits off the beginning and end of the file, and ensured it started and ended in total silence. Then I used some compression to even out and optimize loudness for the final polishing.
That’s it, in a nutshell. The result is in the audio file above. Click here if you haven’t already heard it.
All this was done on my computer in my house, in a regular bedroom that is not treated or sound-proofed in any way. If you’d like to learn how to do this type of thing also, check out all the free articles and videos at Home Brew Audio, as well as our video tutorial courses, recording guide e-book and just all-in-all your home recording one-stop shop.
Good luck and don’t hesitate to ask any questions about this article right here in the comments.
Cheers,
Ken
NAMM University Schedule Announced For 2011 Summer NAMM Show
If you’re into music recording, you should be familiar with NAMM, the National Association of Music Merchants. According to their site at: http://www.namm.org NAMM is the not-for-profit association that unifies, leads and strengthens the $17 billion global music products industry.
NAMM scheduled its educational session, NAMM Universtiy, just before its upcoming show to be held at Nashville, Tennessee, during mid July this year. As a prelude to this, they’ve organized a ‘Breakfast Session’ starting with a free breakfast, presentations, discussions etc, affecting musical retailers today. This will be followed by an educational session for feature presentations from musical retailers. This year’s sessions will offer technological sessions based on Google usage. Later sessions will suggestions to focus on changes happening within industry to survive and thrive within industry etc, would help musical bands/groups survive better.
Read the full article here:
NAMM University Schedule Announced For 2011 Summer NAMM Show
Your Home Recording Headquarters: www.homebrewaudio.com