 Here are some suggestions on how to record a voice over. Ready to land your next voice over job?
This is a fairly detailed step-by-step guide for creating a pro quality voice over using Audacity (the free audio software). The steps here will work for any mic, but you should use at least a decent USB mic like the Samson Q2U (which you can get for 59 dollarinis). Ready? Here we go.
1. Open Audacity (you can download that here)
2. Make sure your mic is set up in Audacity
To do that, go to Edit/Preferences/Devices (choose the Samson mic under “Recording” and make sure it says “mono” under “channels.”
3. Click the “Record” button (big red circle) in Audacity – a track will appear and begin recording.
4. Record your voice-over
Here are some tips for that:
- Use a pop filter if you have one. If you don’t, you can make one quickly by stretching an old pair of nylon stockings over a wire hanger that you have shaped into a circle. But you can buy one for about $10 on Amazon – Auray Pop Filter.
- Record in as quiet a place as possible.
- Keep you mouth close to the mic (3-5 inches). Most of us record in spare rooms in our house, which means lots of echo-y, reverb-y room sound. And one quick way to reduce that that you can implement immediately is simply to record close (that 3-5 inches I suggest) to the mic. I believe that this could be the most helpful bit of advice on how to record a voice over of everything in this post.
- Keep recording even in you make a mistake. I like to clap my hand or make some other quick, loud noise after a screw-up so that I’ll see it on the track when I’m editing. Just make that mark and continue recording. You can cut the bad takes out during editing.
- Make sure the wave forms (blue blobs) are fairly large in the track. You don’t want to over do it to where they go out to the edges and beyond. But if they are too quiet – not much more than what’s on the center line – then you should turn up the input level* and start again until you get fat and chunky blobs. This may be the 2nd most important piece of advice for how to record a voice over!
* If you are using an interface unit to plug your mic in, you can turn the input level up on that. If you have a USB mic, go into your Windows Sound control panel, click on the Recording tab, select your mic, select Properties, click the “Recording” tab, and then “Level.” Make sure the slider is at around the 85-90 percent mark. Sometimes Windows puts this level down to like 20% for some reason.
5. Hit the “Stop” button when you’re finished (big yellowish square).
6. Now find all the parts you want to cut out (bad takes, baby crying, phone ringing, etc.) by highlighting that bit of audio and simply hitting the “delete” button on your computer keyboard.
7. Once you’re left with the parts you want to keep, it’s time to reduce the ambient background noise.
8. Find a section of the recording where you’re NOT talking, but the mic was recording. Usually this will be low-level computer drive noise, electronic buzz or hum, etc.
9. Select Effect/Noise Removal in Audacity and select “Get Noise Profile.” The Noise Removal window will close. You’ve just told audacity what constitutes “noise.”
10. Select the entire audio recording (double-click on the audio), open the NR tool again, and click “OK.”
This will filter out the ambient noise and leave your voice alone (for the most part).
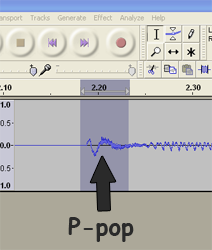
11. Listen carefully to the recording in headphones. You’ll likely have several “p-pops” or “plosives” as they are commonly called.
Zoom in to very beginning of an offensive p-pop (see:
https://www.homebrewaudio.com/how-to-fix-a-p-pop-in-your-audio-with-sound-editing-software for a bit more on this)
12. I find that bad p-pops tend to look like the letter “N” in the audio waveform.
See pic. Select just the “N” part and then go to Effect/Equalization in Audacity.
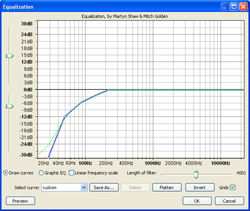
13. Create a curve on the horizontal line that starts sloping down to the left at about the 200-250 Hz spot.
Just click your mouse on the line wherever you want to create a drag-handle (4 or 5 spaced between 30Hz and 250Hz should do the trick). Then drag the 30Hz handle all the way down.
Drag the next one to the right down but not as far, etc. Continue until your curve looks like the picture above.
14. Then click “OK” and listen to the result.
The “p” sound should sound more natural and less like an explosion of air. You’ll also notice that the “N” shape is much smaller.
15. Next You’ll want to compress the audio just a smidge to even out the volume and give it some punch.
So select the entire audio file (double-click on the blue blob somewhere) and select Effect/Compressor. Set the sliders as follows: Threshold: -12 db, Noise Floor: -40 db, Ratio: 2:1, Attack Time: 0.2 secs, Decay Time: 1.secs.
Also, make sure there is a check in the box marked “Make-up Gain for 0dB after compressing.” Click “OK.”
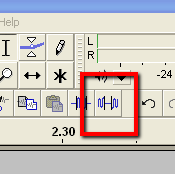
16. Now listen carefully, through headphones, to all the audio.
You may notice a few stray bits of unwanted noise in between the talking bits, so to fix those, just highlight them as you find them, and click the “Silence” tool button in Audacity (see Pic 3).
17. Lastly, save the audio in whatever format you need by selecting File/Export in audacity.
44.1KHz and 16-bit wav files are standard “CD quality” audio. Note that if you want to export the audio as mp3, you’ll need to download the Lame MP3 Encoder here: http://audacity.sourceforge.net/help/faq?s=install&item=lame-mp3 . That will install to the correct place automatically.
Hopefully that should give you an idea how to record a voice over, a professional sounding one, very quickly. For more in-depth info, check out our course, the Newbies Guide to Audio Recording Awesomeness.
Good luck.
Ken
Thanks for the technical details on removing the p-pop, and especially for compression. I have never been able to get compression to sound right by poking around with different values. Your number seem to work well with what I’ve tried.
It might be worth noting that Audacity lets you save the p-pop equalization as a “named curve” (click “Save/Manage Curves…”, click “Rename…”, give it a name, click OK twice). From then on you can just select your custom curve where it says “Select Curve” (unfortunately you can’t save the Compressor settings the same way). Also I prefer to click “Graphic EQ” which displays sliders – I find it easier to move the sliders rather than draw on the curve directly.
Thanks Gary. Yes, what you say is true and a good idea. I just finished a long job doing audio editing using saved EQ settings. It sure saves time.
Cheers!
Ken
Thanks for this Ken. I’ve been looking for a simple explaination to fixing pops for ages! This is like a revelation.
Chris, you’re very welcome! Glad it helped.
Ken
This is my new favourite website! Thanks for taking the time to teach a bedroom journo some production skillz.
That is awesome. Thanks for the guide.
You’re welcome!
Thanks for this Ken. Just starting out and am slightly softly spoken, so recordings were coming out quiet! thanks for taking the time to help us out. Appreciated.
You’re welcome, Greg. Glad it was a help!